Banshee Augmented Reality Guitar Client Project
Client brief

My client for this project is my Uncle Simon, who
has a custom guitar manufacturing business called Banshee. This company creates custom-made high end guitars, where the customer requests certain features for a guitar to be made using high-end wiring, materials and joining techniques during manufacture.
My brief was to create an interactive Augmented Reality application allowing for the customer to view the Guitar’s features and textures in real time on a mobile device. As my Uncle has never had an AR application built for him before, it was crucial that we both understood what outcomes he would like to see on the application. As a result we commenced on our first client meeting.
Documents
Client Meeting
The client meeting lasted around 30 minutes and provided detailed information on how my client Simon, wanted the application to function as well as the key features. Throughout our discussion I broke down key features and a plan on the progression of this project
Brain storming and mind mapping
After the meeting, I created a mind map on the key features that Simon had identified. He empathised the need for the user to be able to alter the coloration of the AR guitar, so users can view their own guitar in different colours. He also mentioned how he would like to model to stay is one size, so there be no need to implement a scaling script.
The guitar would however need to rotate around the Y axis and potentially the X axis however during the meeting he mentioned how the Y axis was more important. Another key feature was ability to tap on a certain part of the guitar, providing detailed information on that particular part e.g. the strings or pickups of the guitar.
From here, identified a range scripts to create the functionality needed to produce the application, and take the project forward.
Week Four- Setting up Unity and AR Project
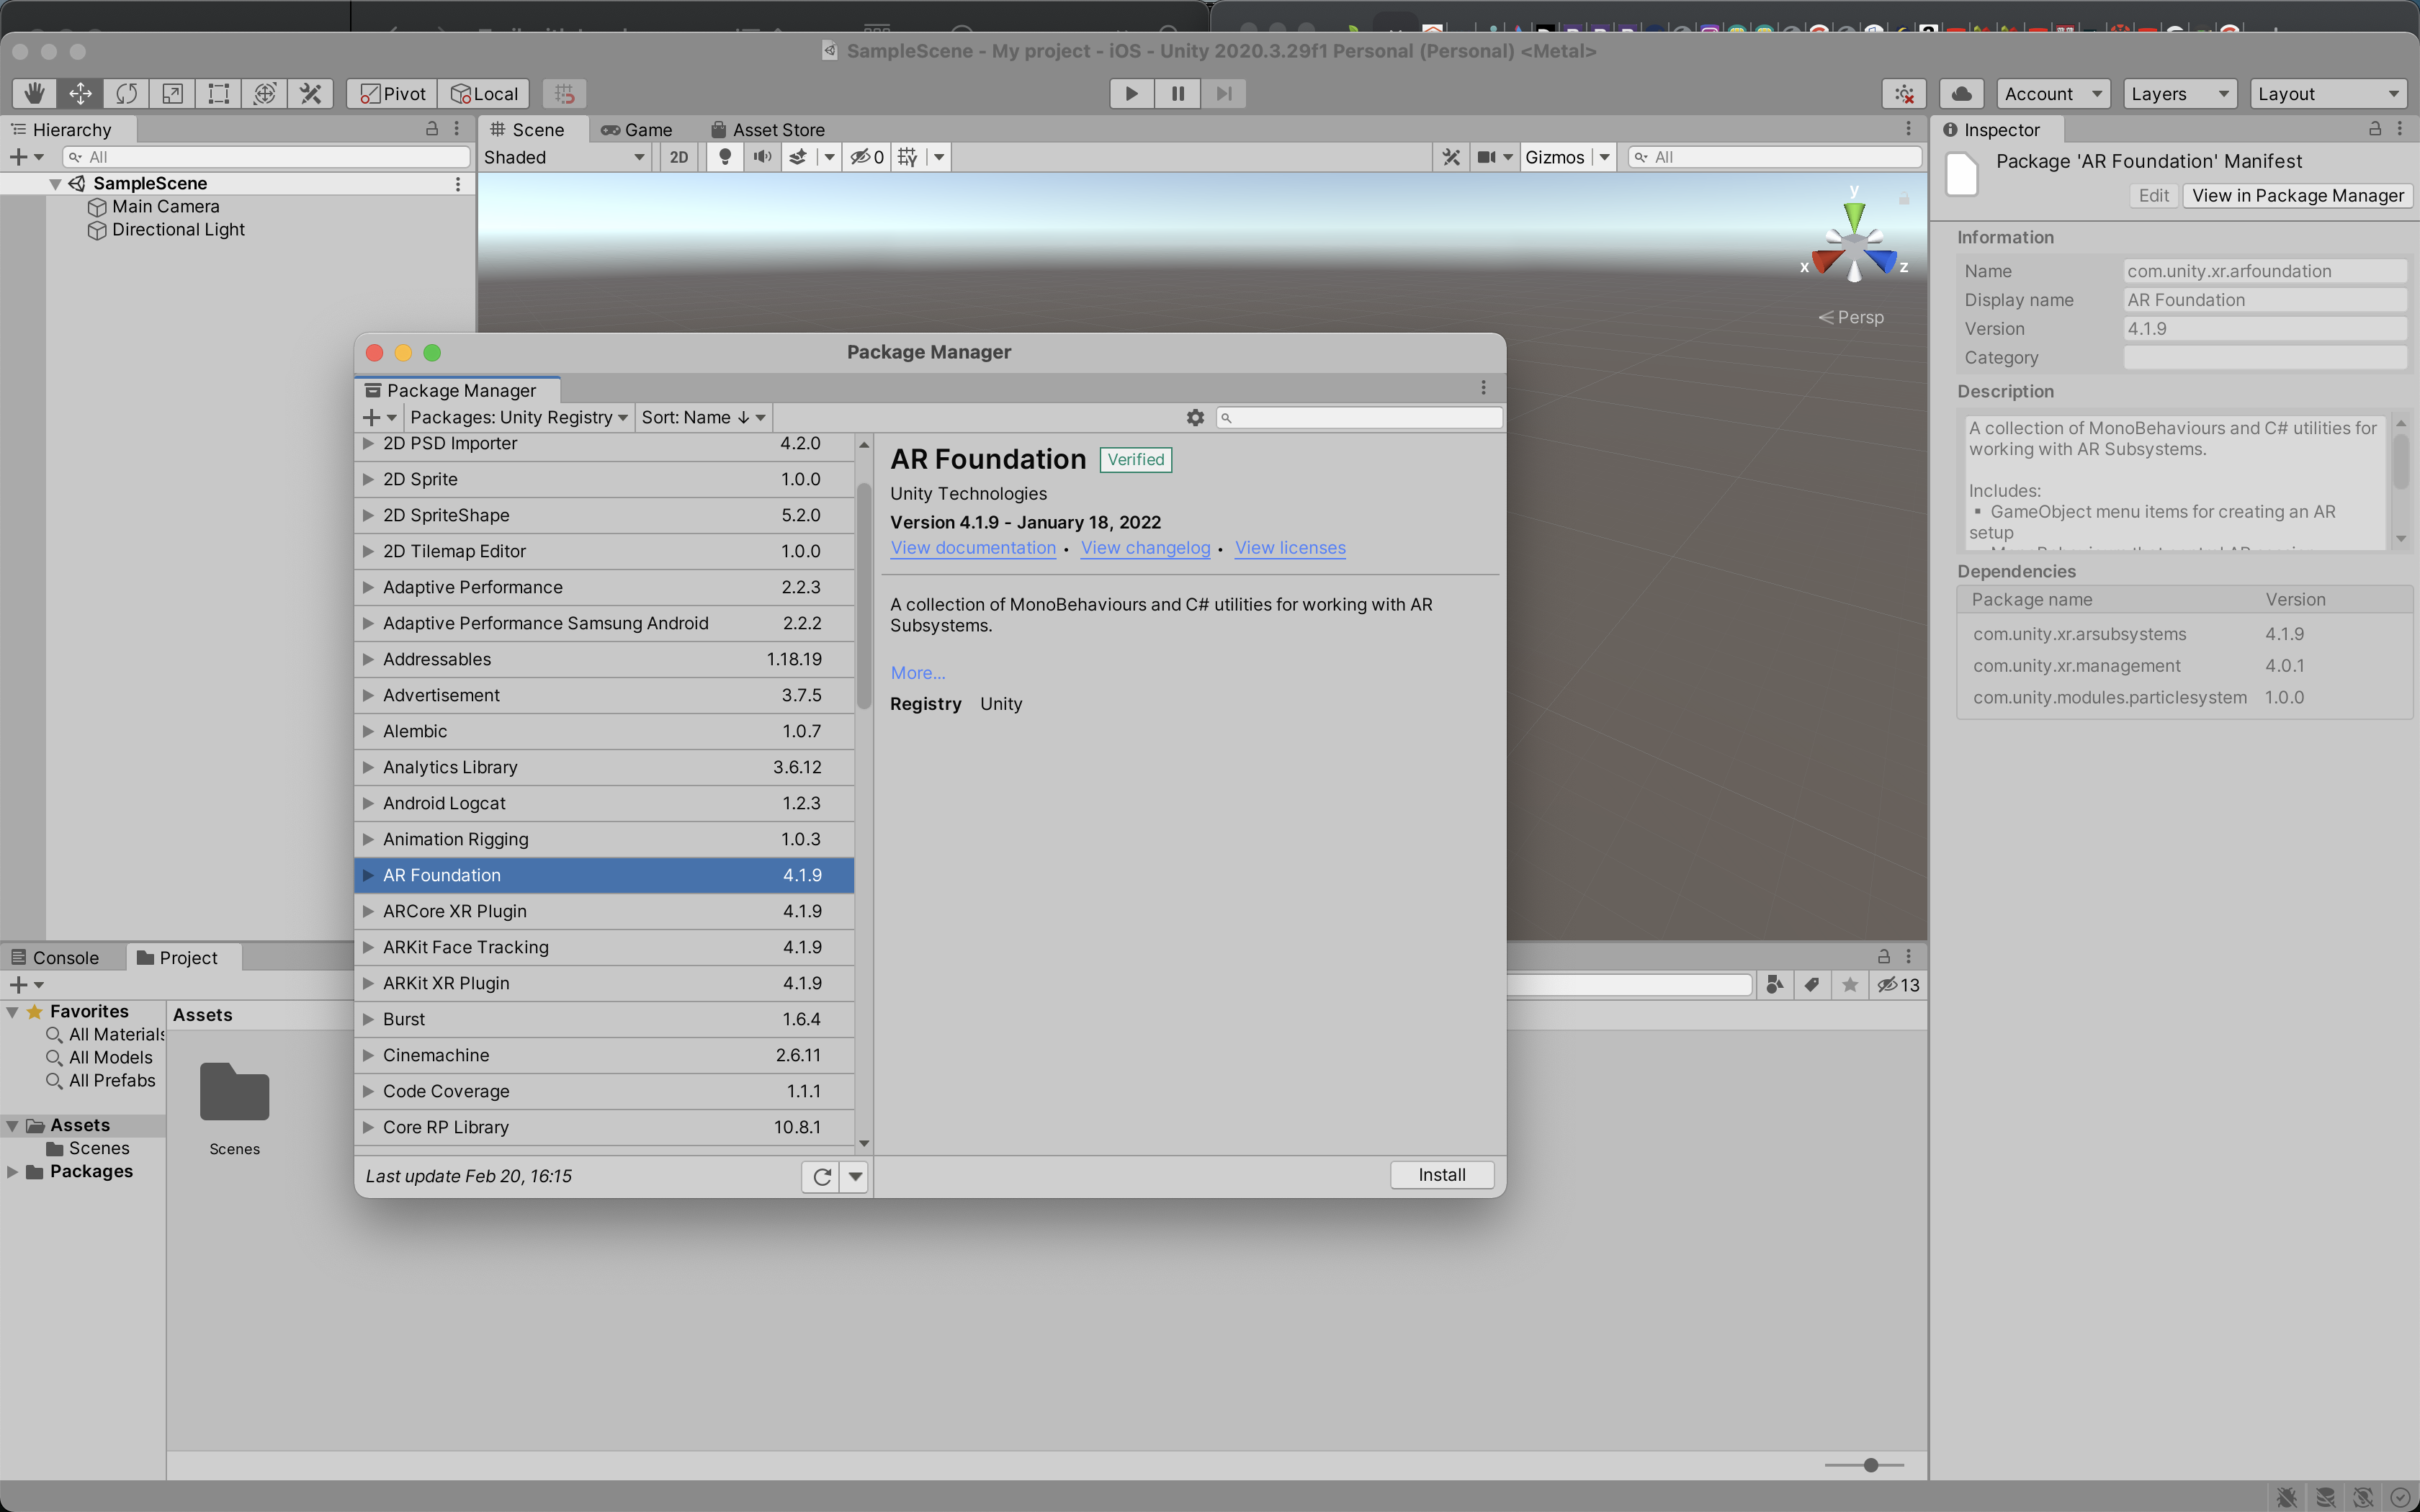
The next step was to download AR foundation, which is sa cross platform framework that enables Unity integrate C# scripts into the AR subsystem. This provided the necessary AR components.
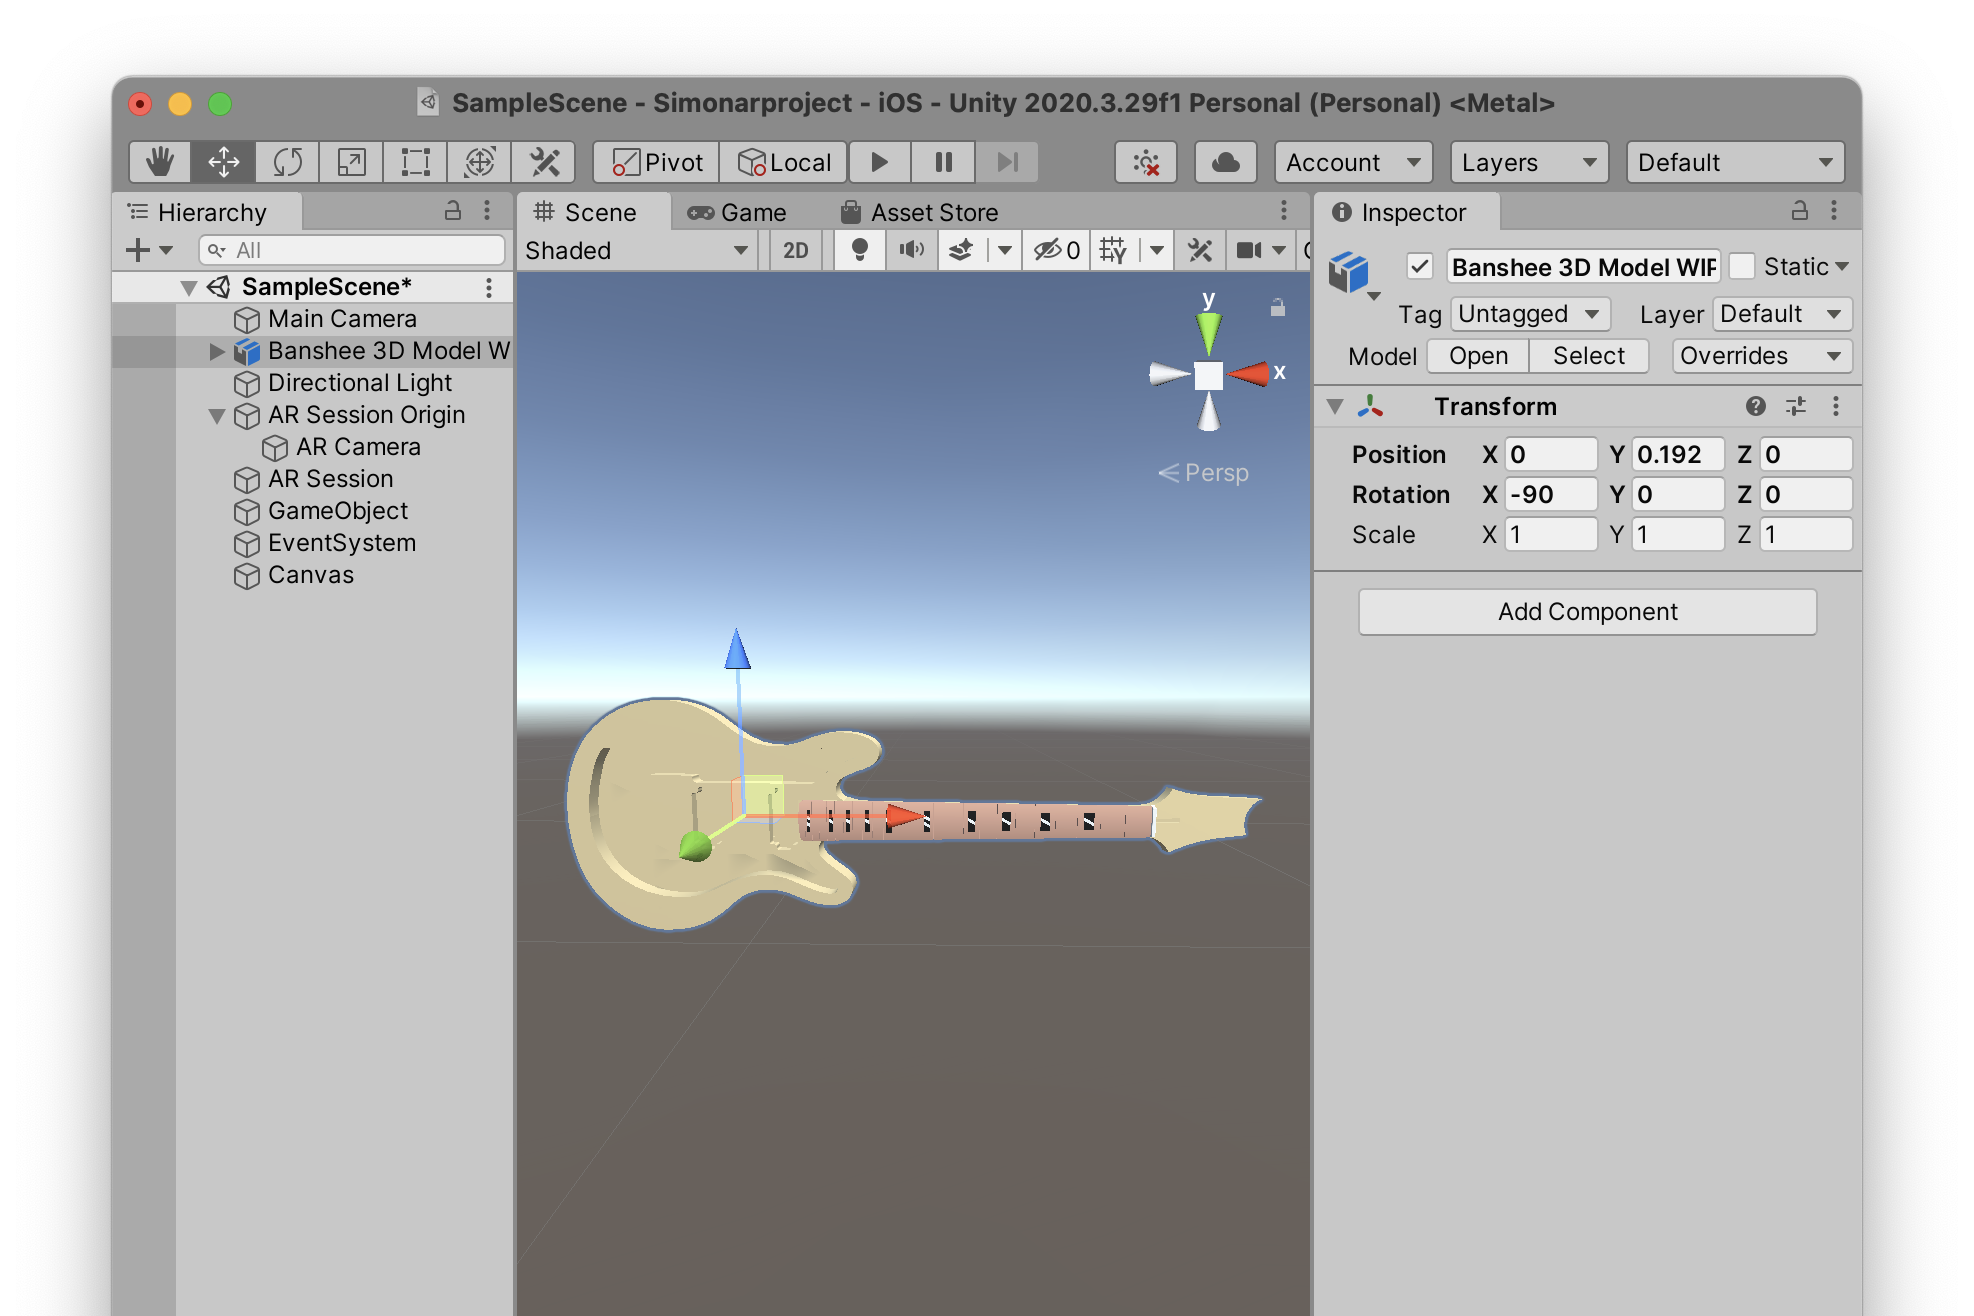
After downloading the AR Guitar Model from Alex Pritchett, the next step was to implement the asset into Unity. AR foundation also provided key AR functionality, such as AR Session Origin, AR Camera and AR Session.
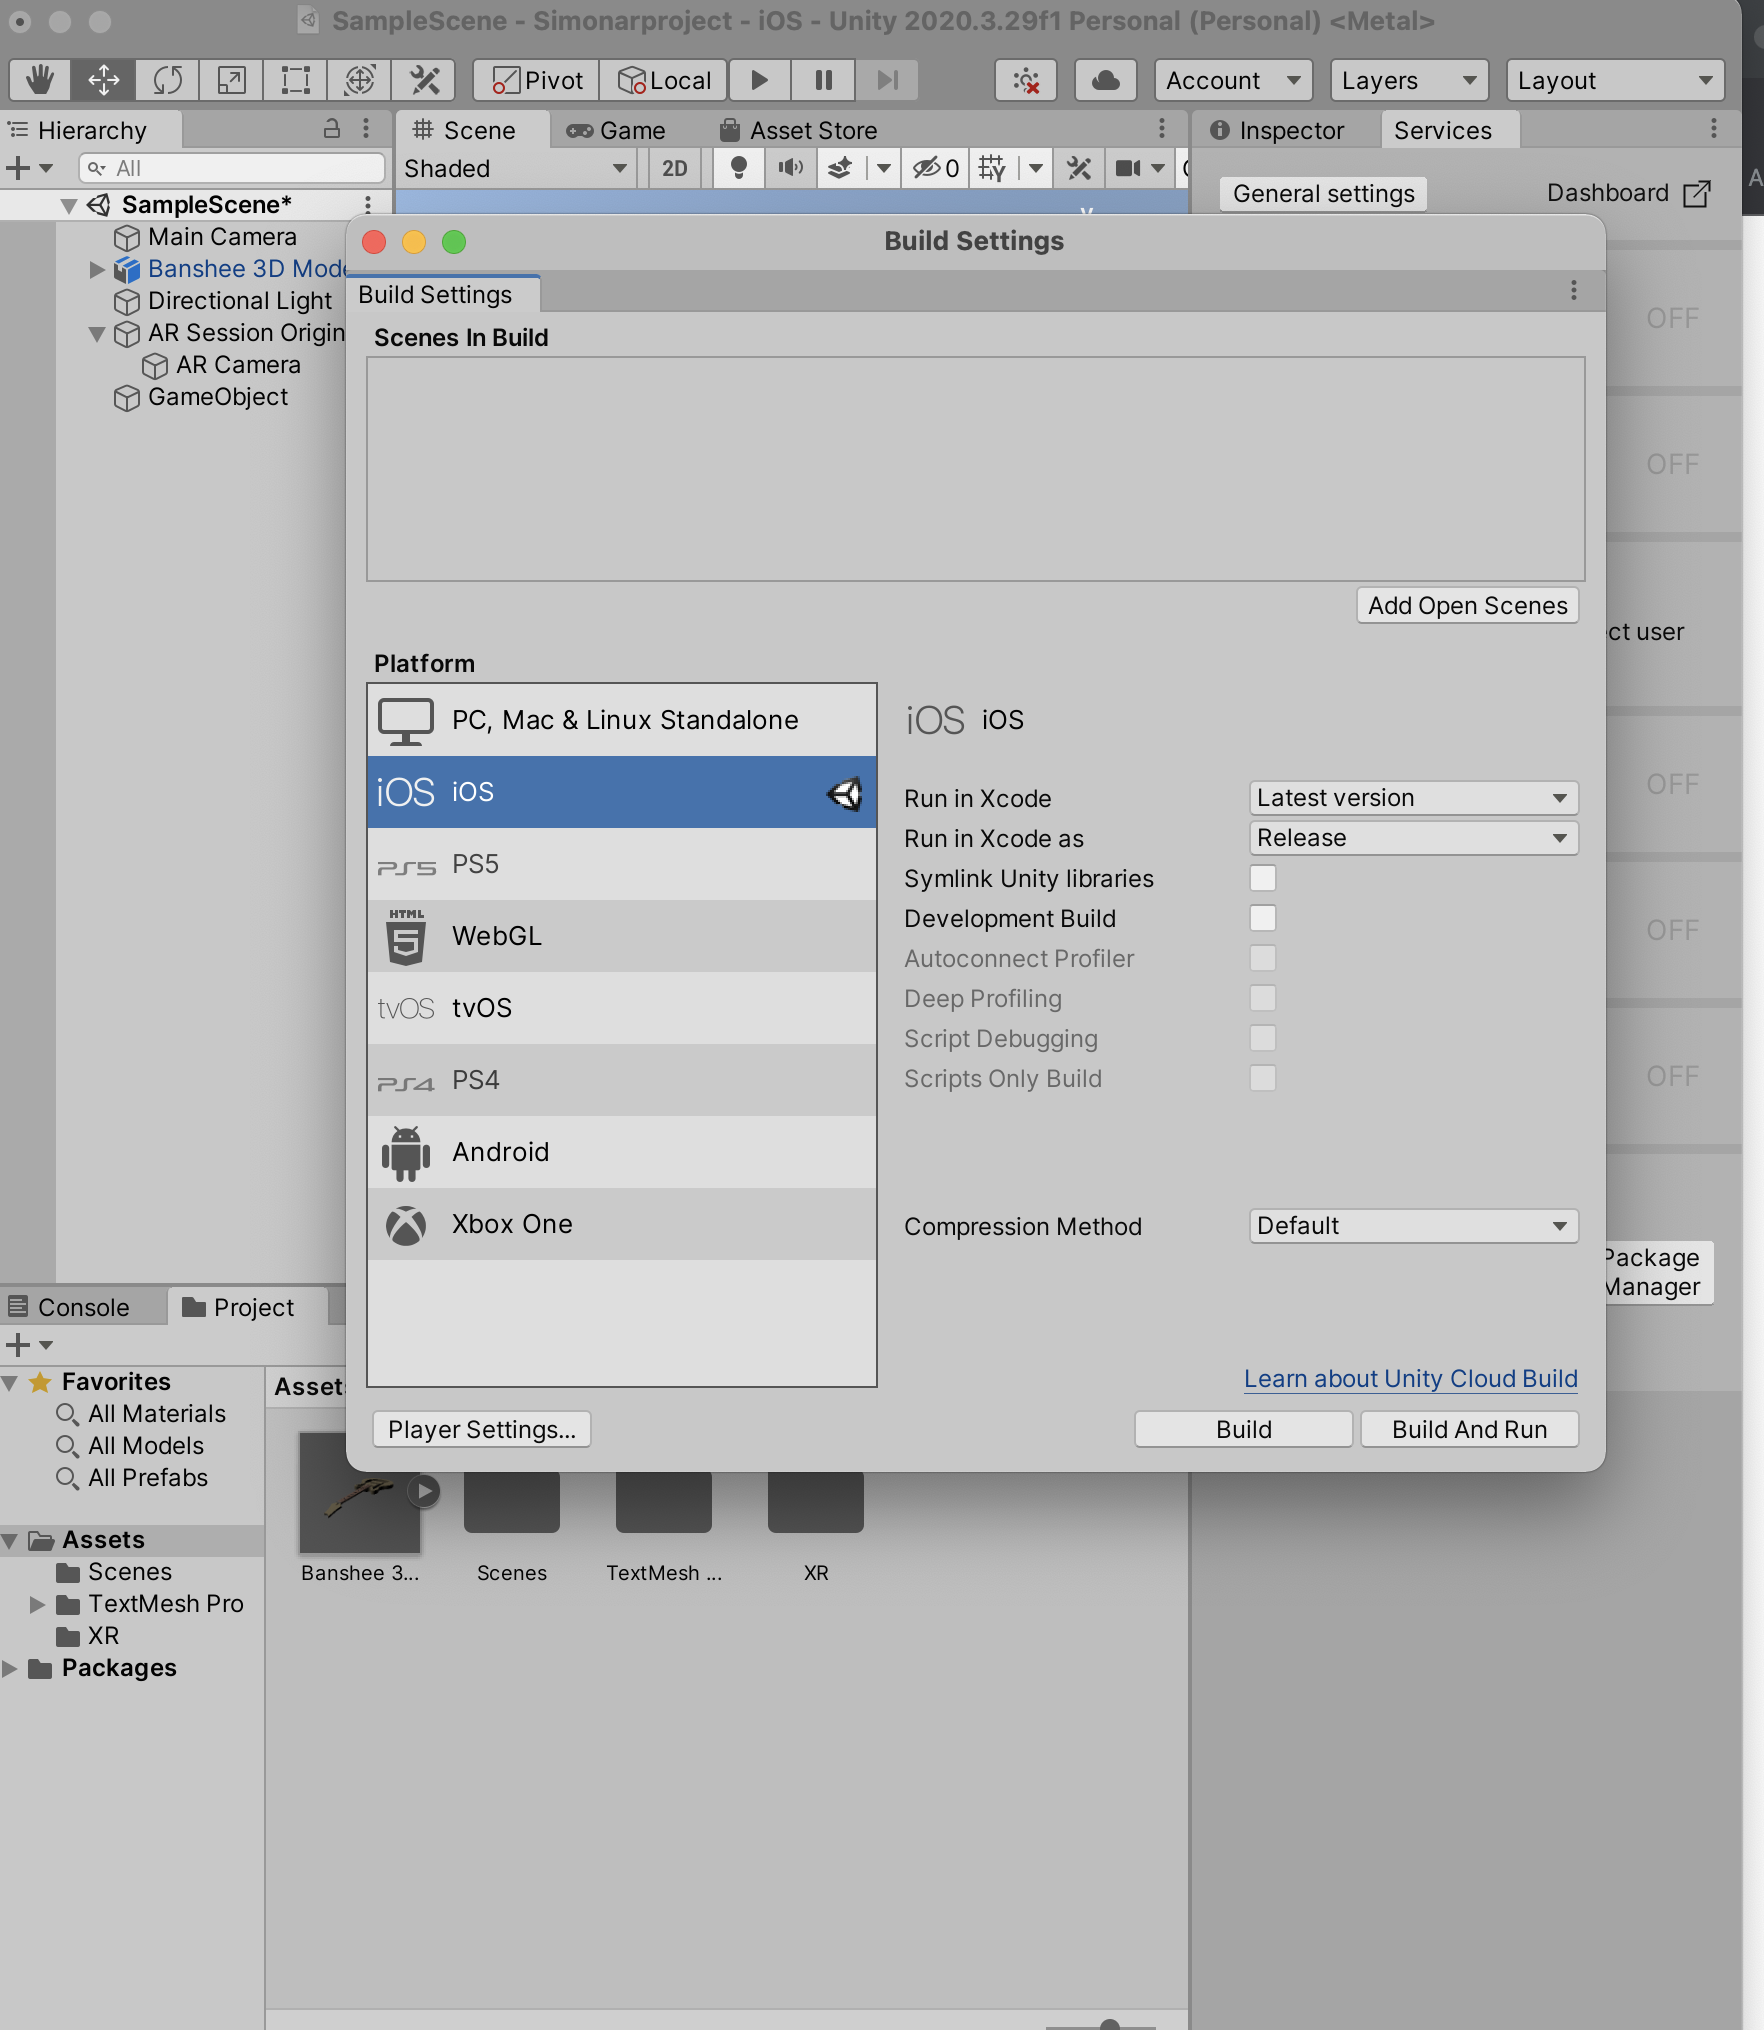
Next I changed the Build settings to run on IOS (iPhone Operating System) as. The devices I would be testing it on, is both iPad and iPhone, however AR Foundation enables cross platform builds of the application, allowing the app to be built for Android Devices too.
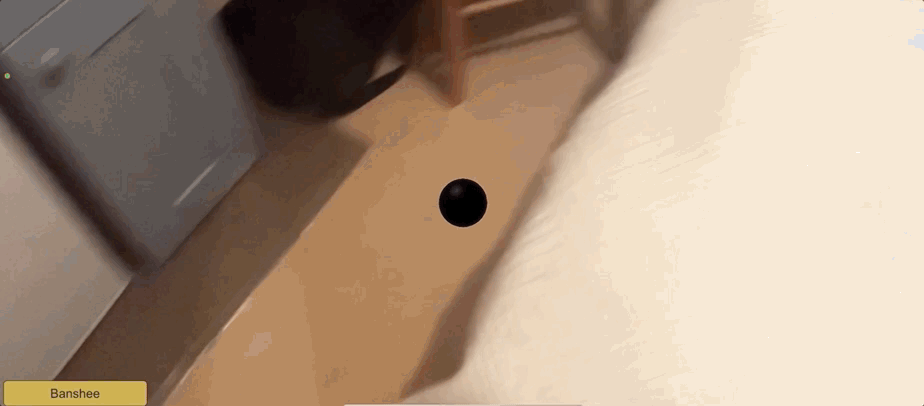
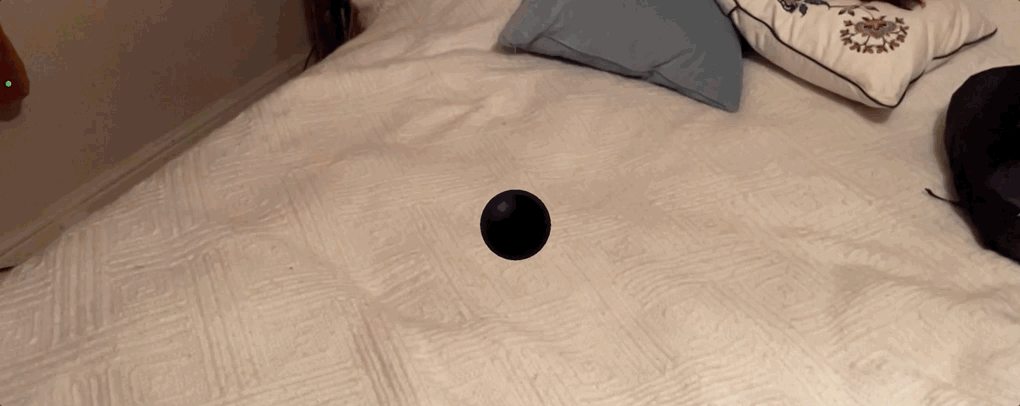
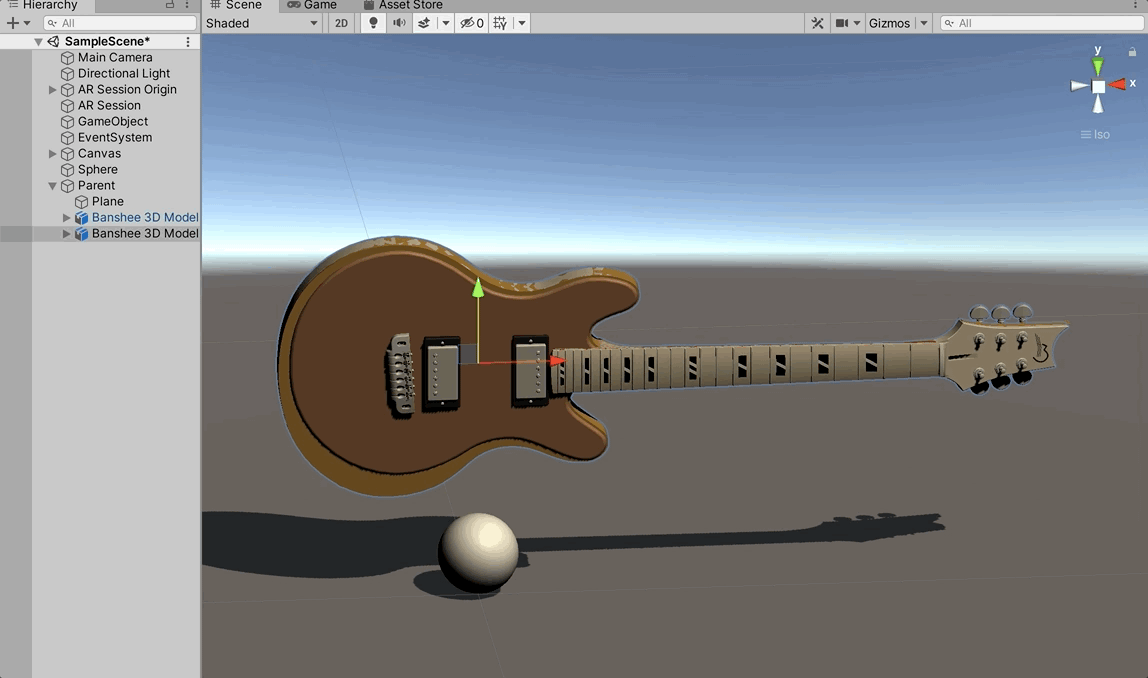
The next step was to create a sphere object, which would be used as a reference to detect flat surfaces for the AR application.
Implementing key scripts and URP
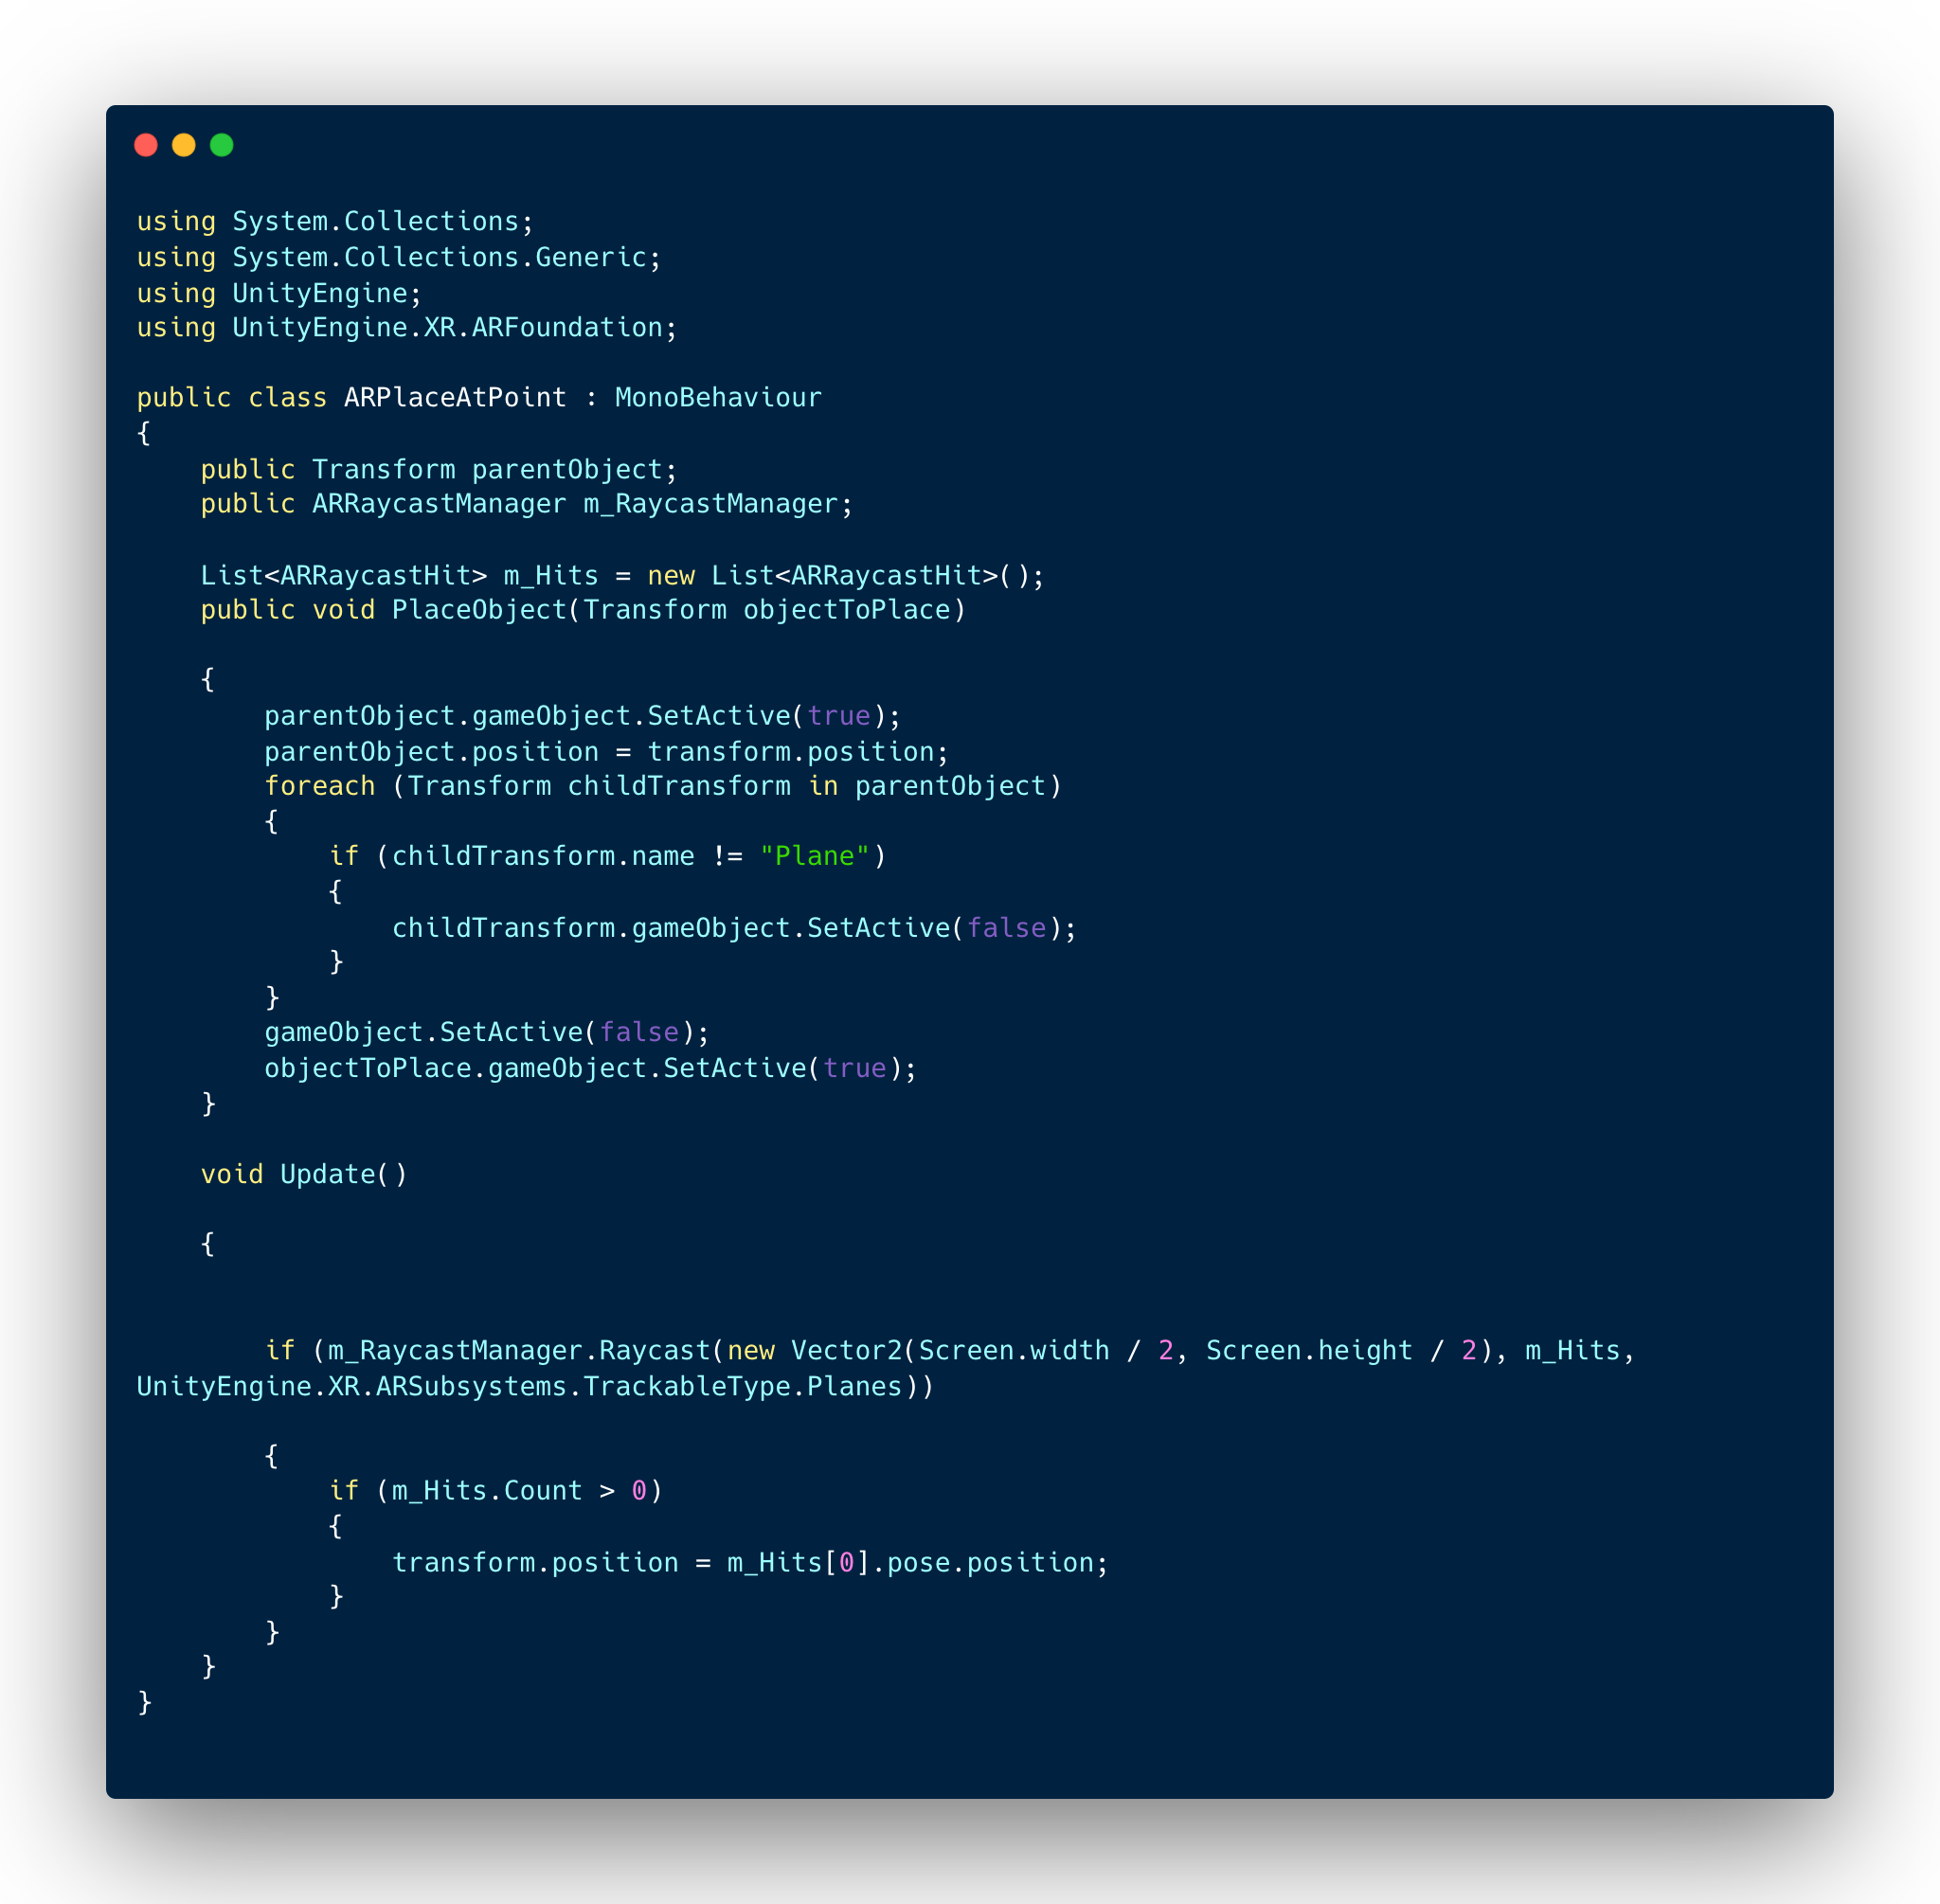
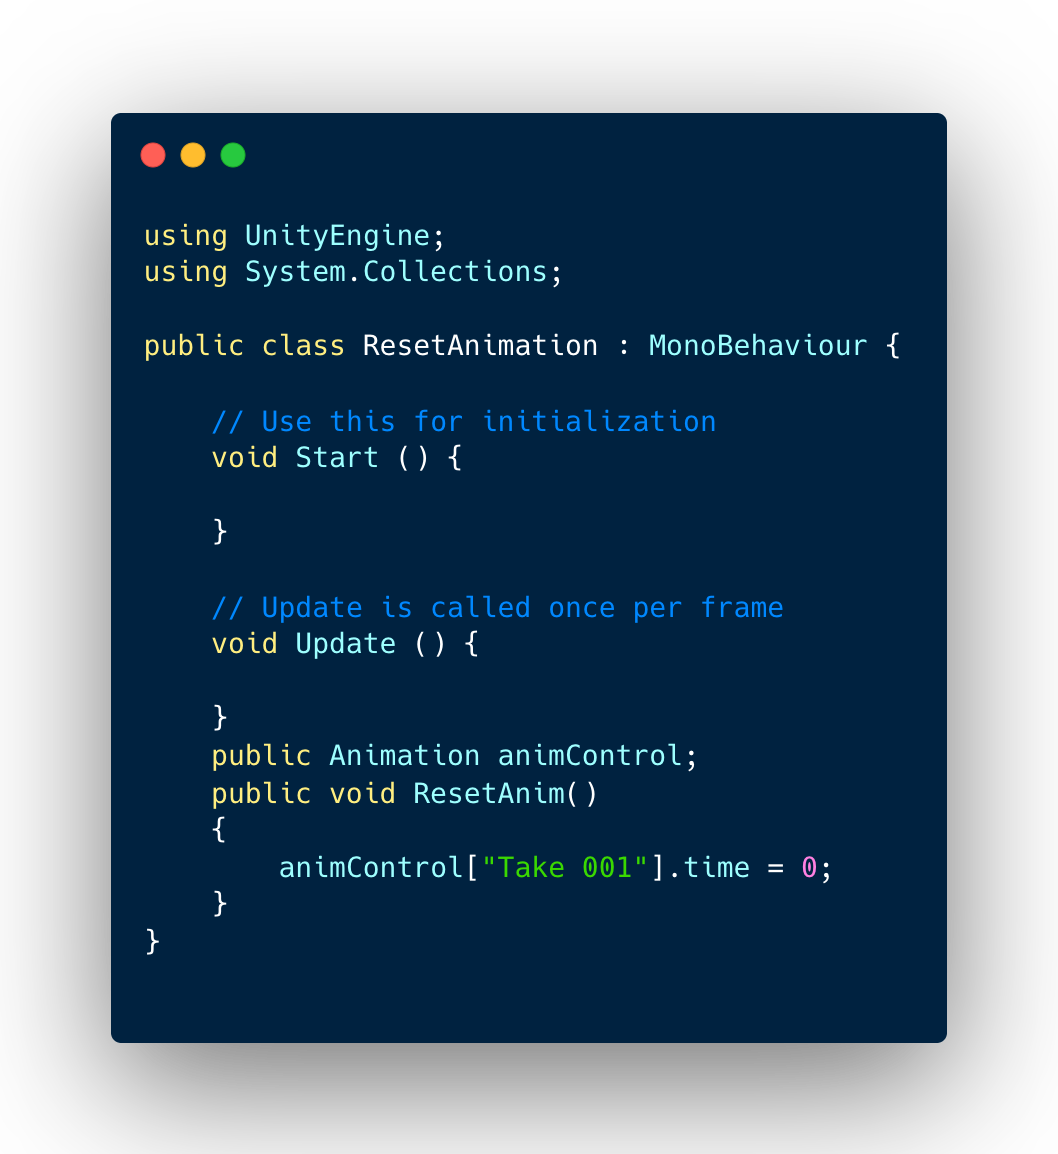
One of the most important and fundamental scripts of the application, is the ARPlaceATPoint script, which enables augmented reality into the application using AR foundation. The script was initially taken from my previous Troll and Dragon project but was updated to allow for the transformation of each 3D asset inside the parent object from the Funko Pop project. In order for the script to find a flat surface, I used the pre existing vector two script that divided the screen into 2/2 on the X axis and Y axis to allow for the Sphere to be placed in the centre of the screen..
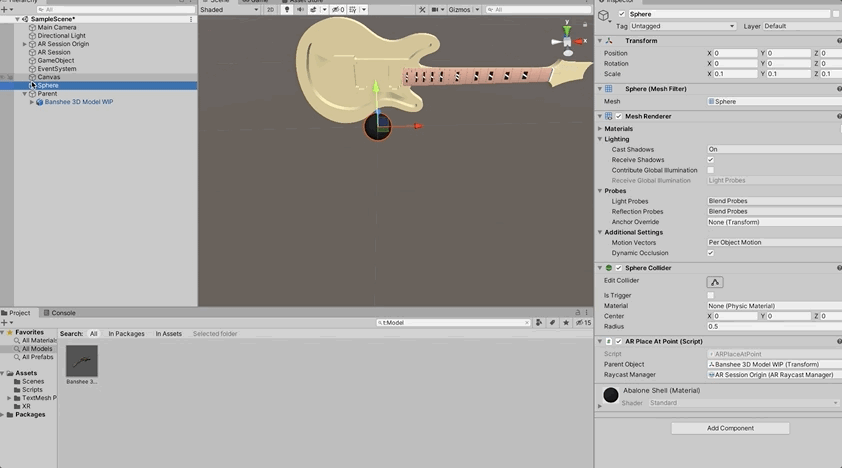
Next I created an empty game object and renamed it ‘Parent’ and placed the 3D model inside of it. I then attached the Sphere with the ARPlaceATPoint script, and dragged the Parent into the Sphere enabling it to be Augmented.
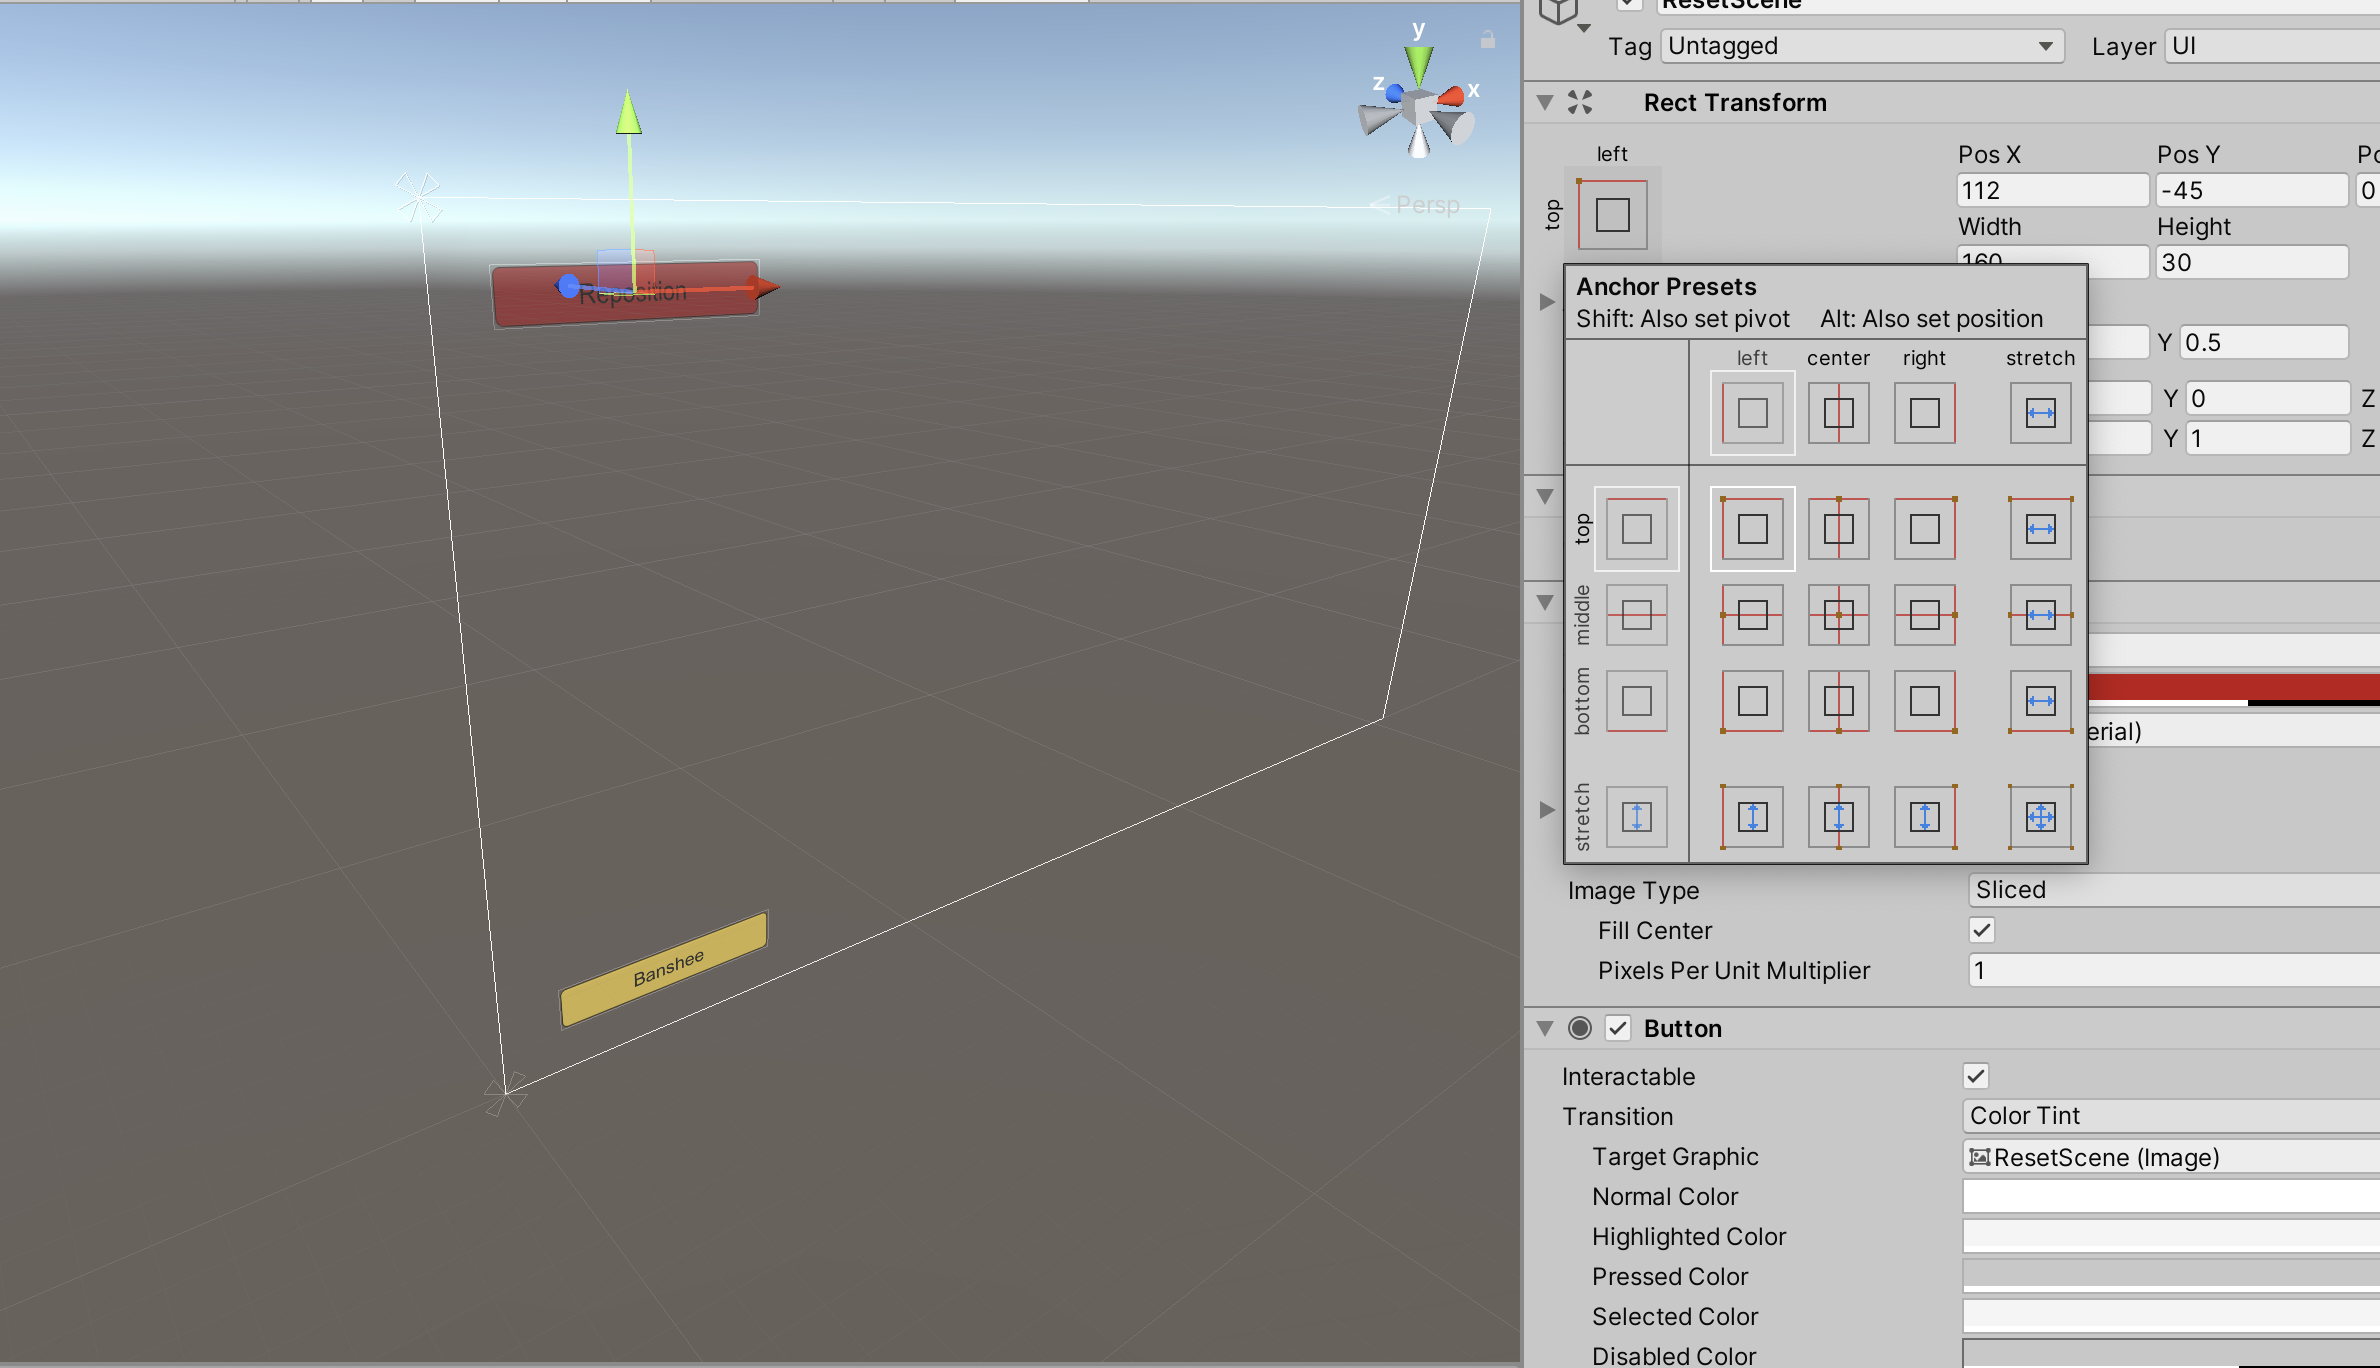
To test out the Augmentation of the application, I implemented some basic UI with buttons to place and reset the Guitar. In order to keep the Buttons in the correct place, I altered the anchor points of the UI display.
Using the ‘Show Banshee’ button, I attached the Sphere onto it and enabled the function ‘PlaceObjectTransform’.
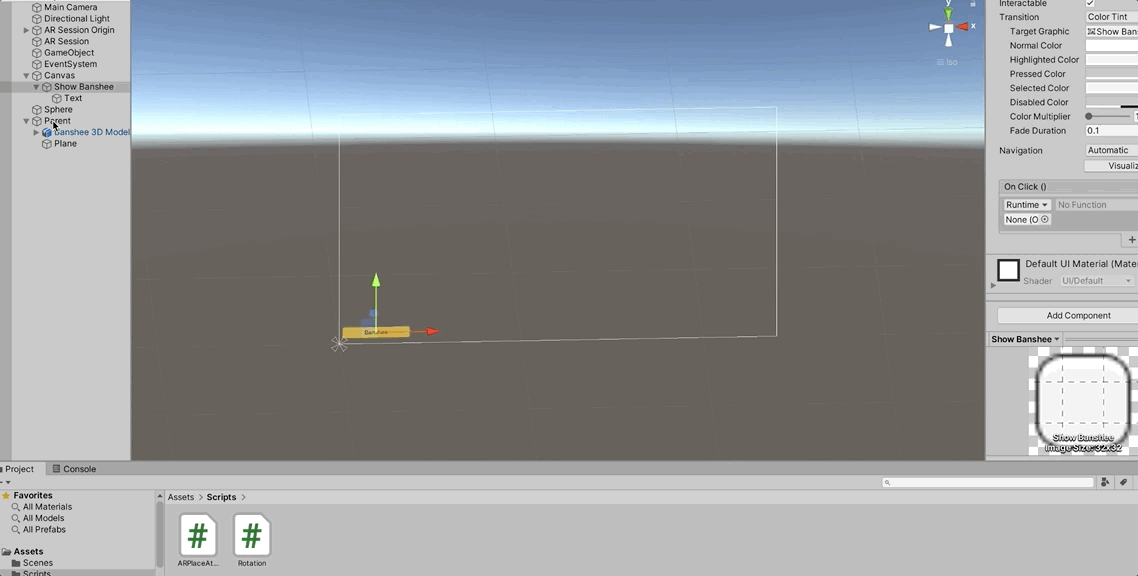
Next I attached the Banshee Model to the OnClick function enabling it to be placed upon tapping the ‘Show Banshee’ button.

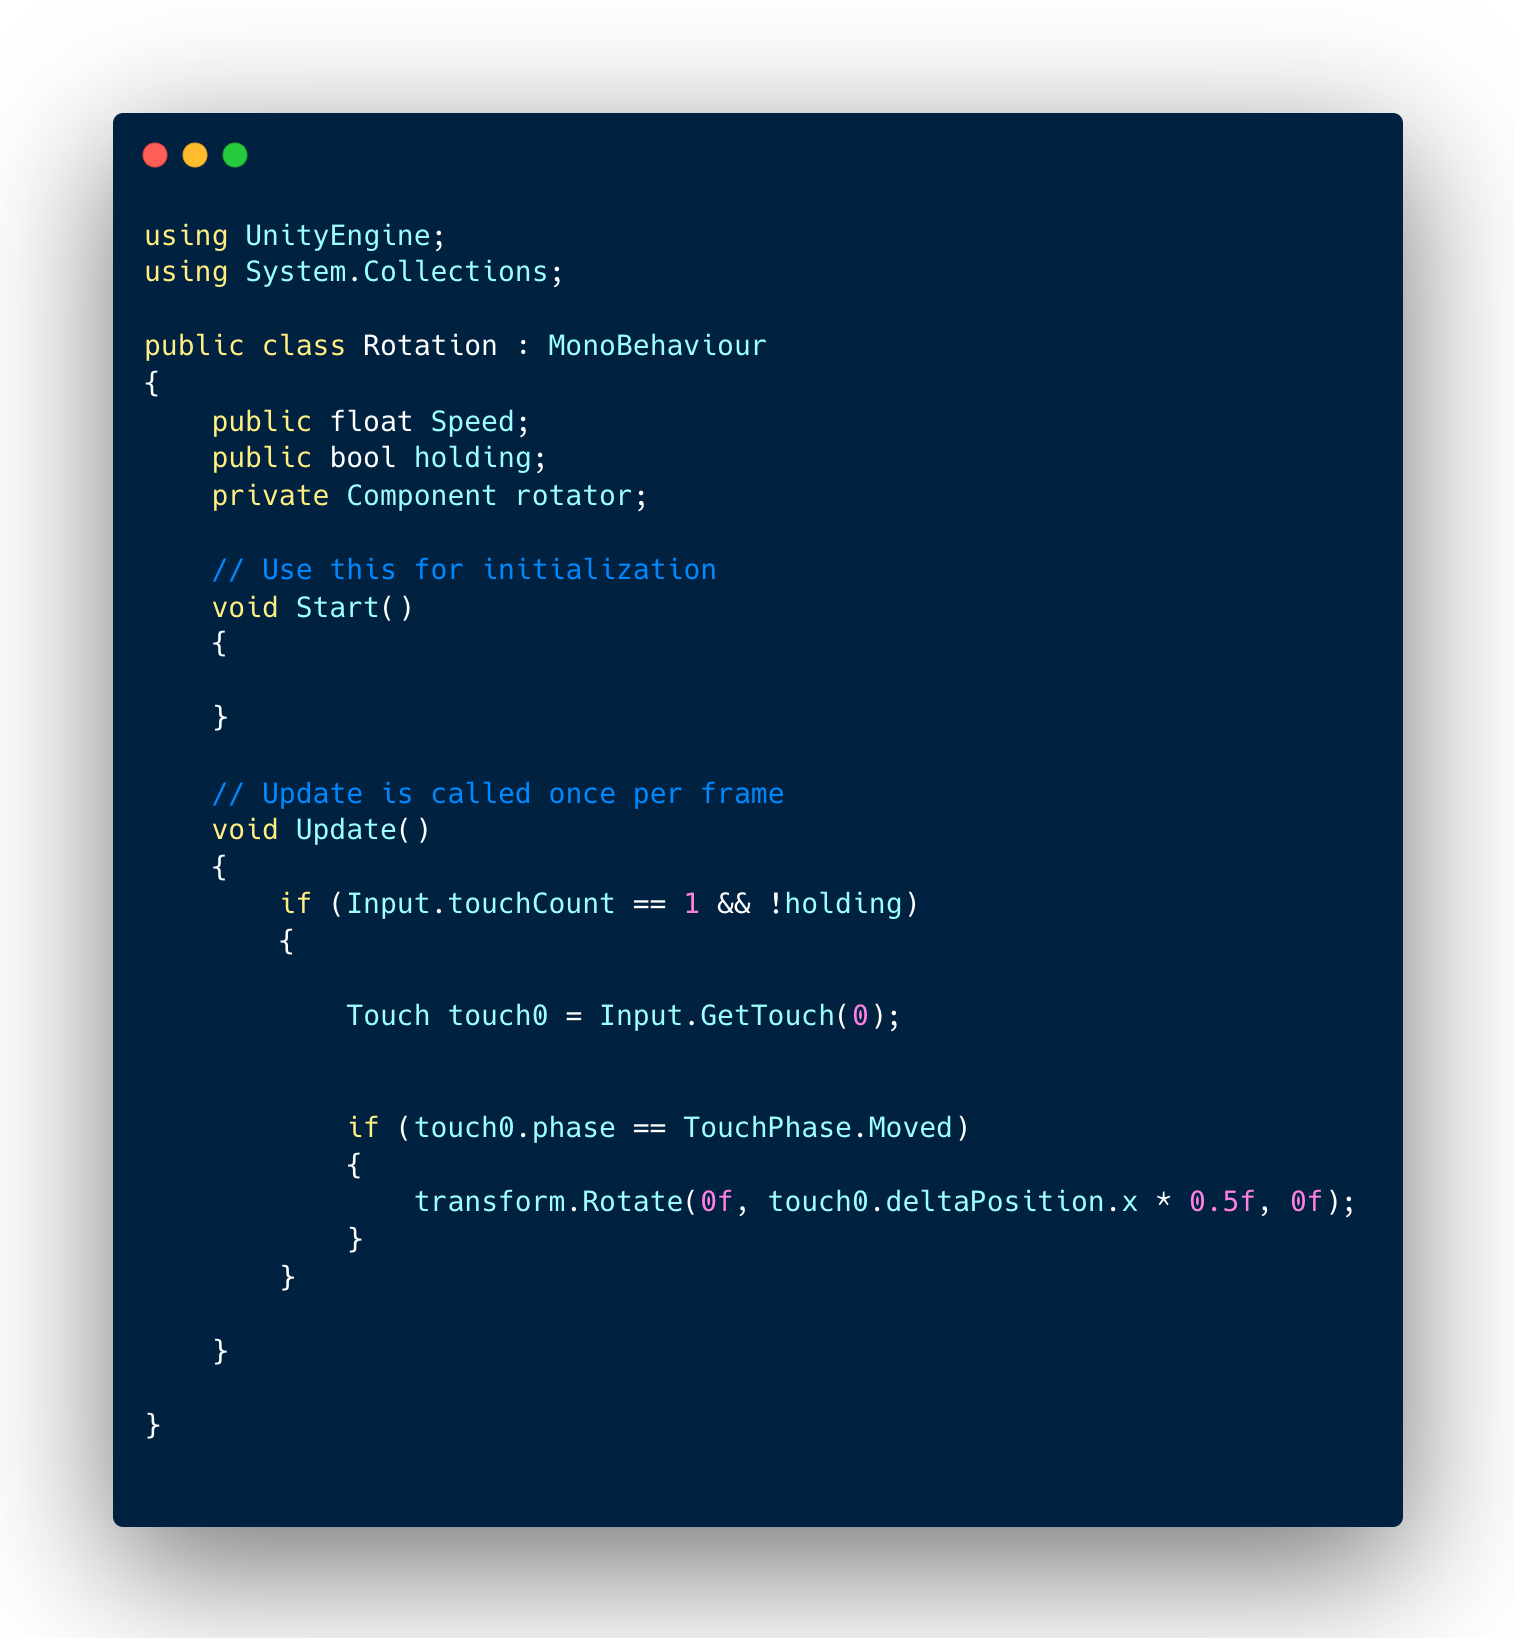
I implemented the Rotation script, enabling the assets to rotate from finger input. This script was found from StackOverflow rotation script.
Afterwards I implemented a reset script, enabling the scene to be reset bringing back the Sphere.
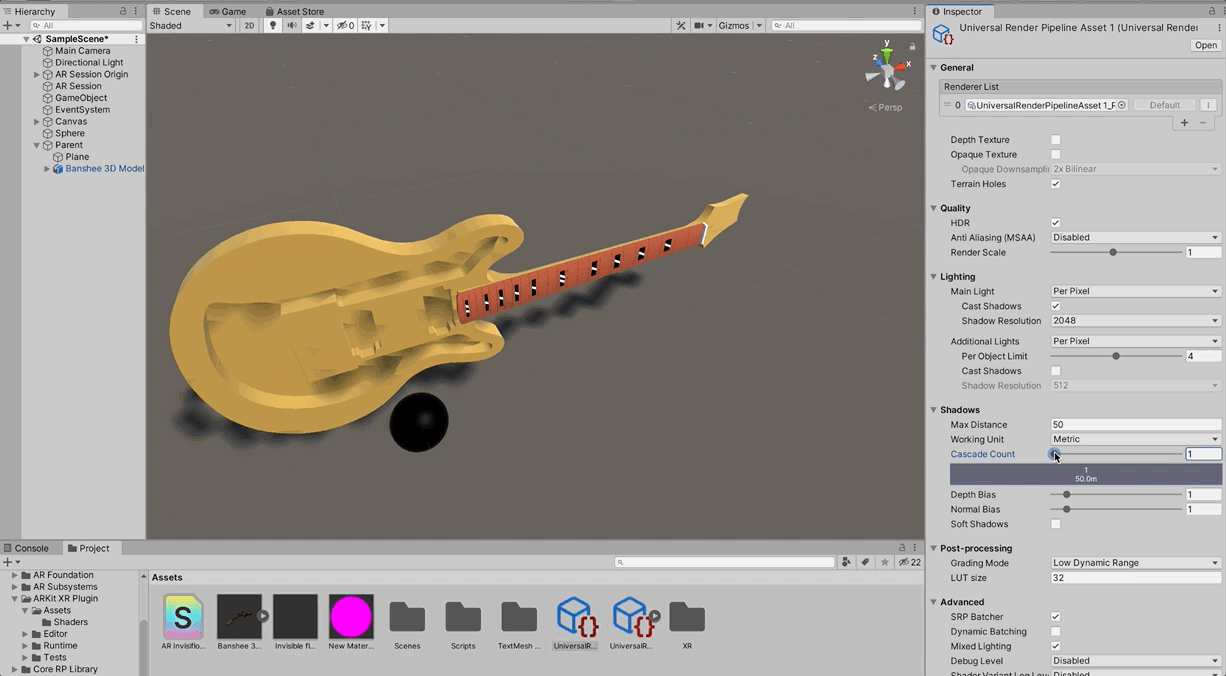
Next, in order to get the very latest textures and shadows, I decided to upgrade the render pipeline from SRP (Standard Render Pipeline) to URP.
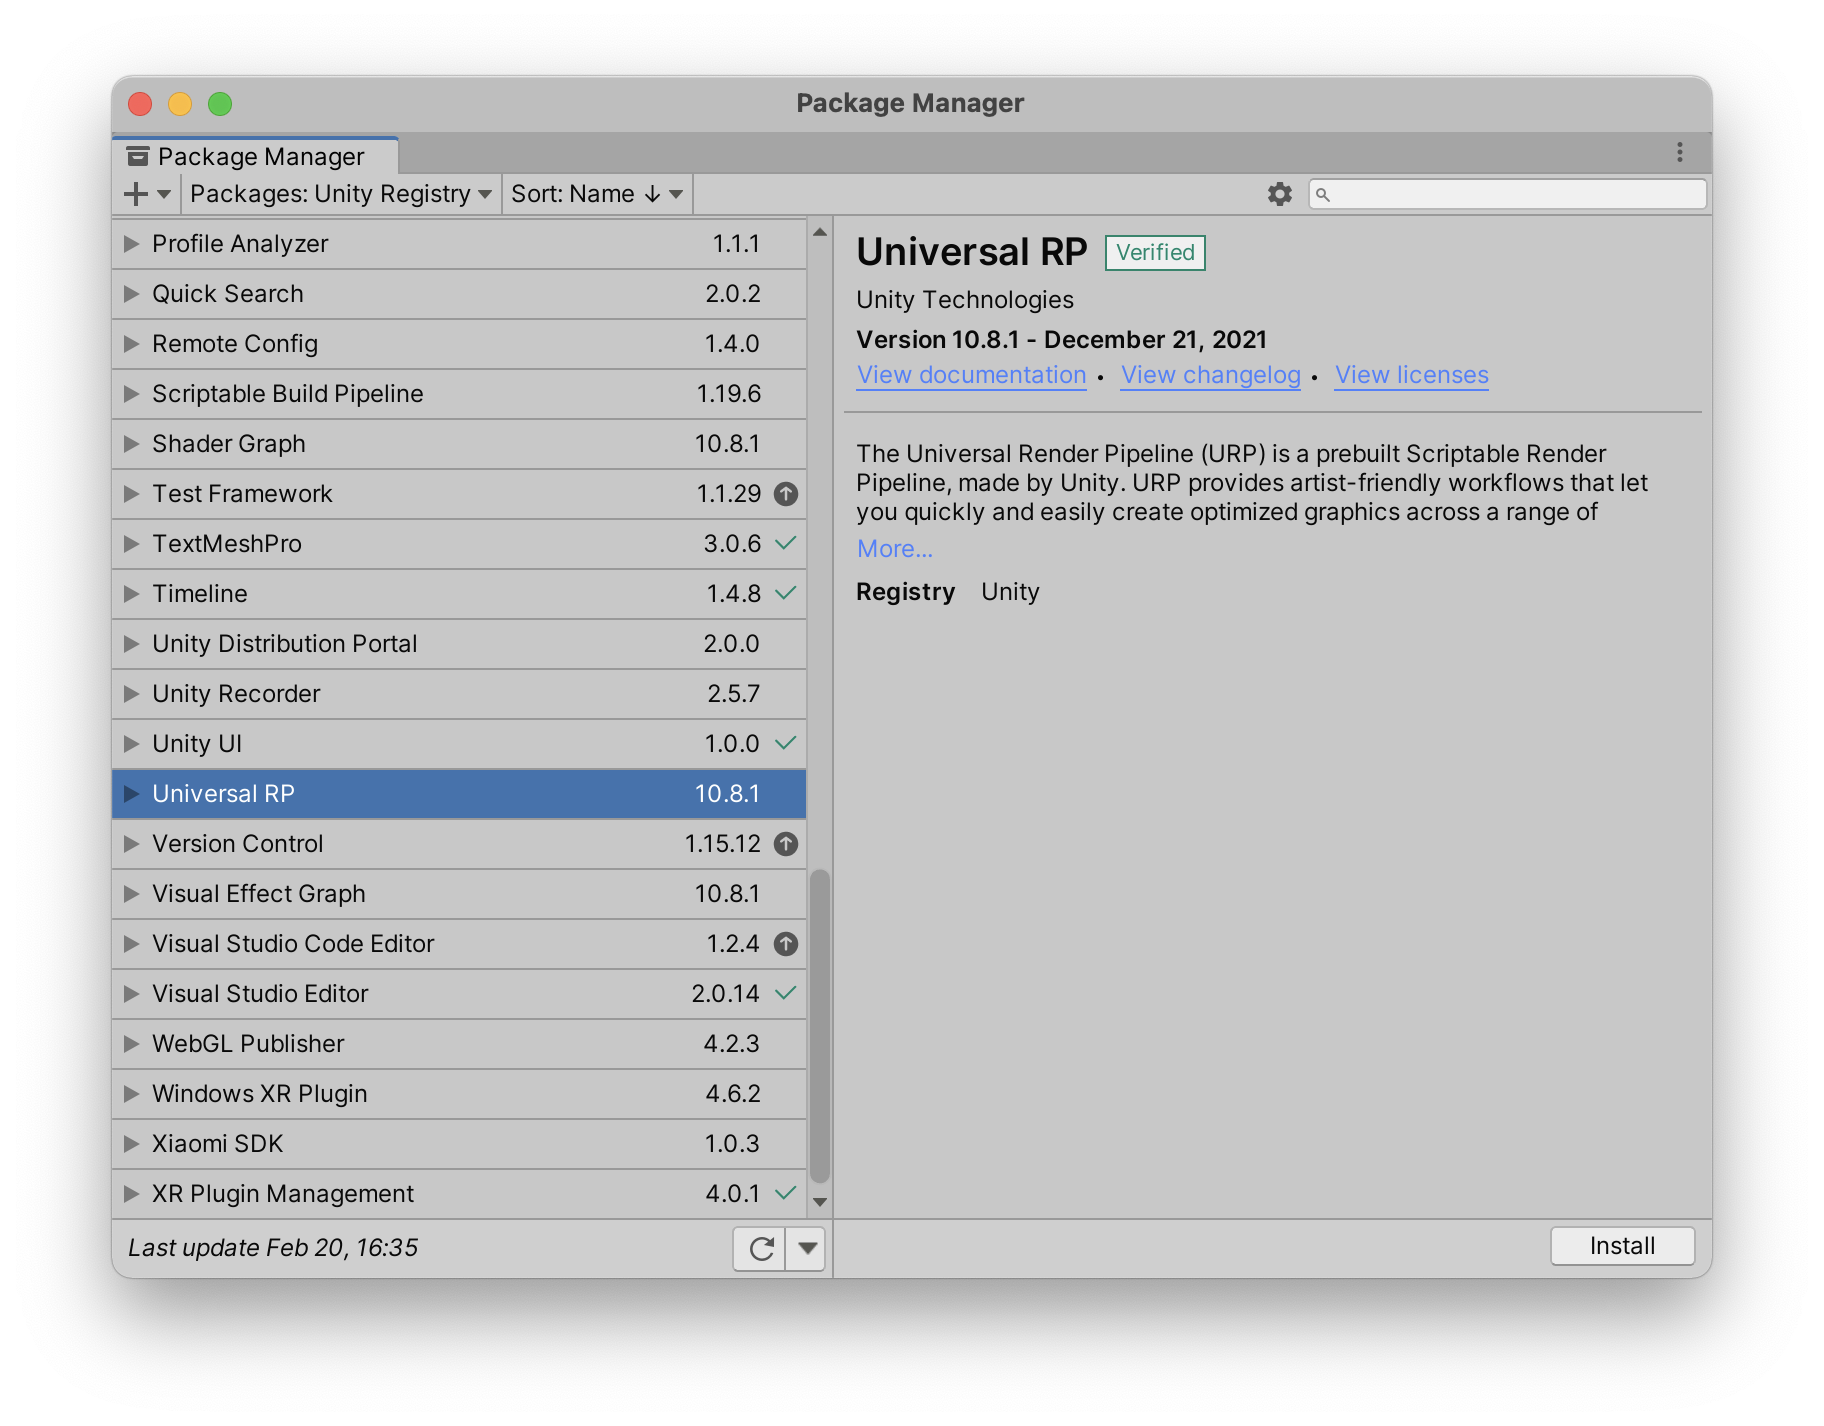
This was done by going into Edit> Render Pipeline> Upgrade Project to Universal URP Materials.
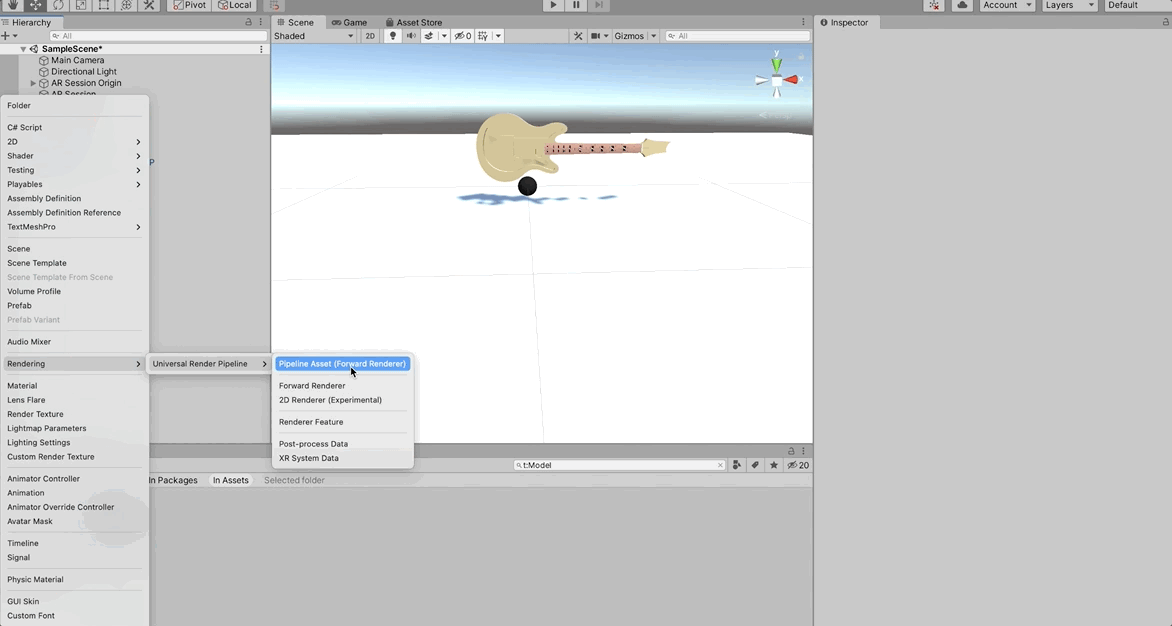
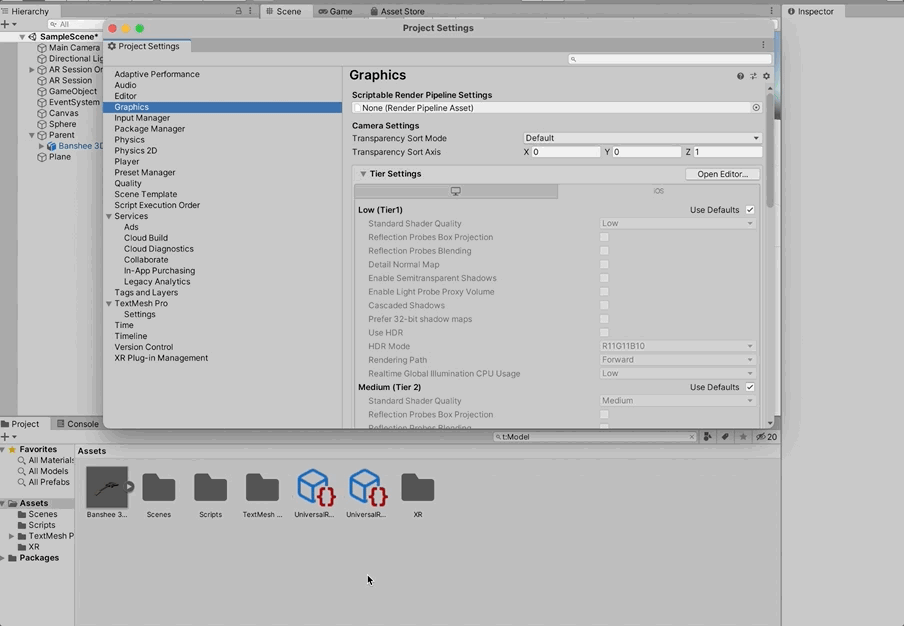
After the URP installed, I went into the project window and dragged the URP into the Scriptable Render Pipeline asset. Afterwards this led to the 3D model going pink due to the shaders changing.
As a result I reimported the model, which removed the pink colouration over the guitar.
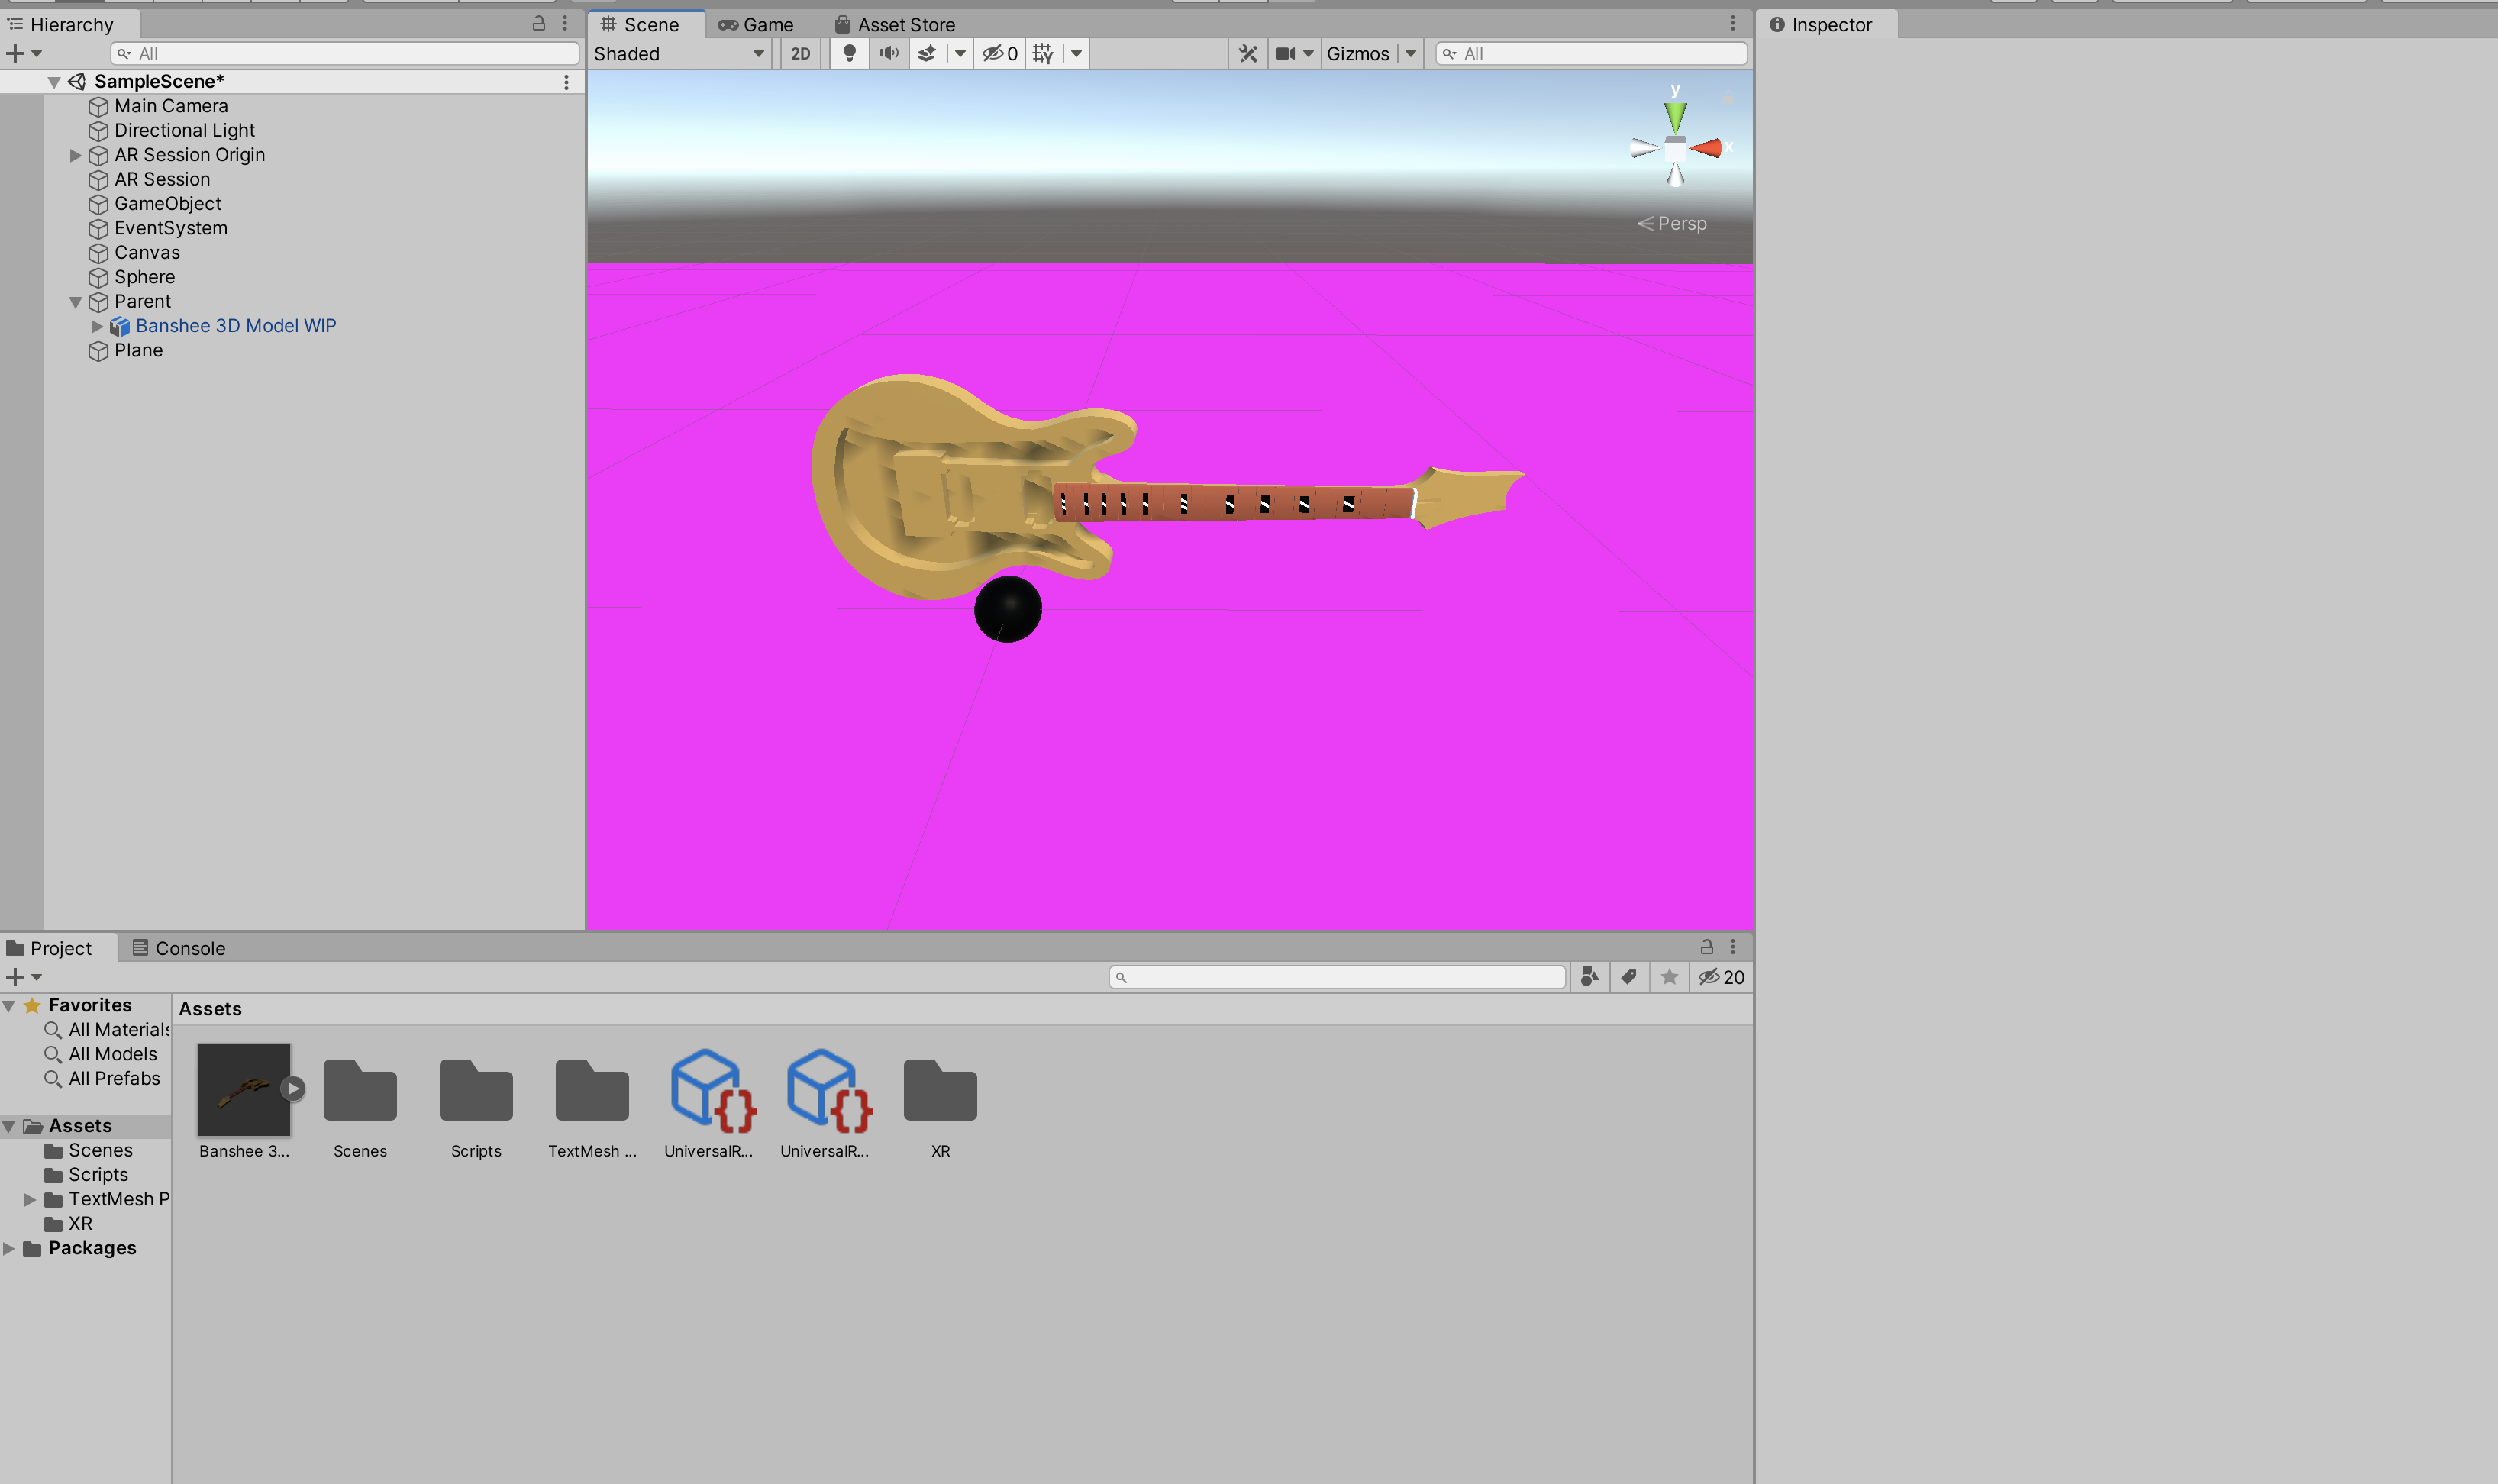
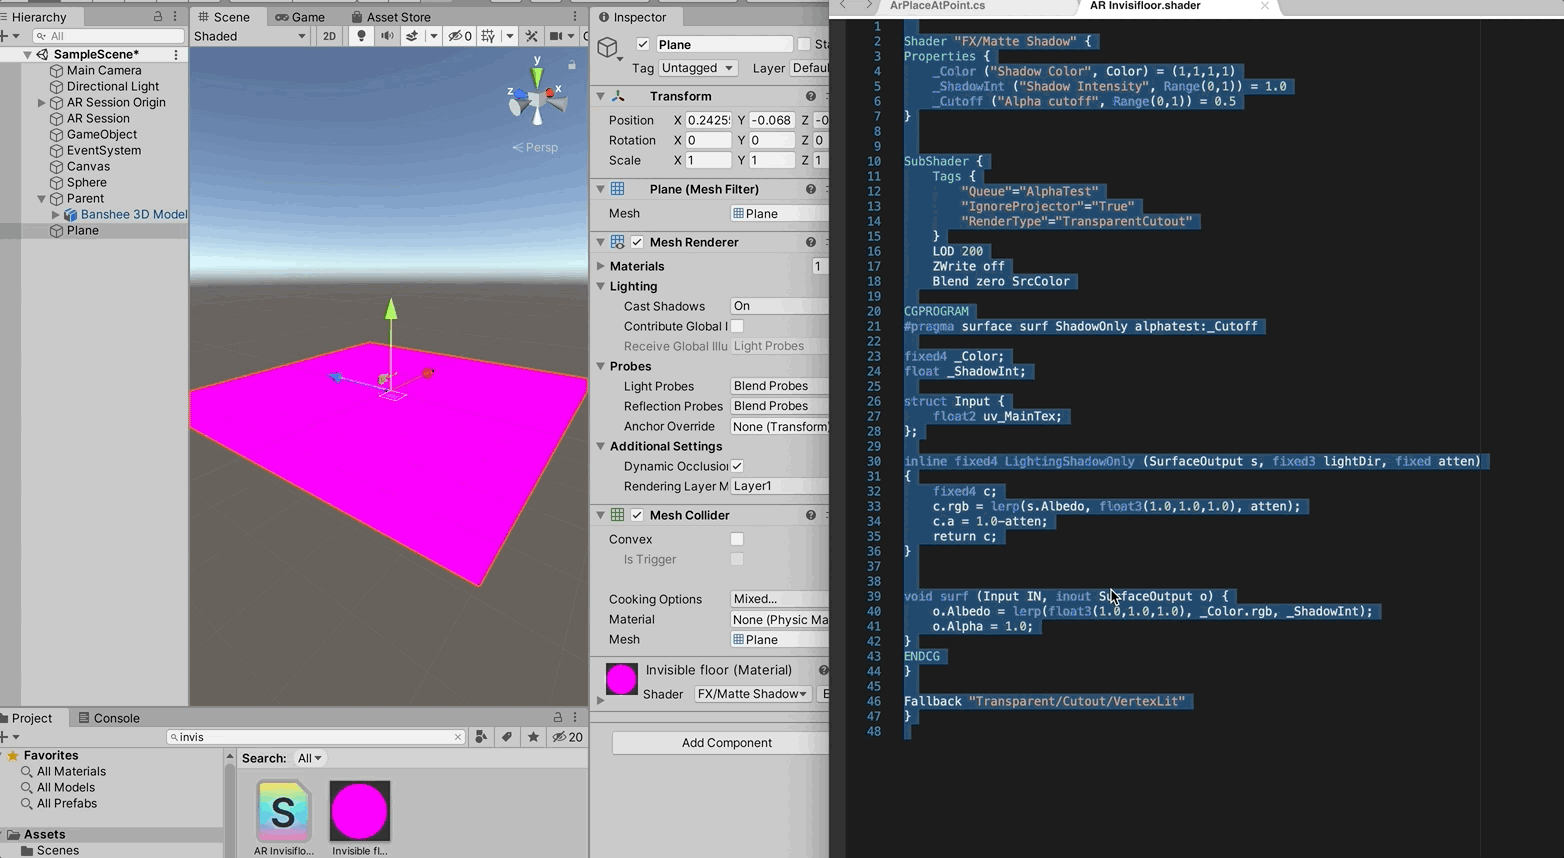
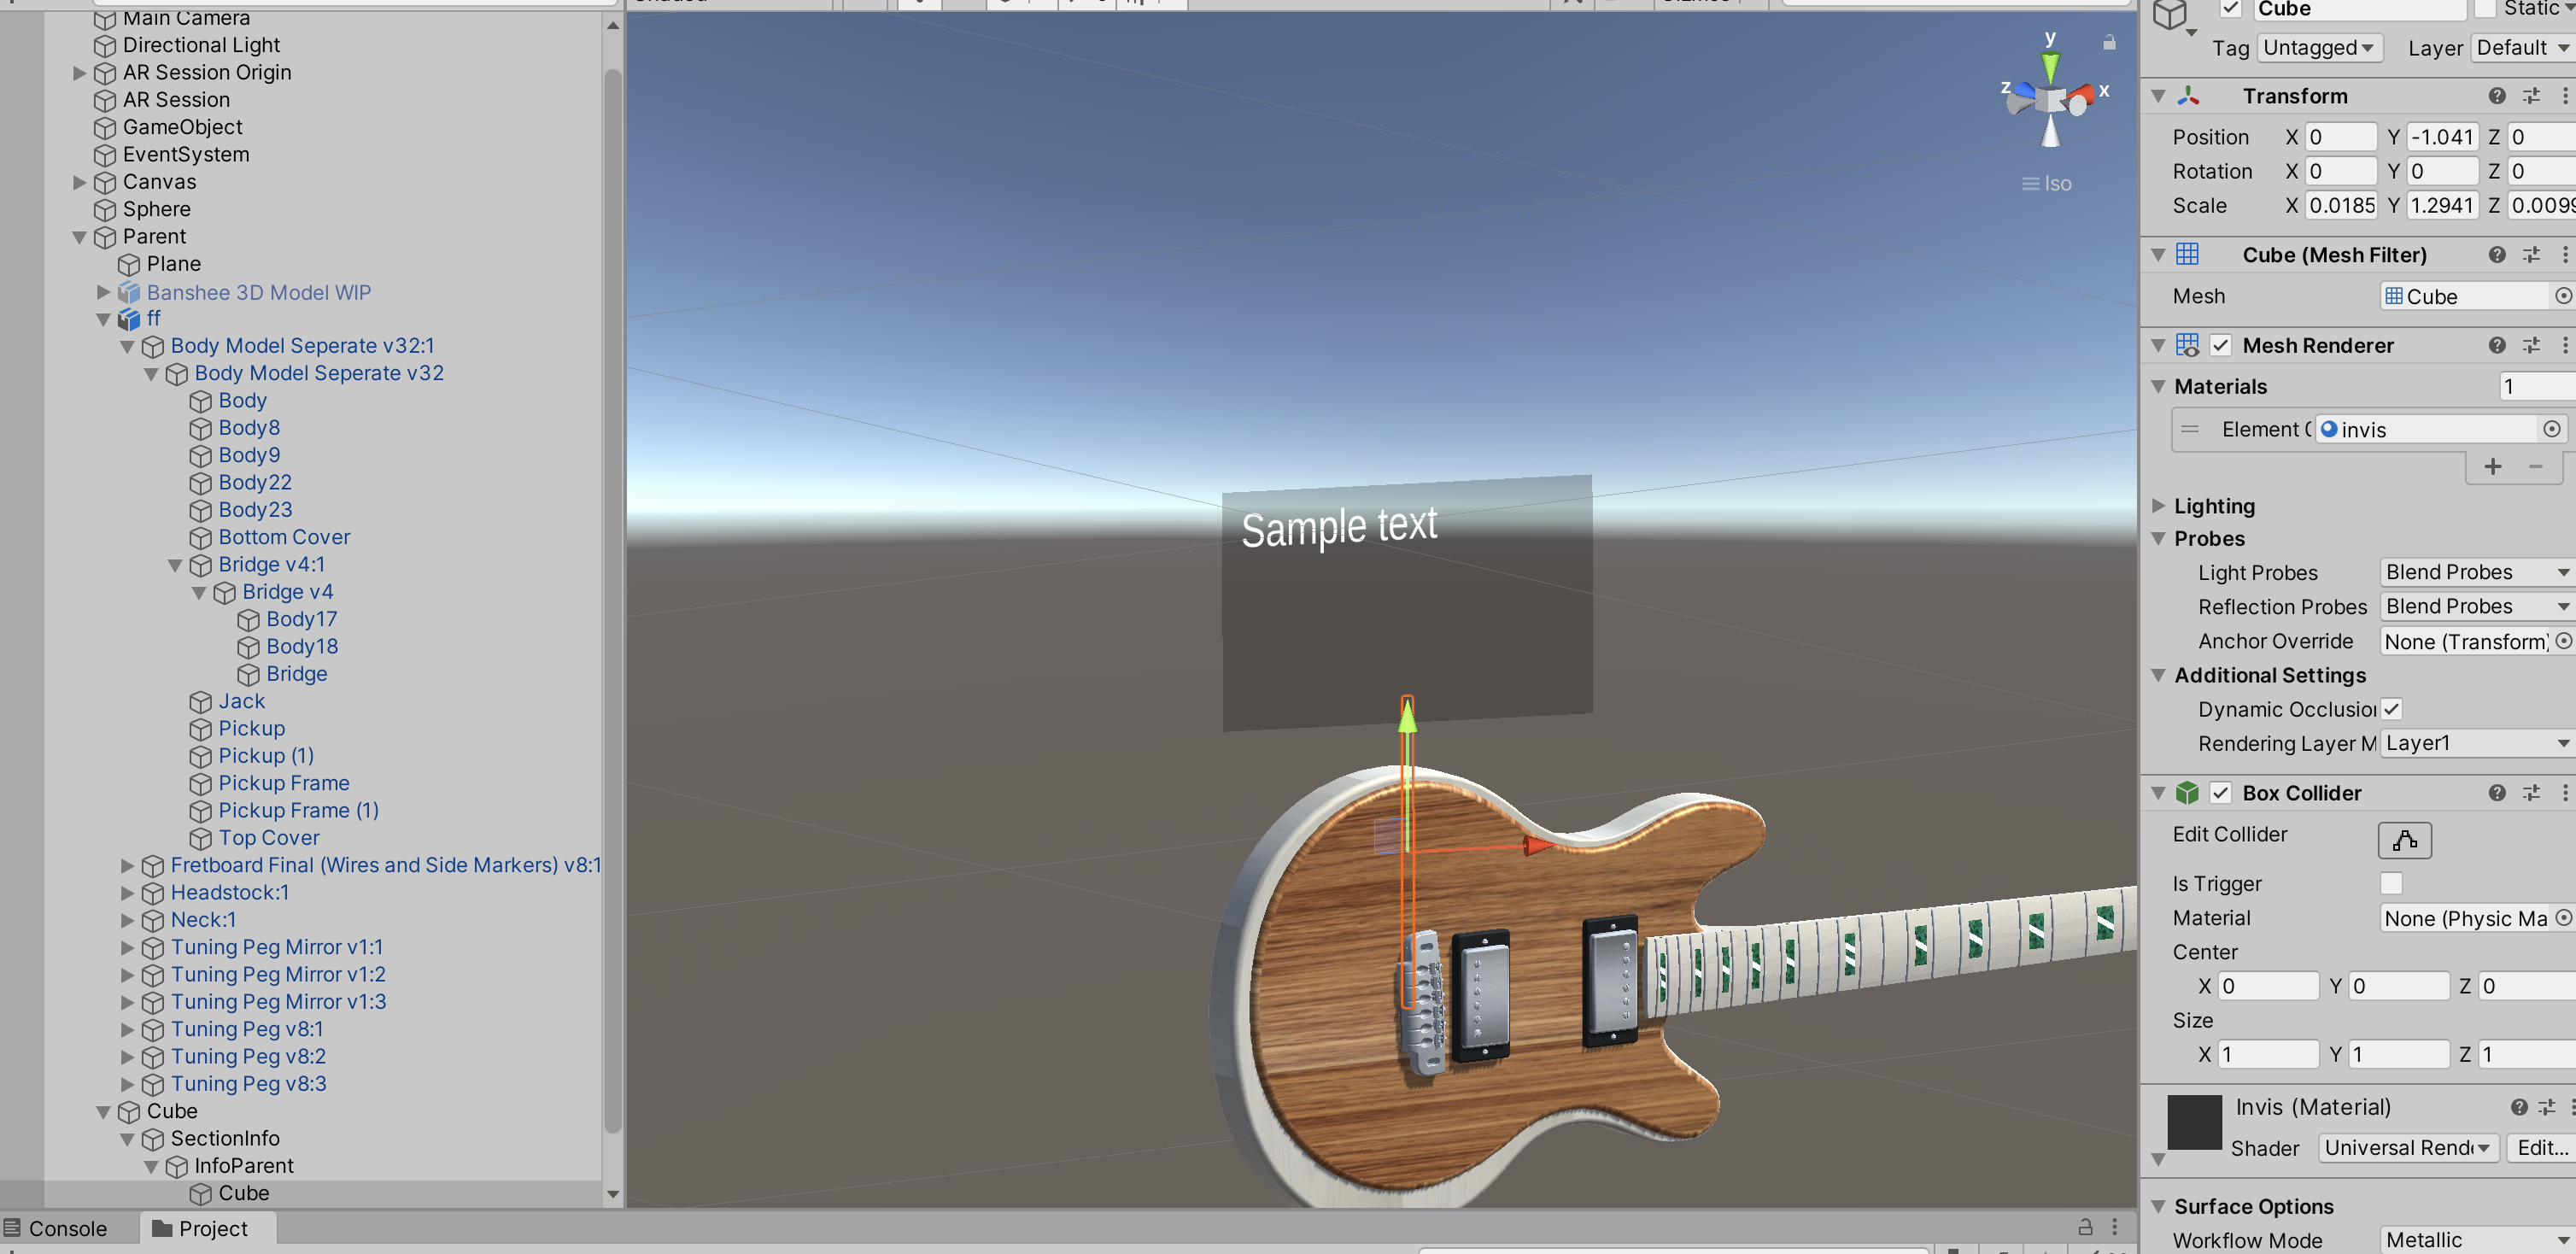
The flat plane below the guitar went pink too, which had to be fixed by implementing a invisible floor shader over the flat plane below.
Troubleshooting and Testing first model
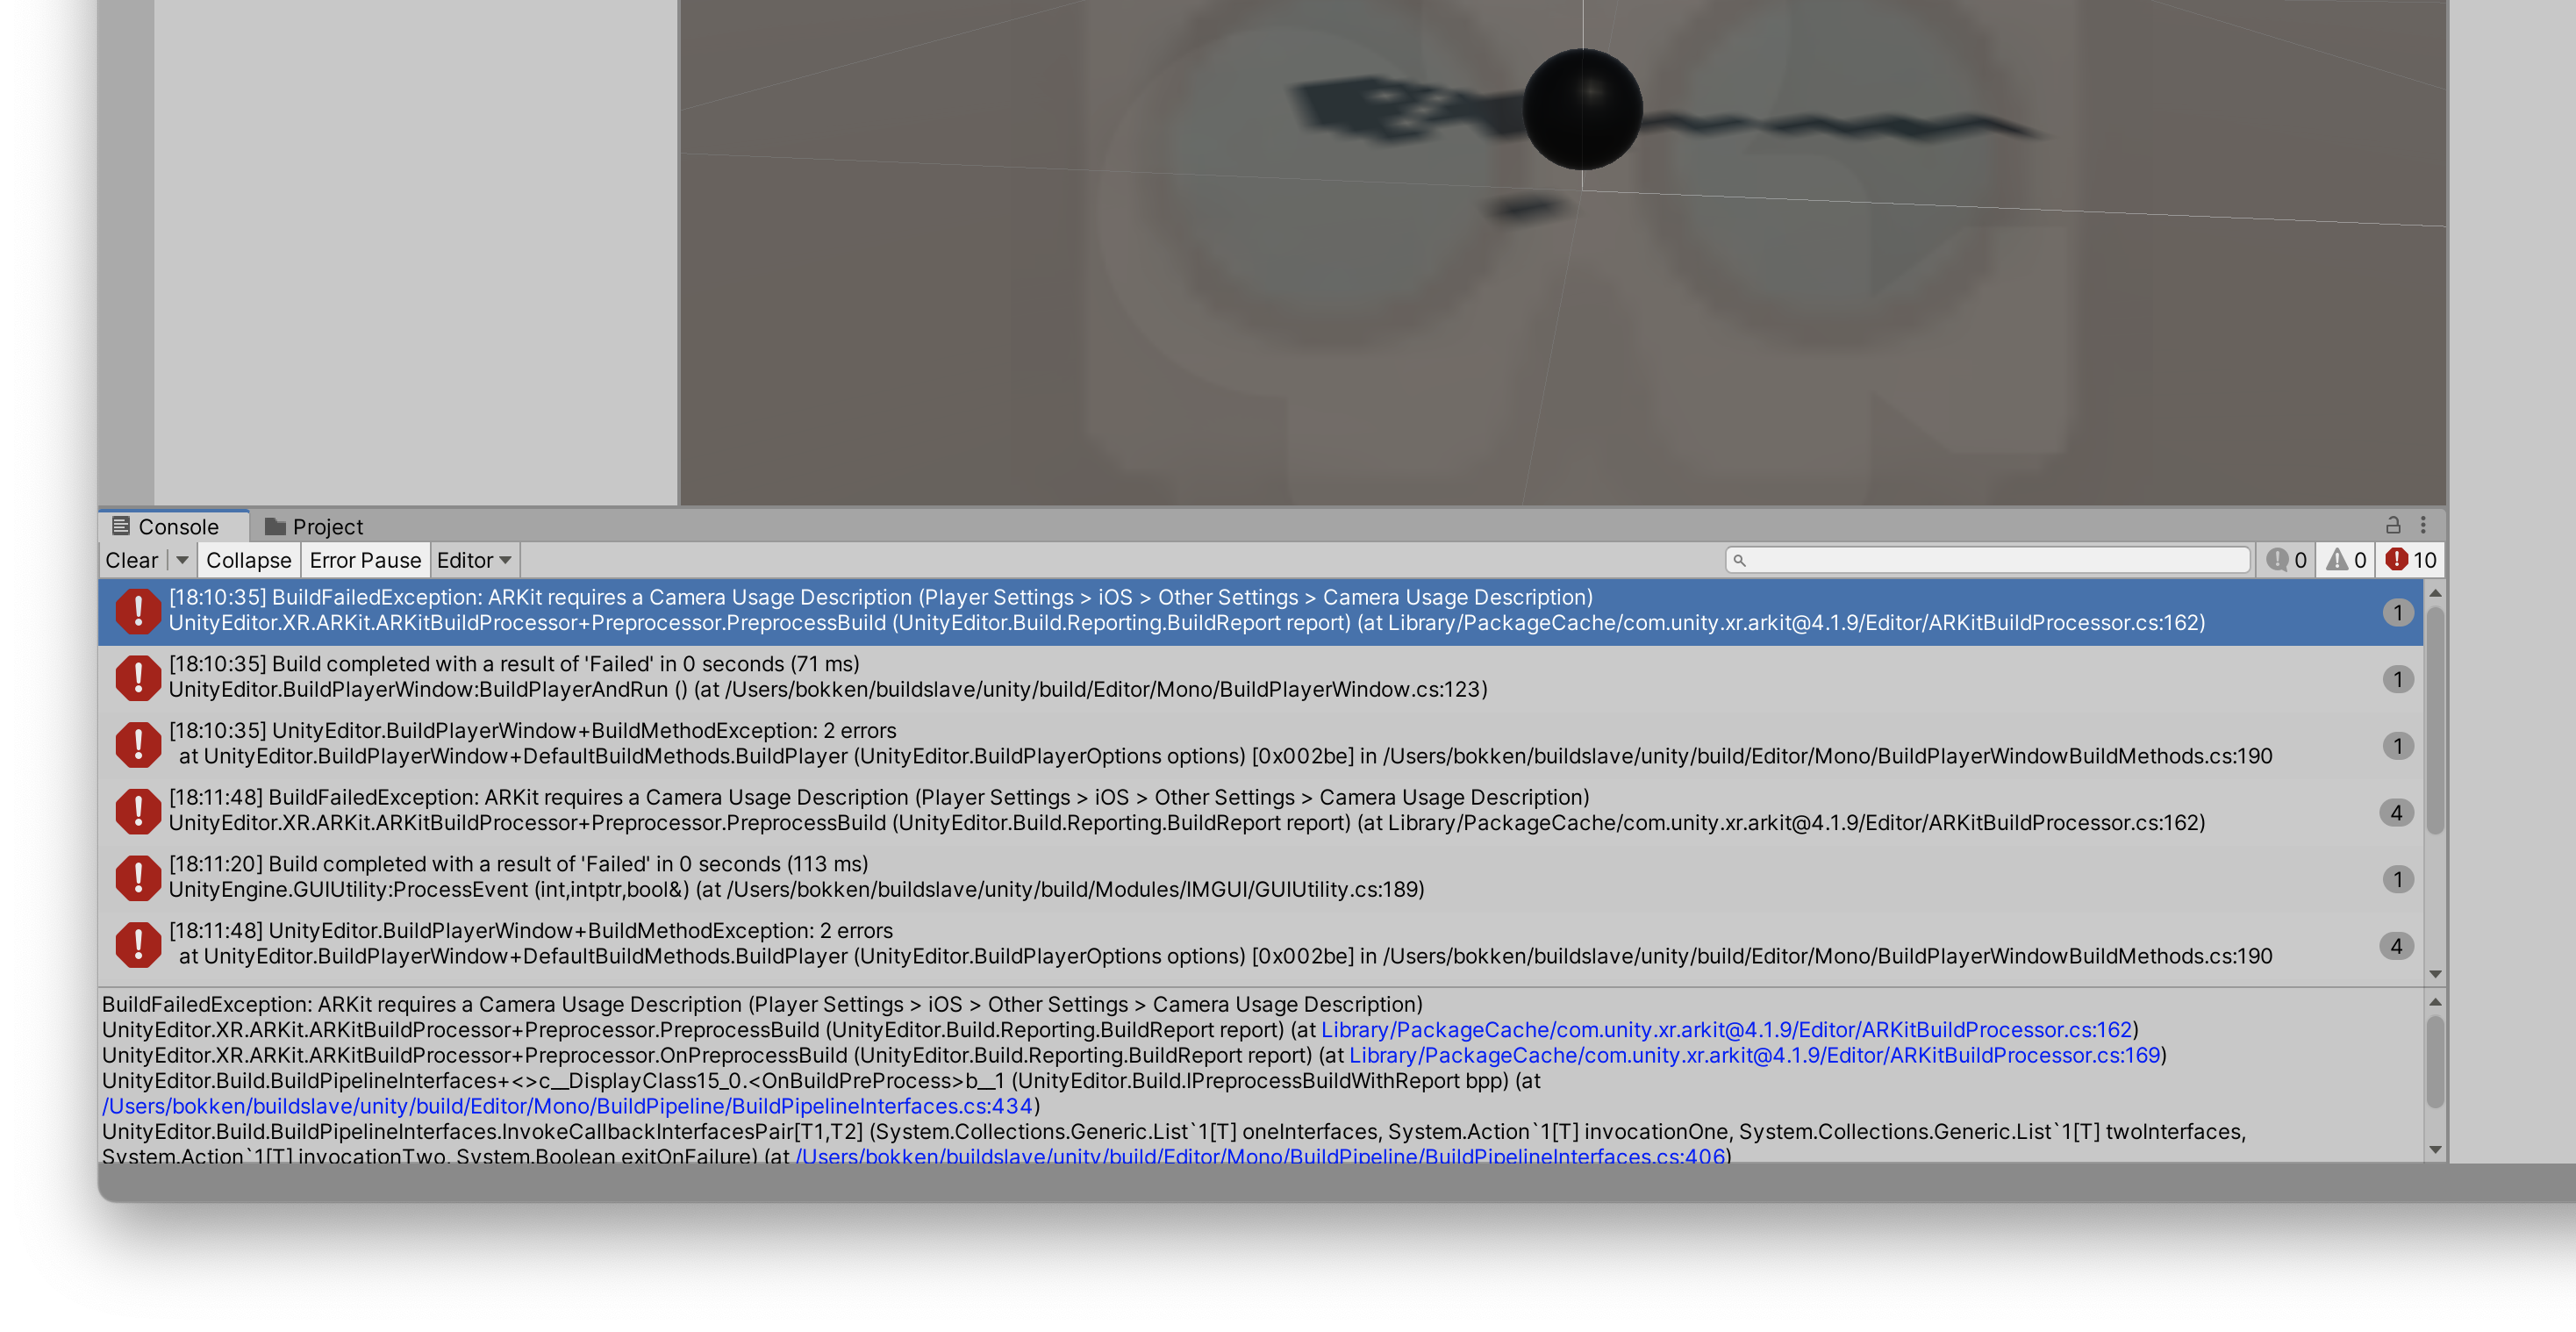
The first error I encountered was the lack of camera description usage which prevented the AR application from functioning.
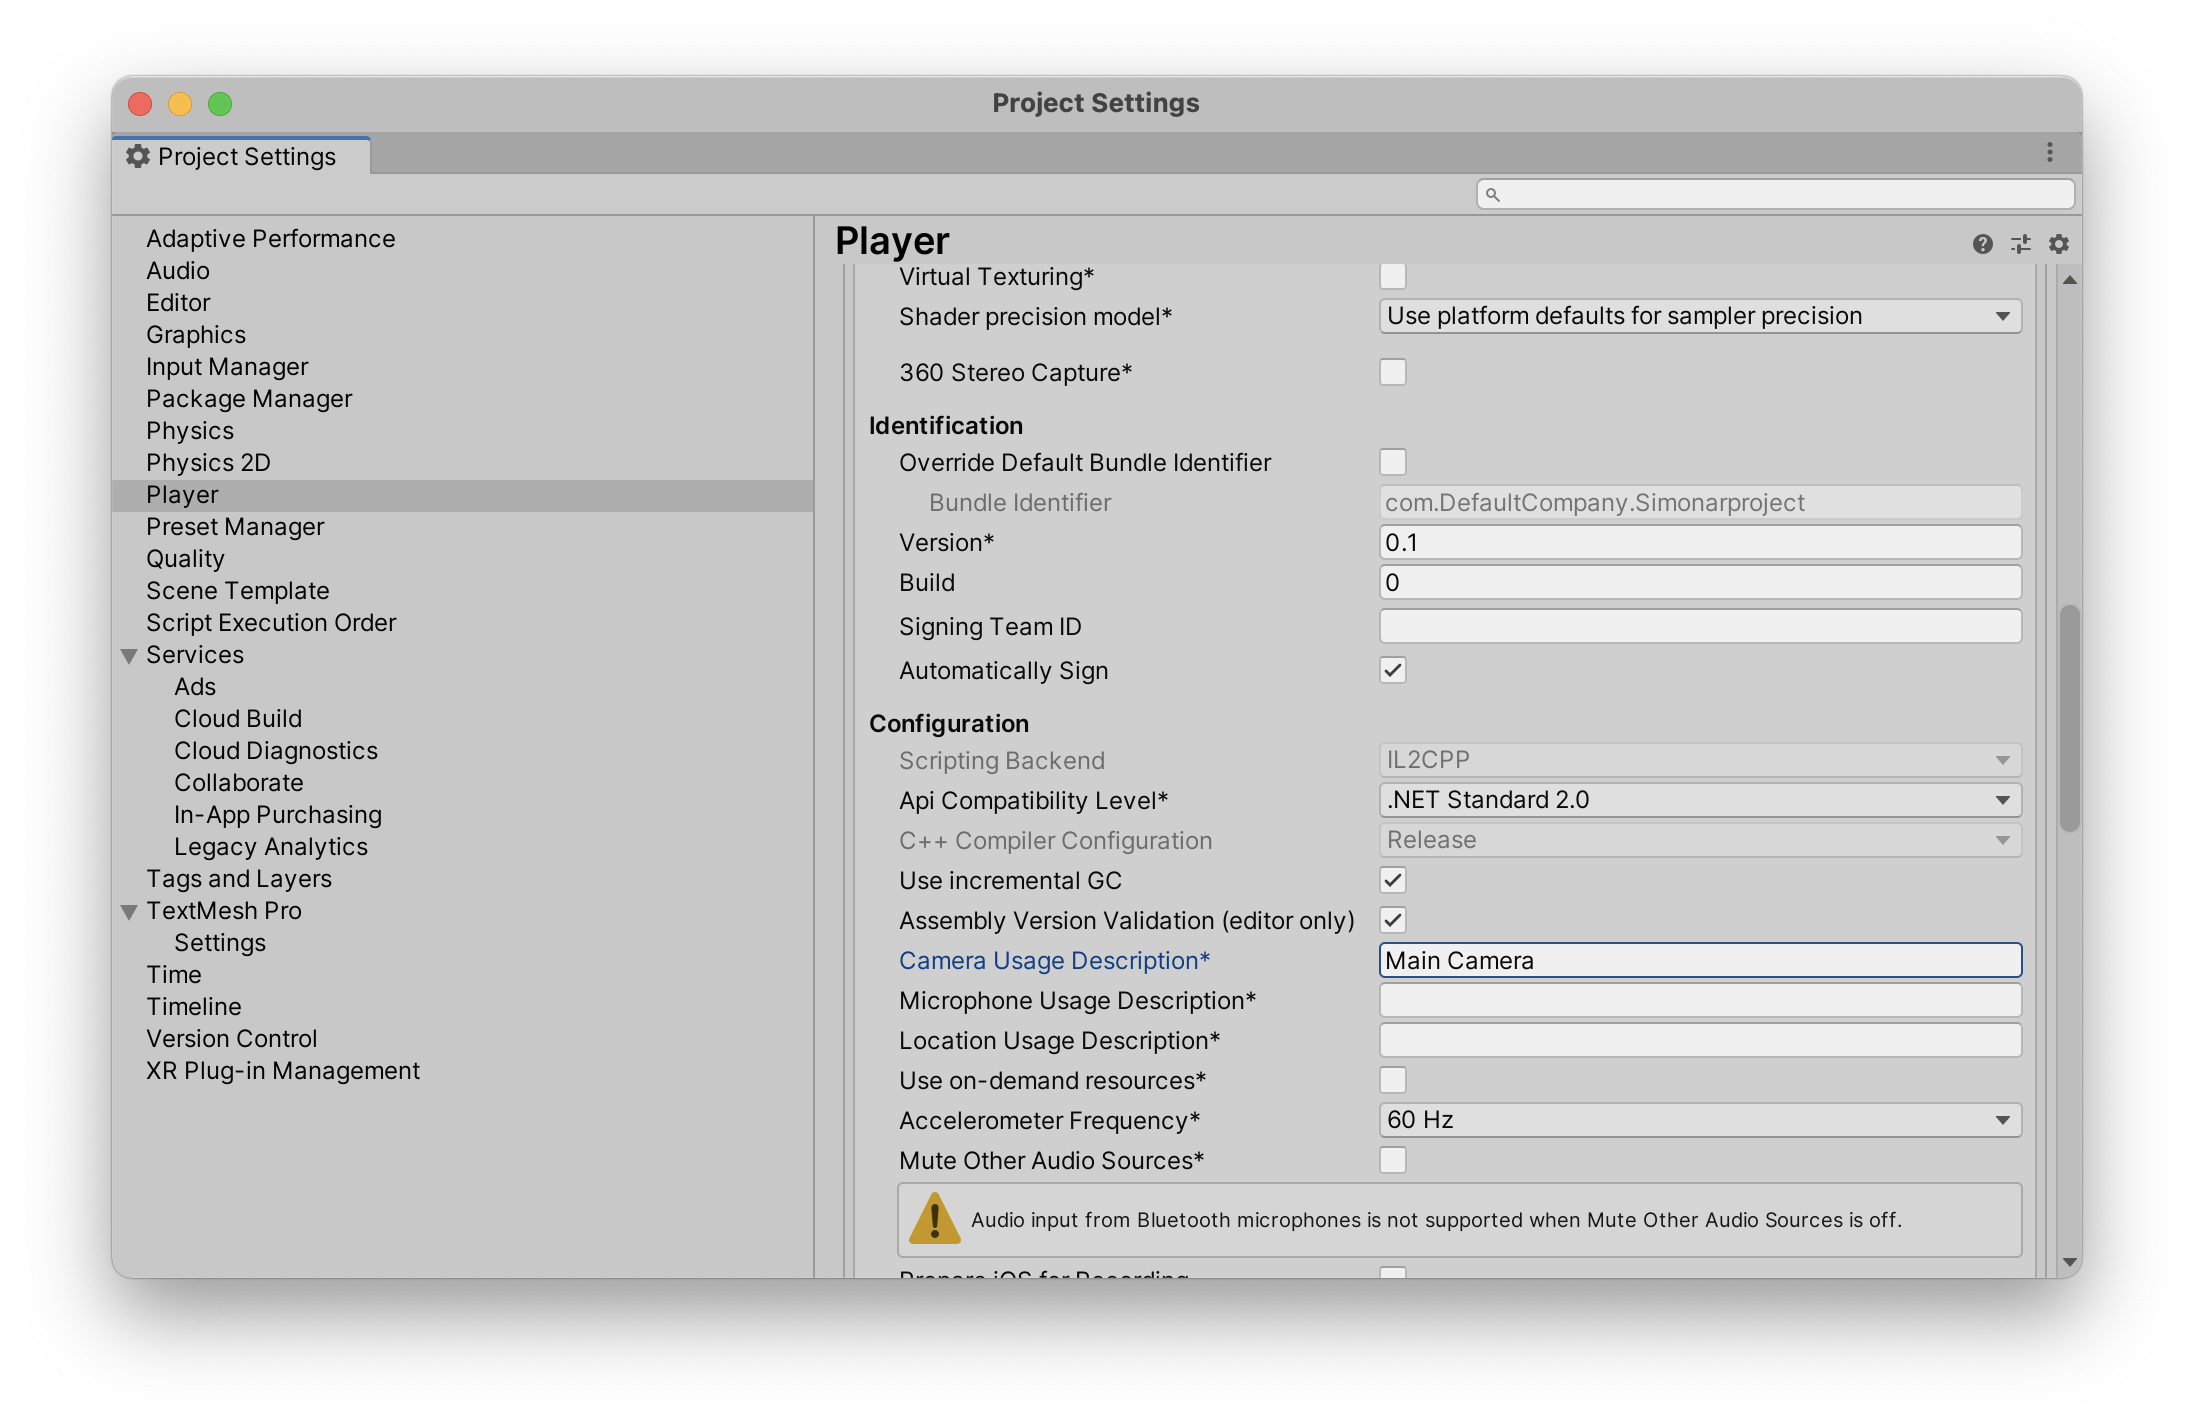
This was corrected by Entering ‘Main Camera’ into the Player settings within Unity's project settings.
The next deployment issue was due to the invalid code signature within Xcode.
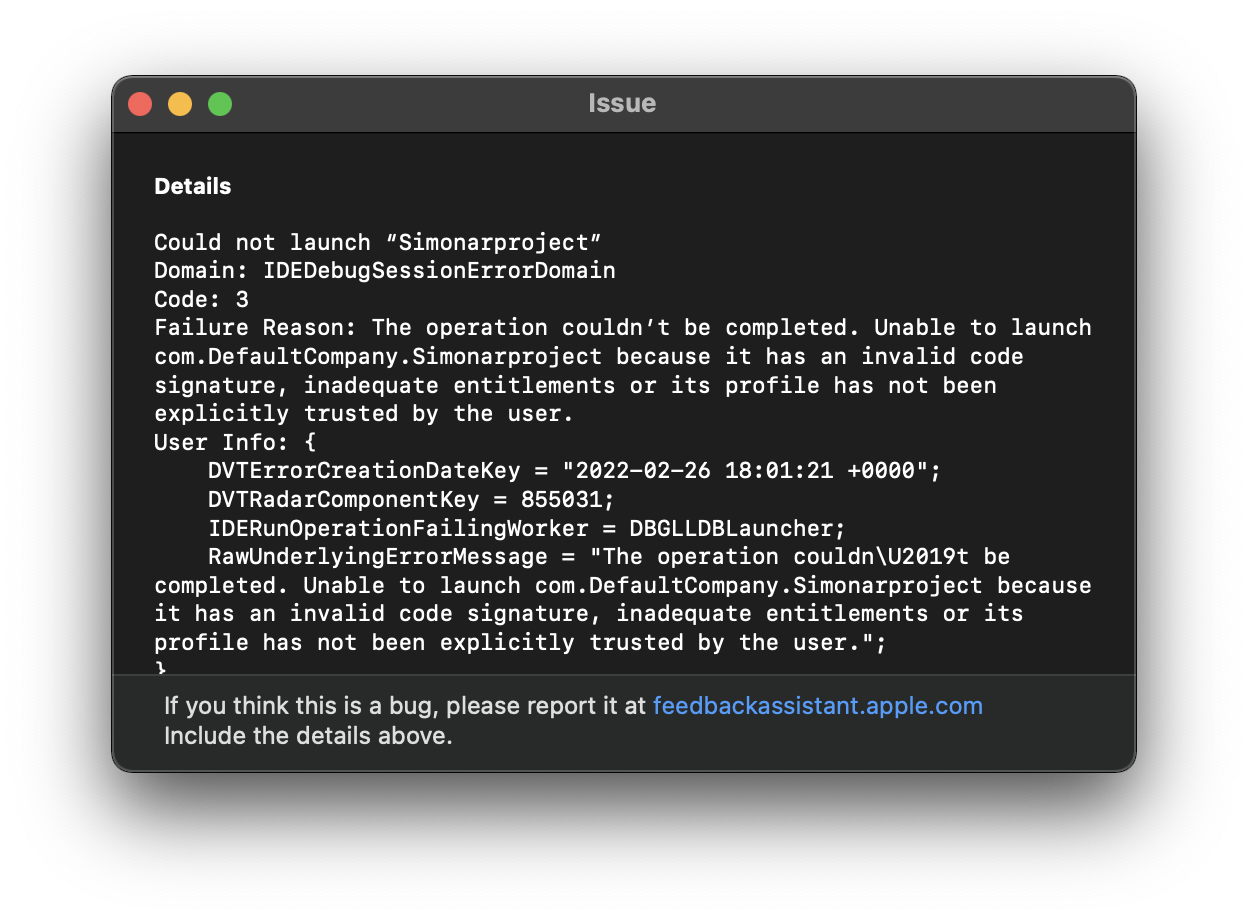
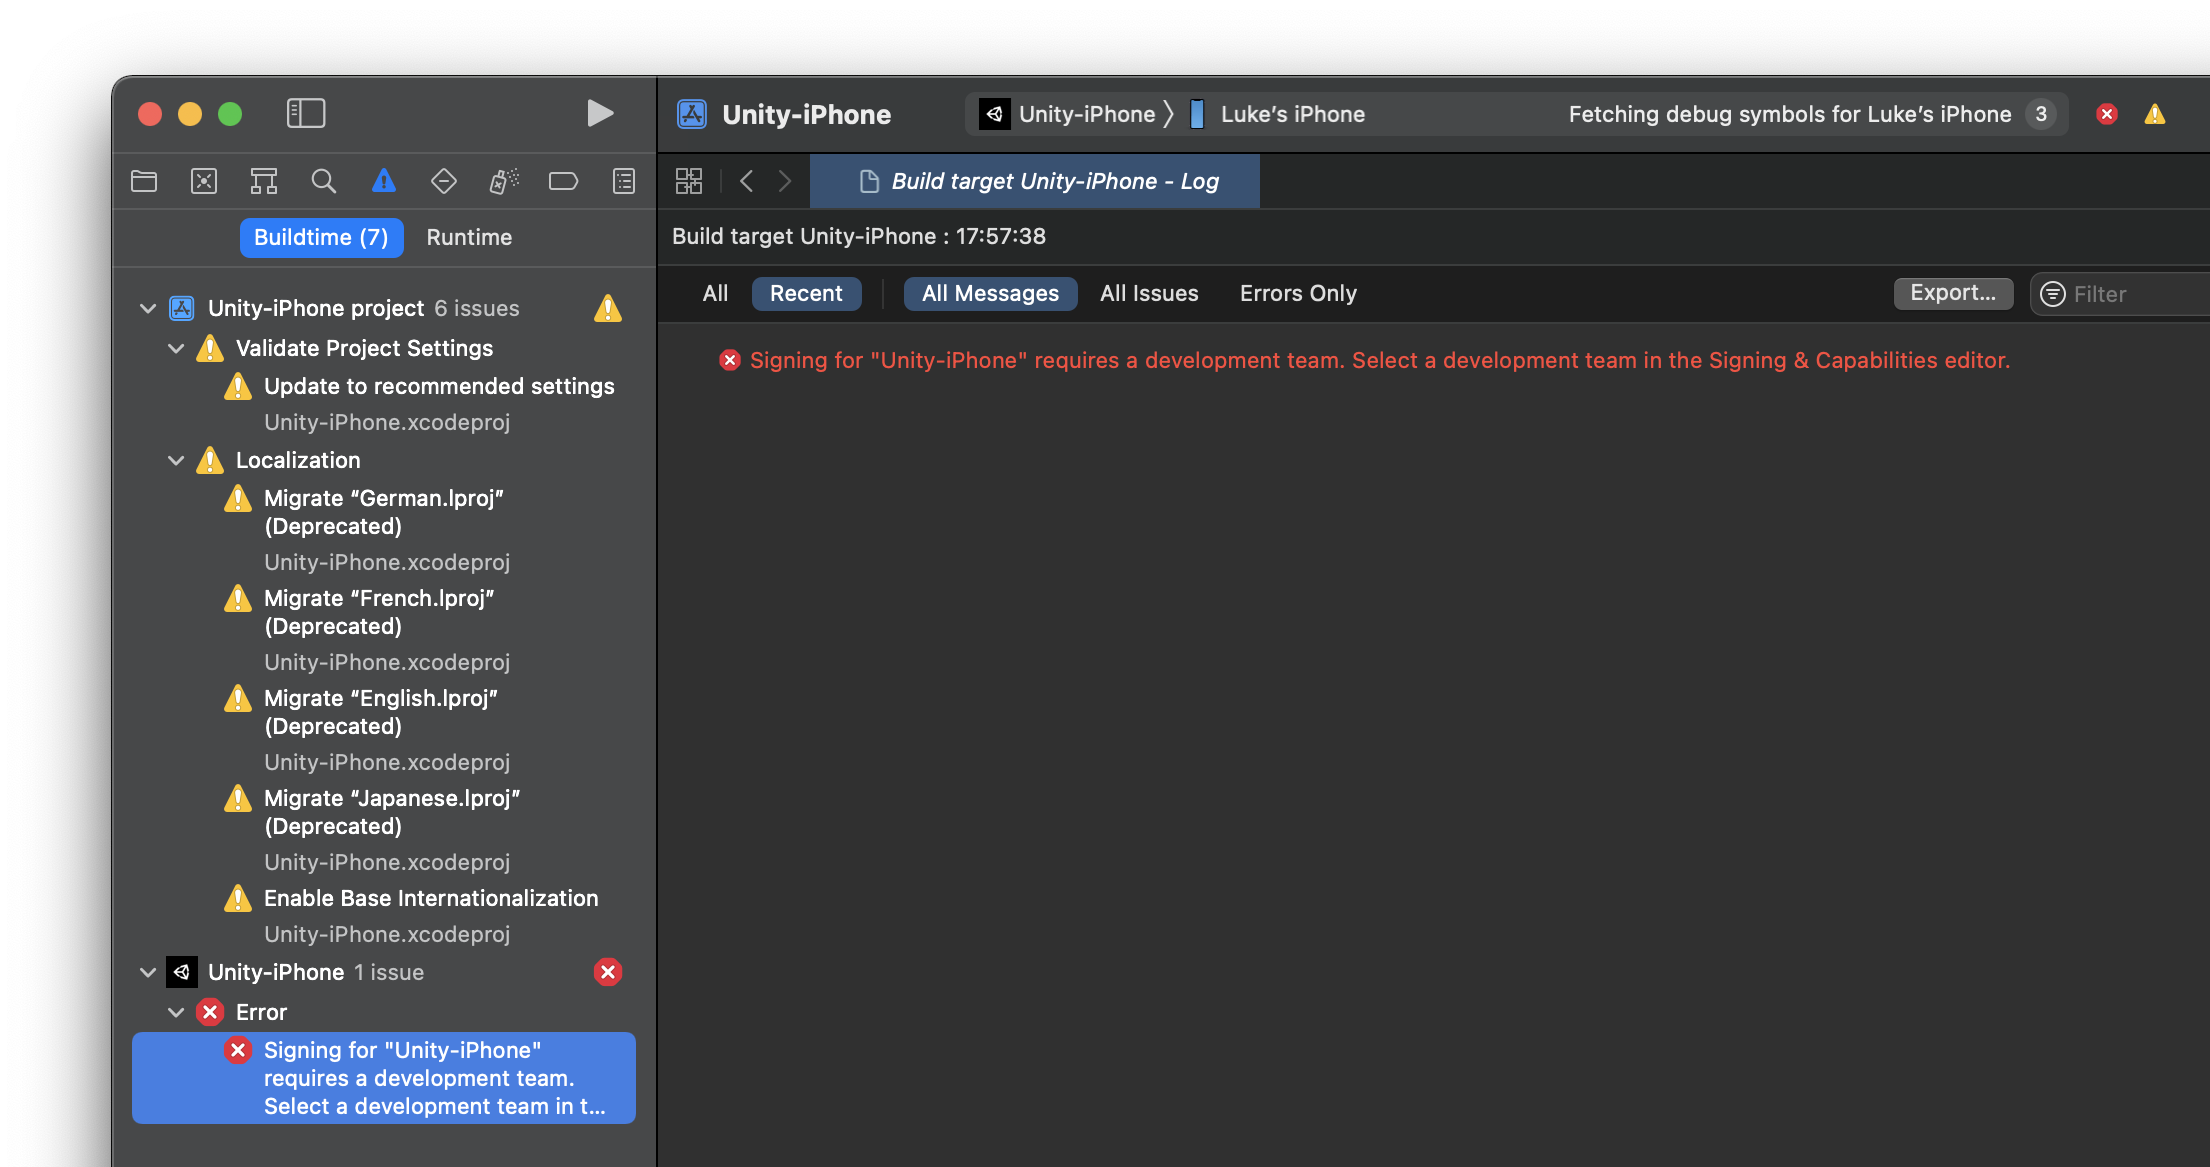
In order to fix both the deployment issue and the sign in error, I created a new Development team within Xcode.
After the XCode deployment errors, there was an issue with the actual placement of the Guitar. This was fixed by re adding the ARPlaceATPoint script within unity as well as redragging the Banshee model.
After the AR model was Augmented, the casted shadows by the URP were distorted and pixelated, producing an inaccurate version of the AR Guitar.
Week 5- Altering URP distance
Within the URP settings, I increased the Cascade count to four in turn creating three splits to be created. Each split is the distance from the camera, with the max distance at 50 meters.
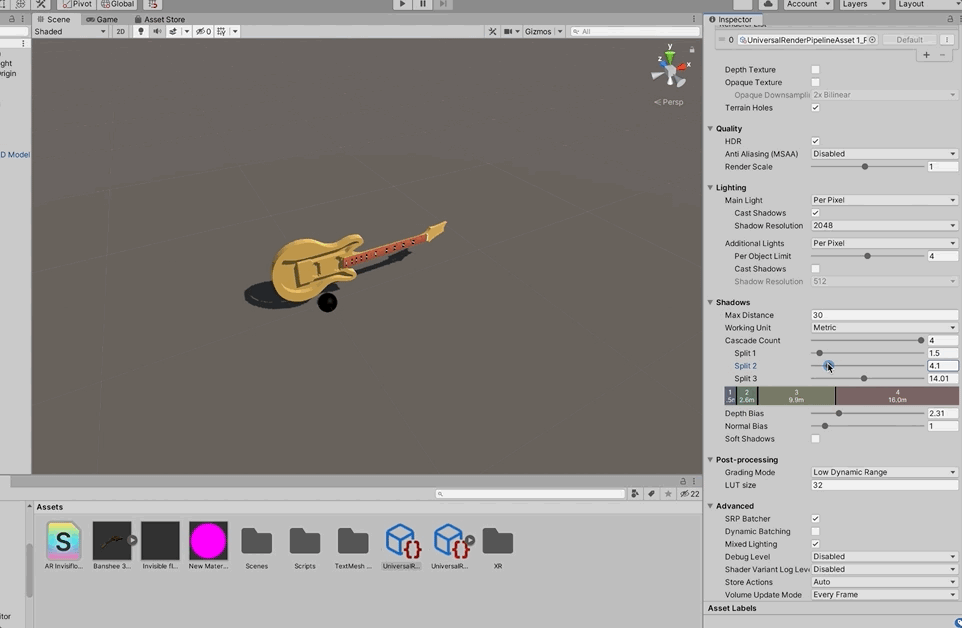
The first distance on the first split was entered to 1.5m, with the second at 2.8 meters. This alters the quality of the shadows, so based on the distance the device is from the augmentation the shadows will change accordingly.

As you can see on the left, the Guitar’s augmentation produces a detailed shadow of the 3D model.
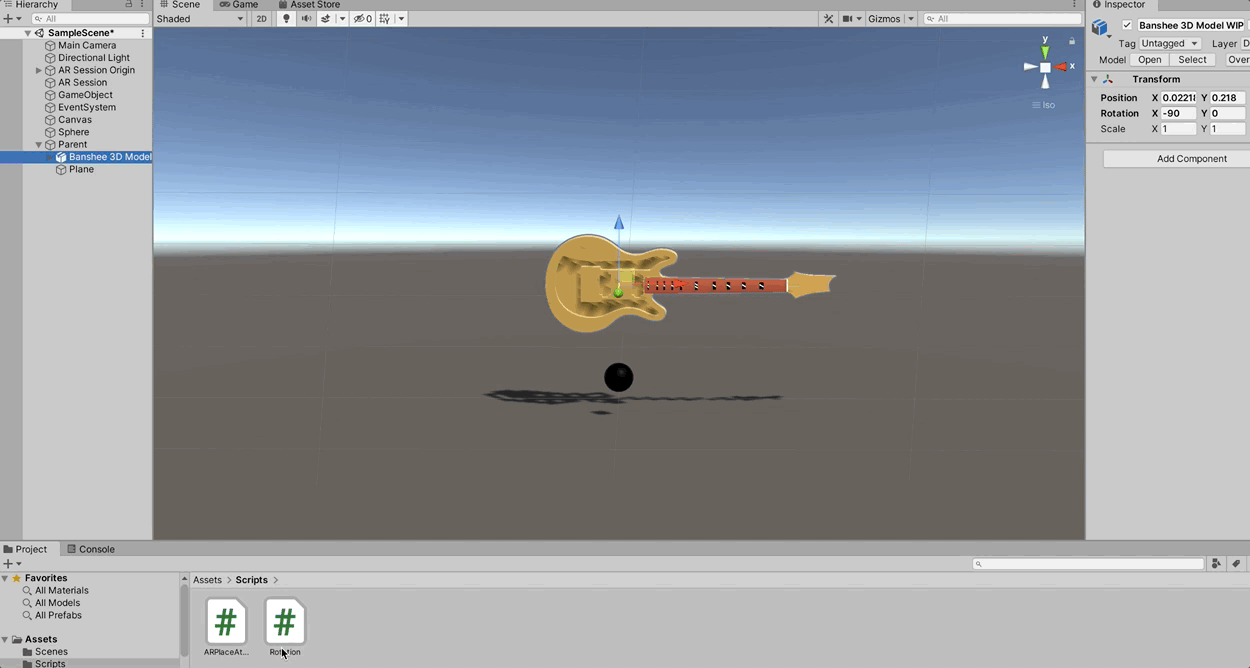
Next I dragged on the Rotation Script on to the model, allowing the Y axis to be rotated around.
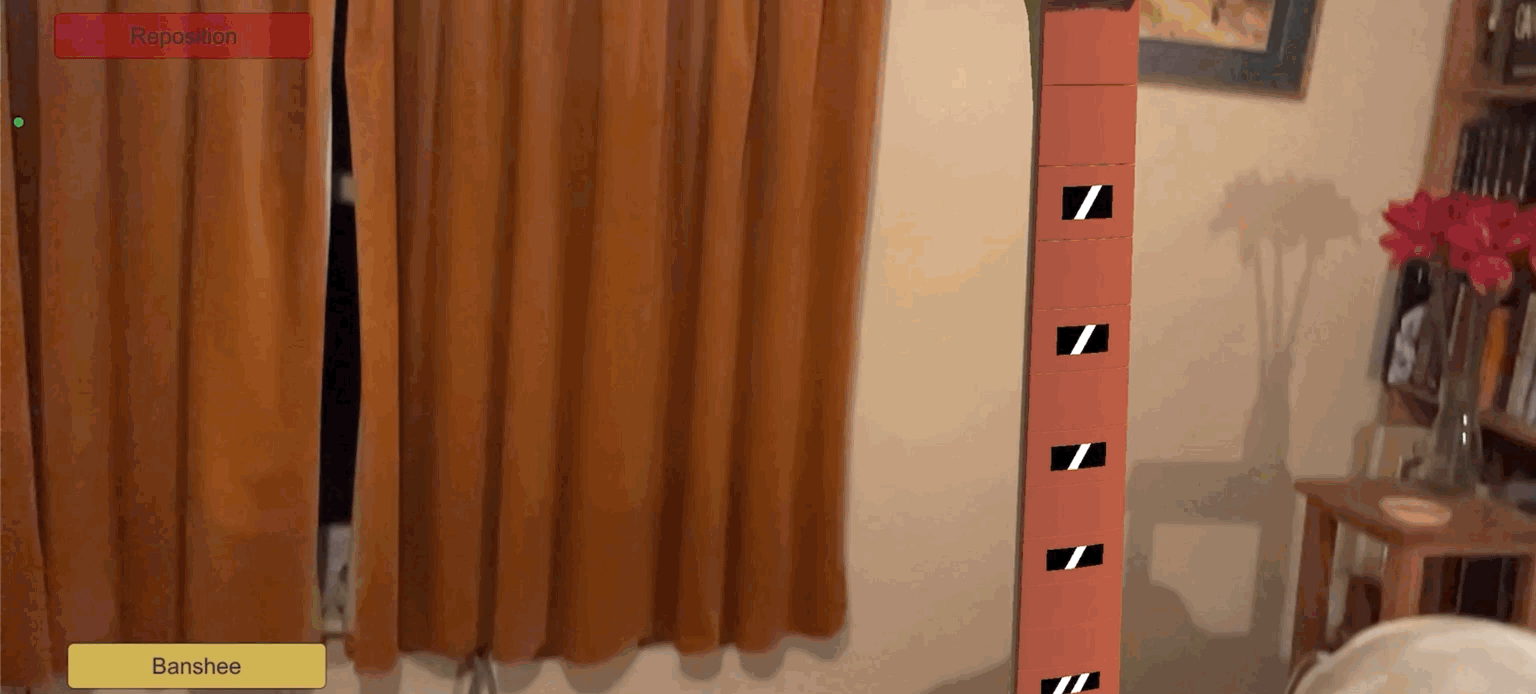
I then deployed the latest model into XCode and opened it up within the application. As you can see the scale of a real guitar and the Augmented Guitar are identical.
After the model had been successfully deployed and tested, I spoke with my Uncle about the functionality and aesthetics of the model and what potential changes he would like to see. The feedback regarding the functionality of the application was positive, however he mentioned that he would like to see the ability for the model to change colour based on the user’s preference. This allows the customer to view the variety of woods and colorations available for customisation.
Secondly my client also requested for the abilty for each of the individual assets to display infomation. Such assets would be a part of the guitar, such as Pickups, Bridge, Jack, Head etc. This would allow for the user to interact with the model and understand the unique parts of the guitar.
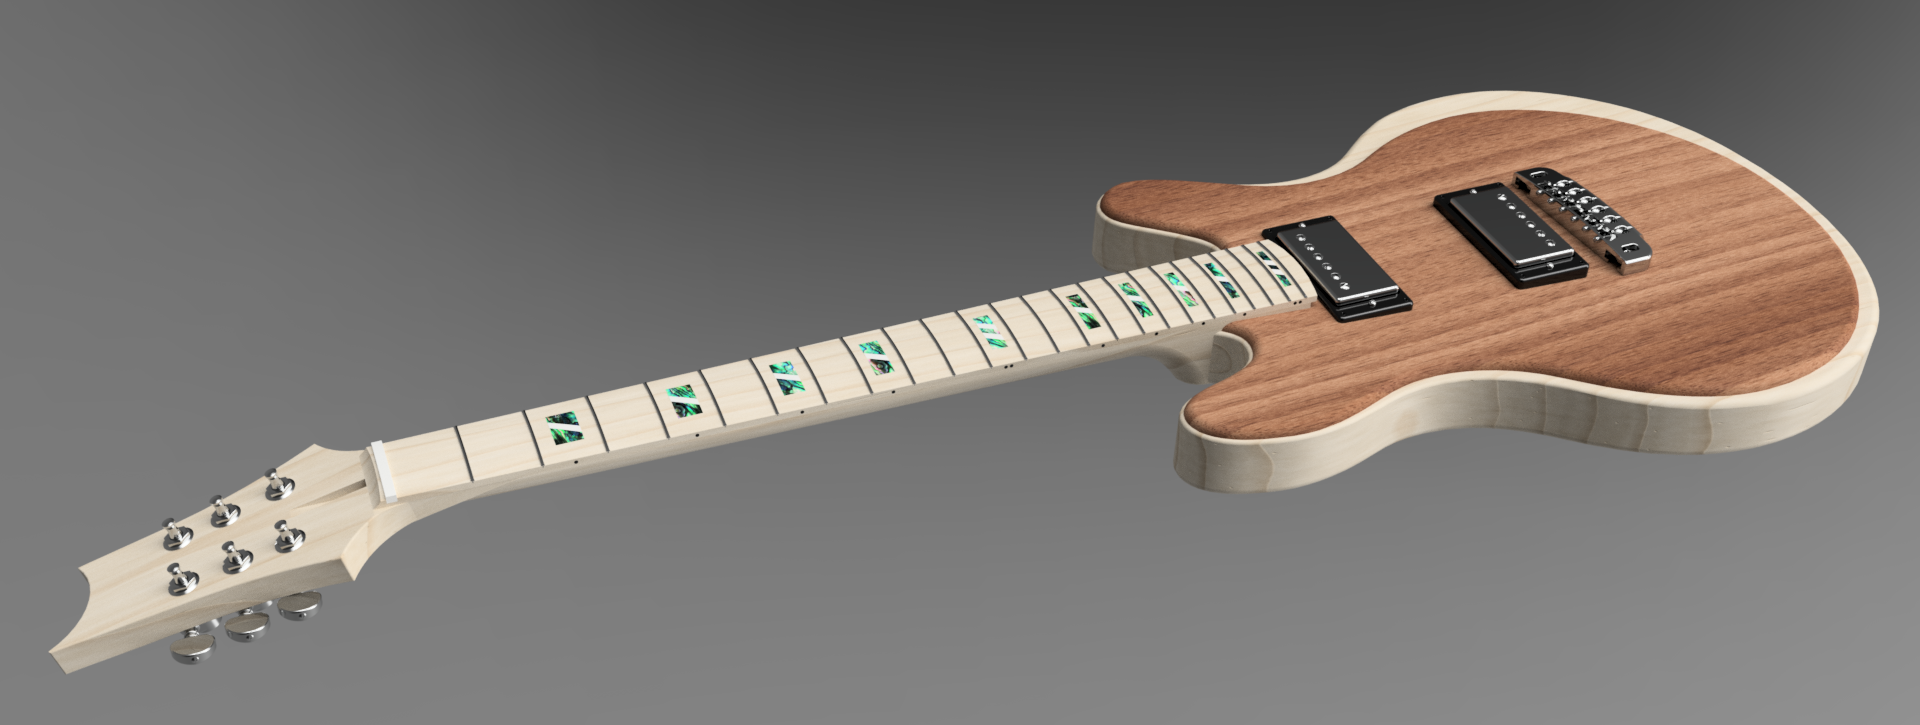
Thirdly the colours and textures had to be updated with a newer model that had been supplied by Alex Pritchett.
Week 6- Model version two intergration
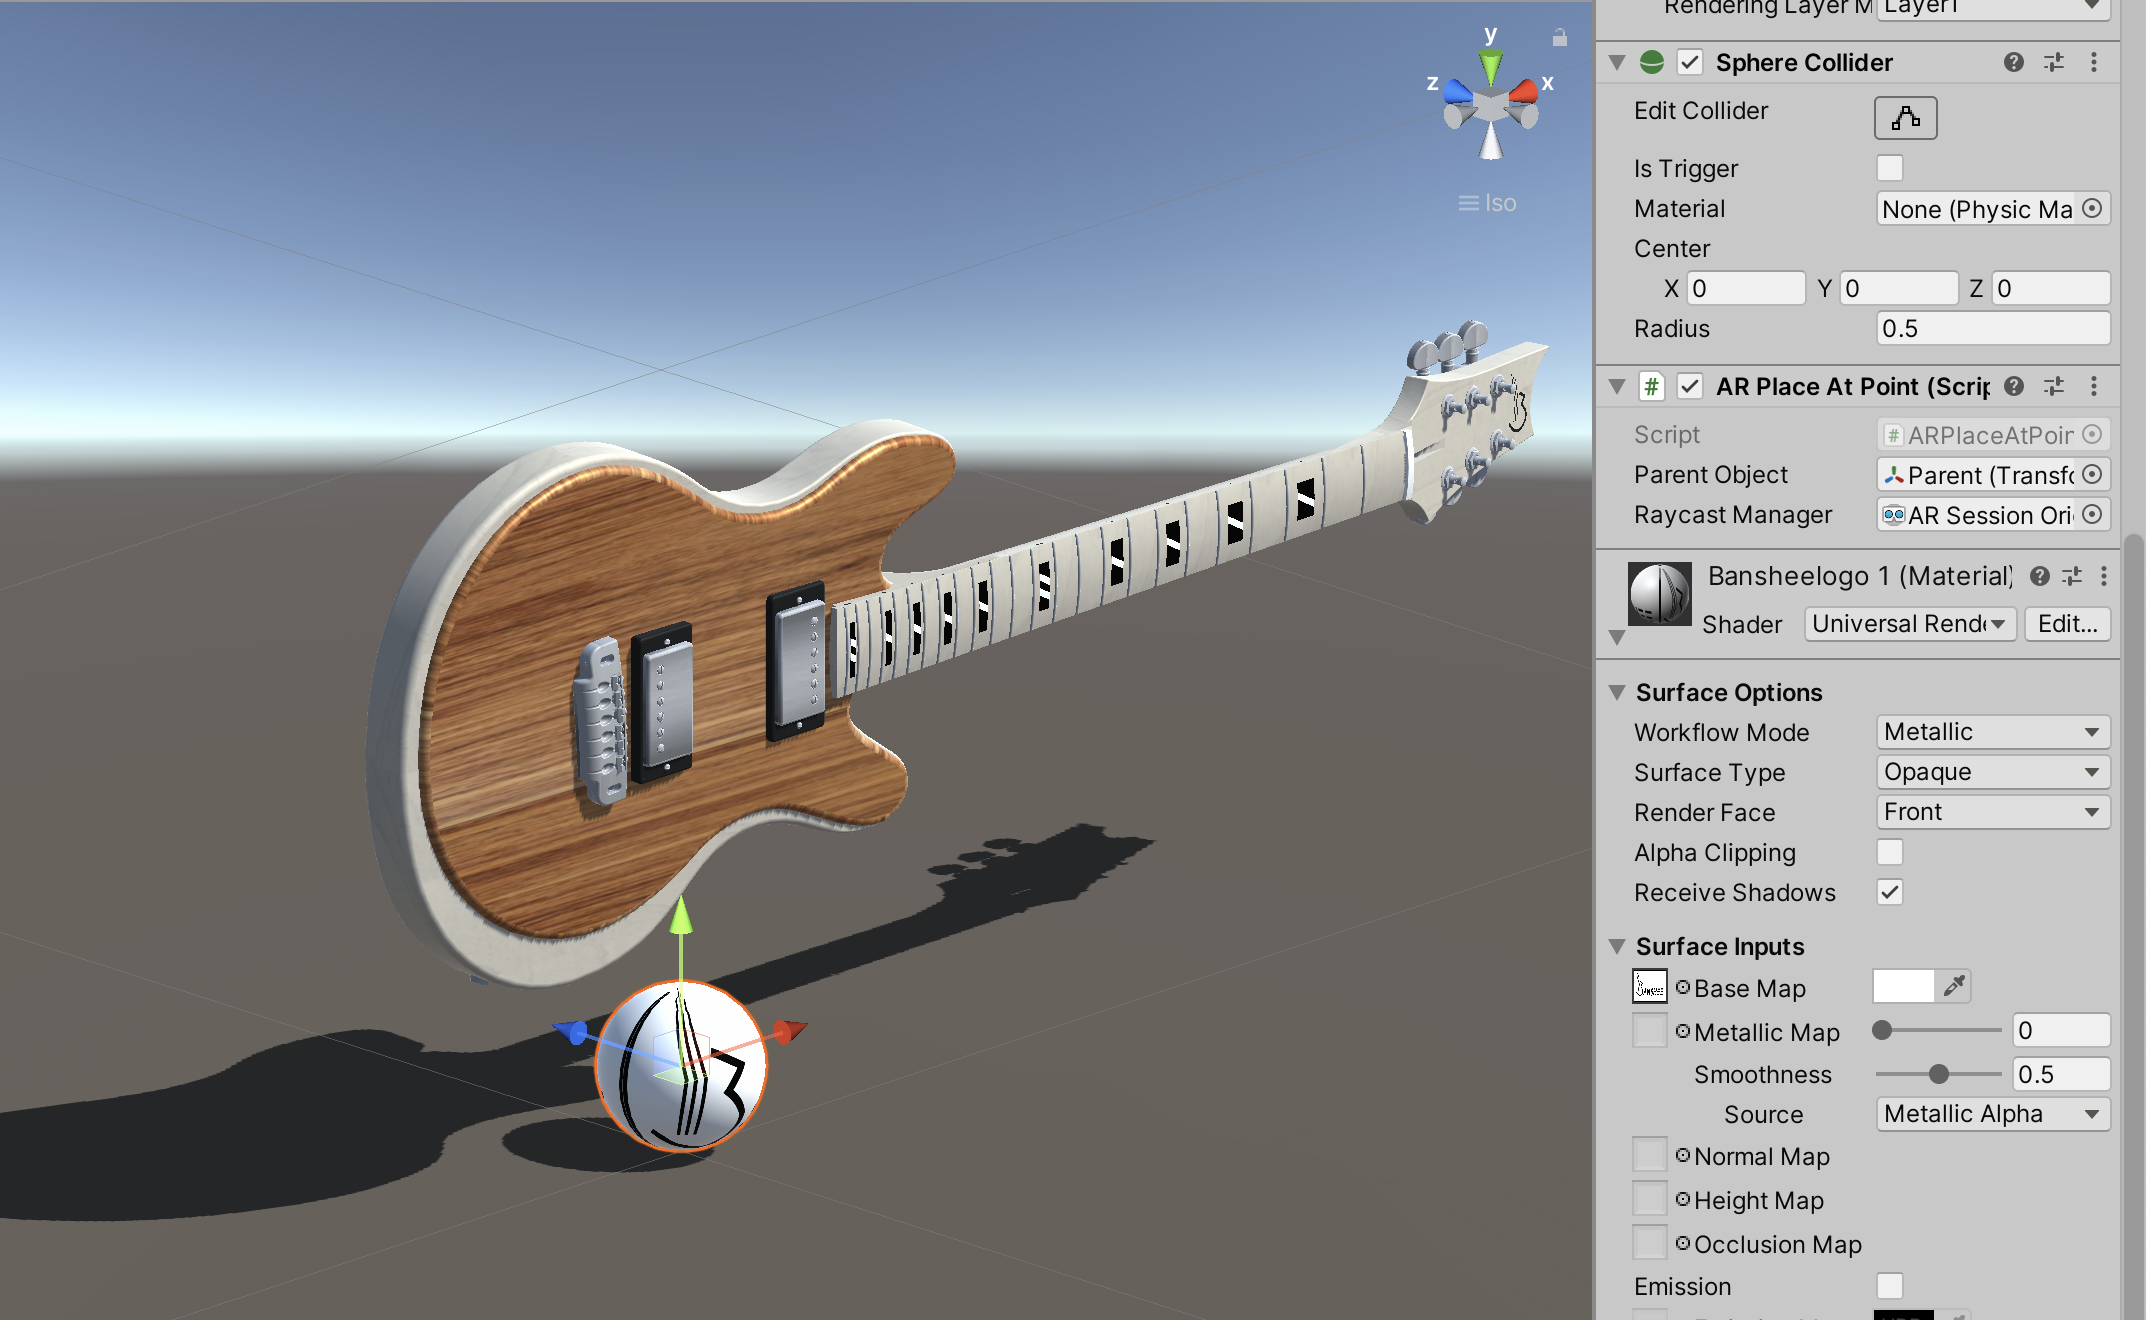
Next I imported the new and improved model into Unity, and dragged it over the pre-existing model, enabling the exact same location of the two models to be identified.
After re-adding the same scripts to the model, I then built out the augmented model onto my device, showcasing the current textures that the model has. However the base textures that the model had, was not the correct.

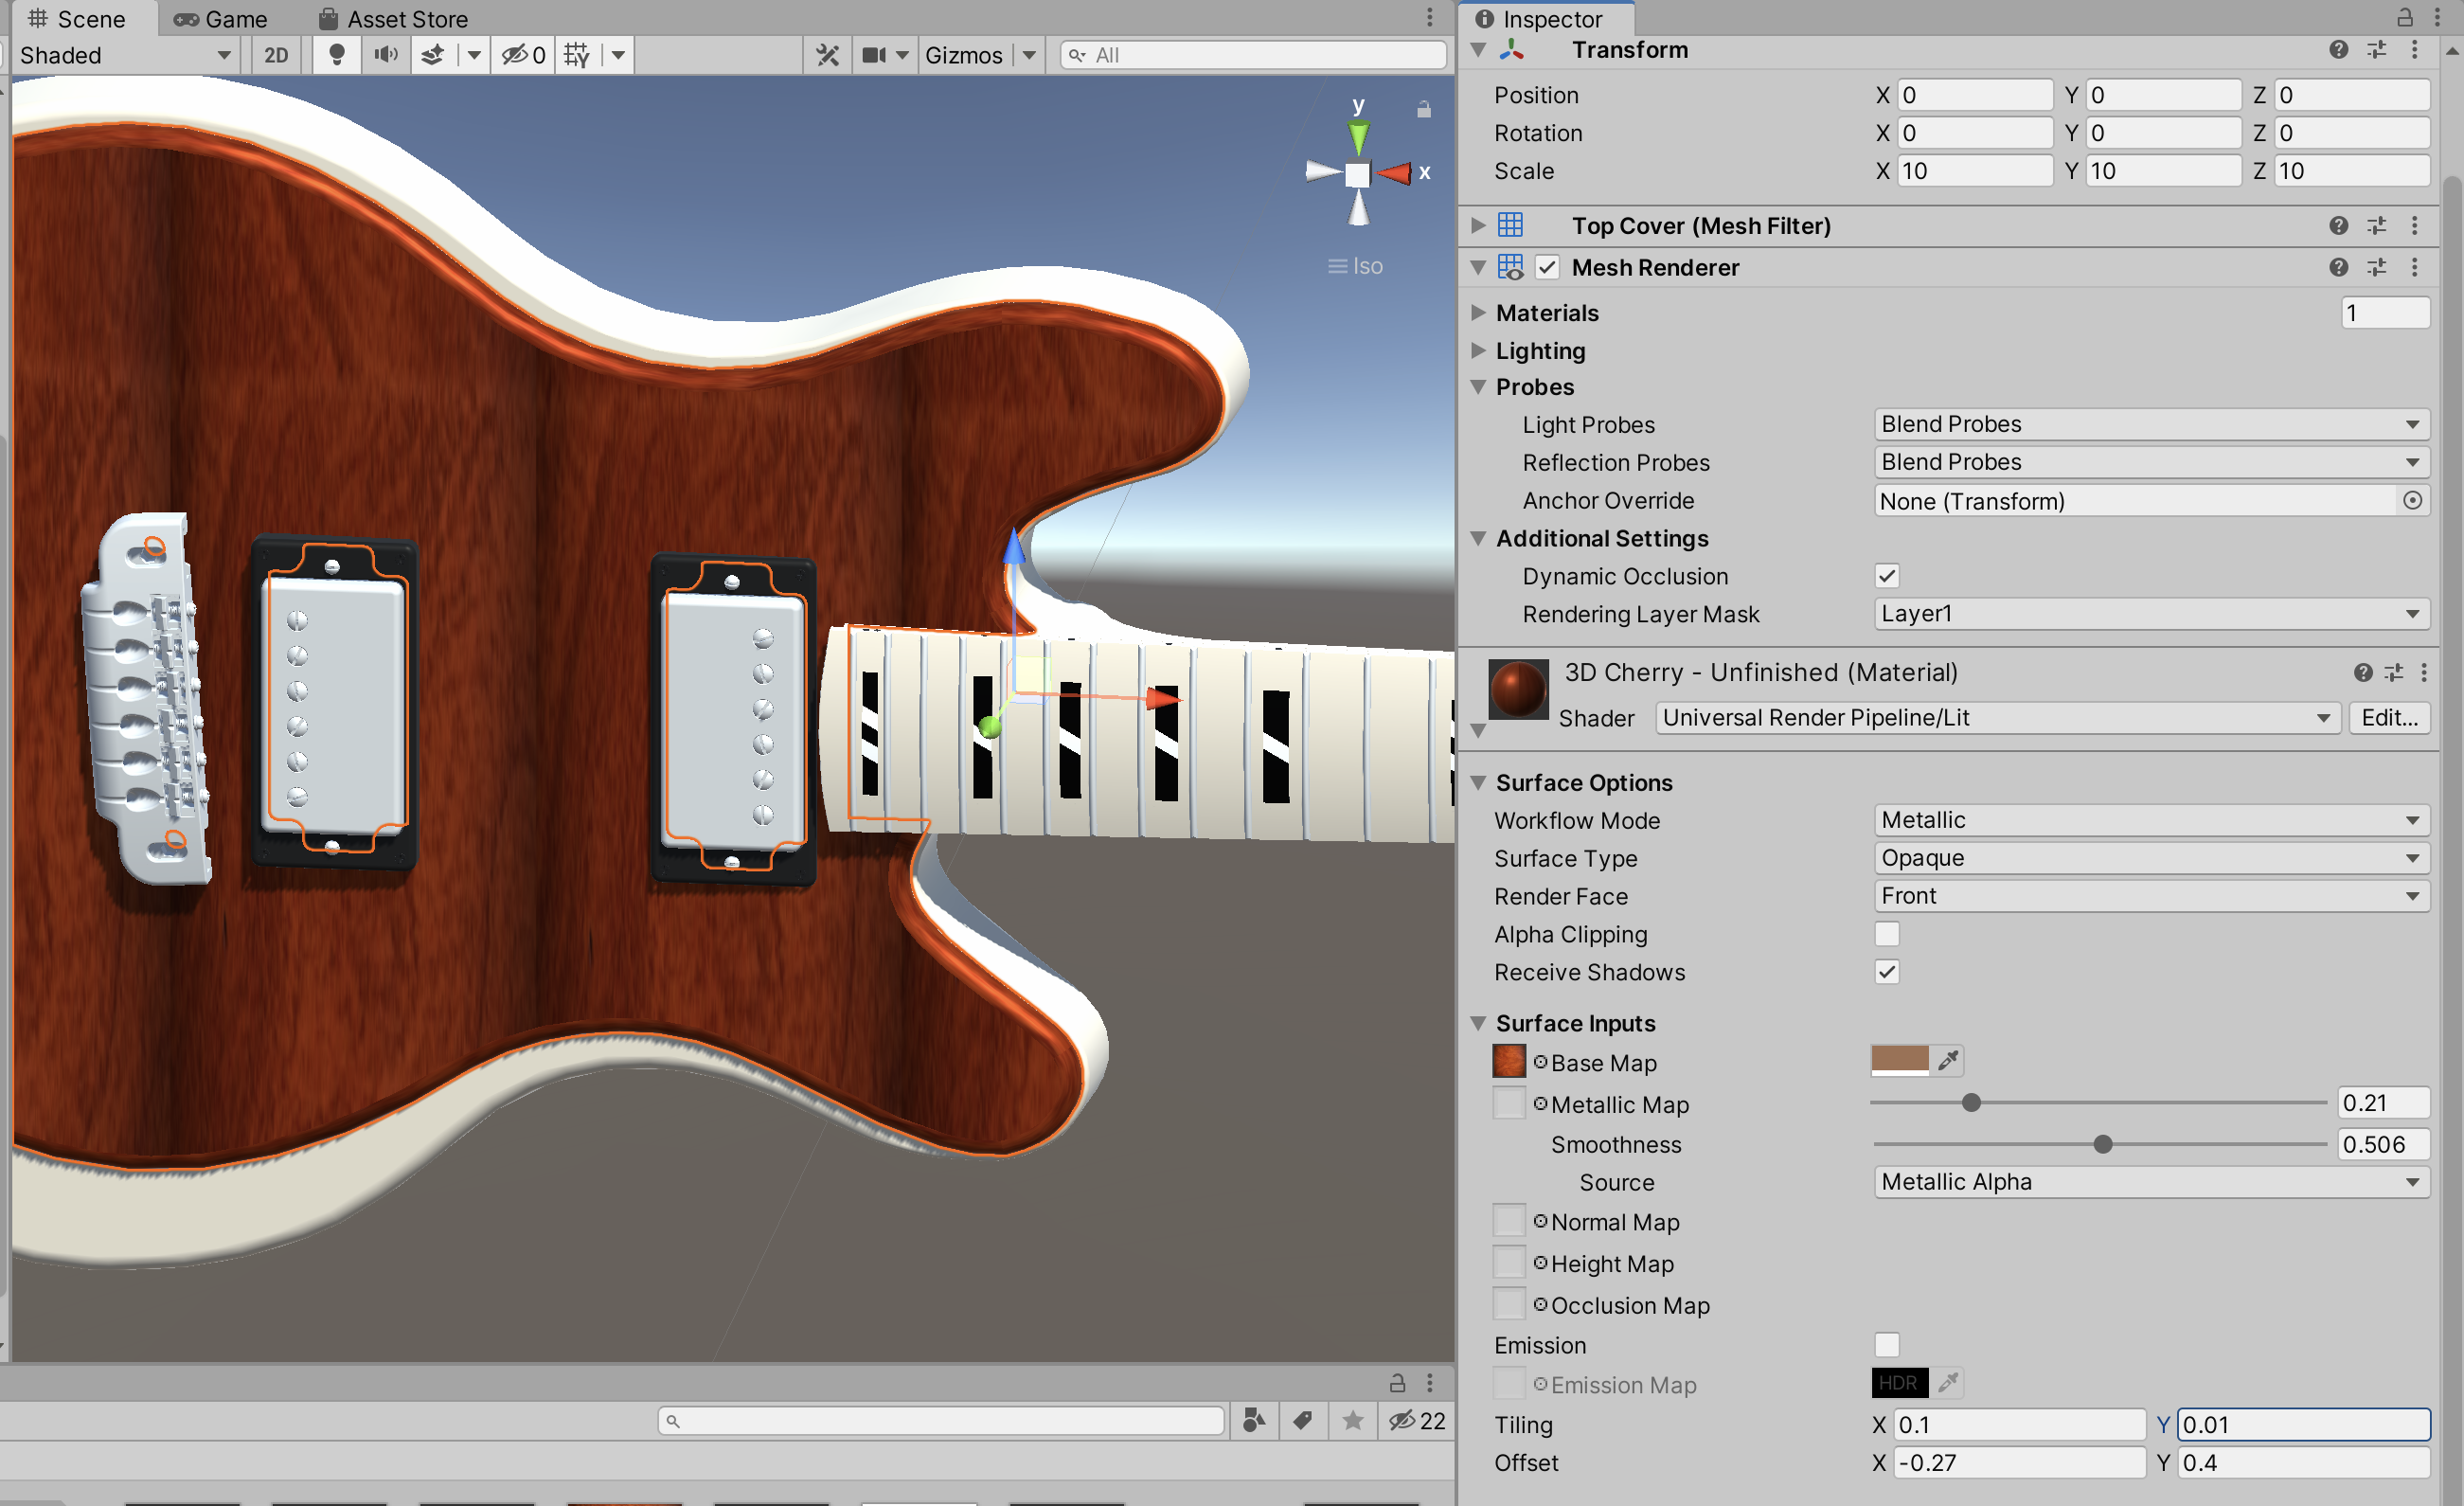
As a result I downloaded a test PNG of a red Cherry Wood texture and imported it into the Unity Build. Next I dragged it into the Base Map, within the Surface Option to test the colouration.
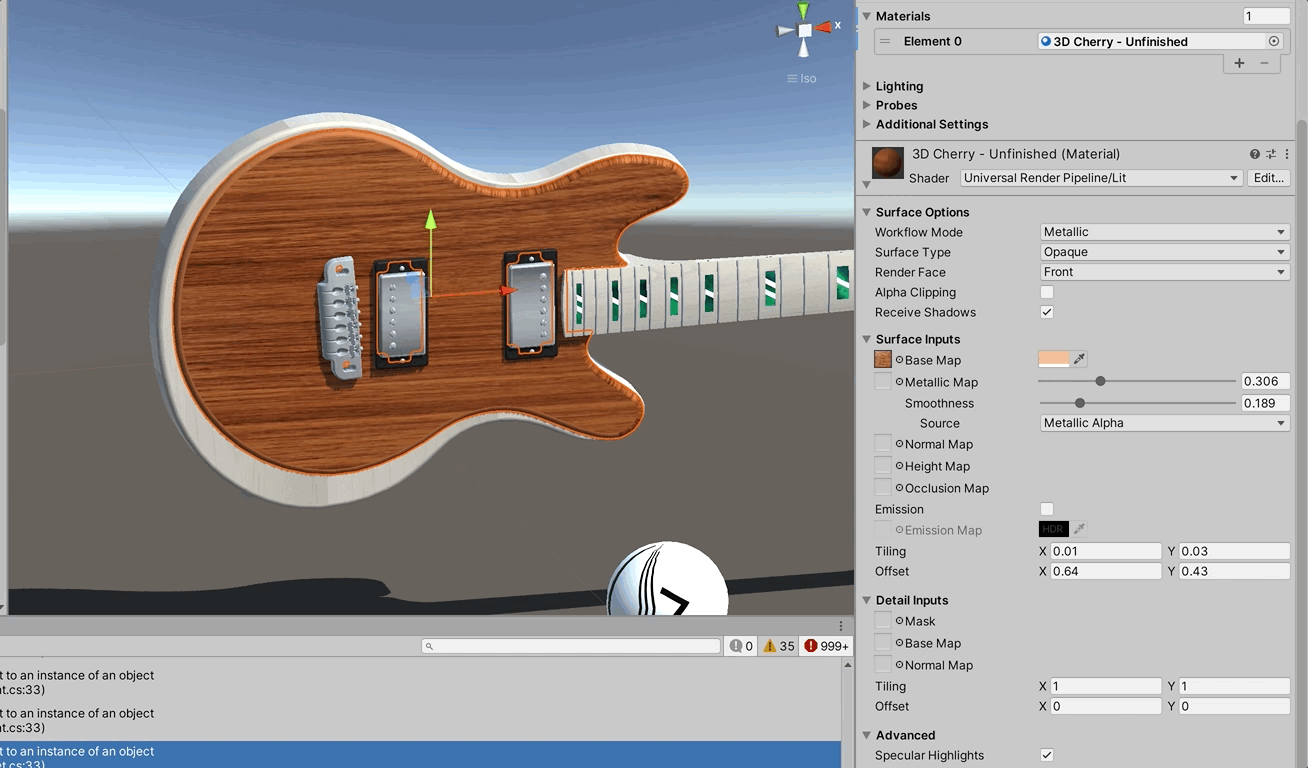
The previous cherry wood colouration was too dark, so I downloaded a lighter Cherry wood coloration. In order to arrange the wood grain, I altered the Tilling and Offset options to pick the preferred look of the wood grain.
Finally I changed the Sphere’s look, where I added the Banshee UI logo, personalising the look of the application.
Colour Changer
The next step was to implement a colour changer script into the AR application, enabling users to choose certain wood finishes or colours for what Banshee offer as a custom Guitar application. I located a YouTube tutorial that enables a Car to change colour based on a selected colouration Augmented Reality for Everyone.
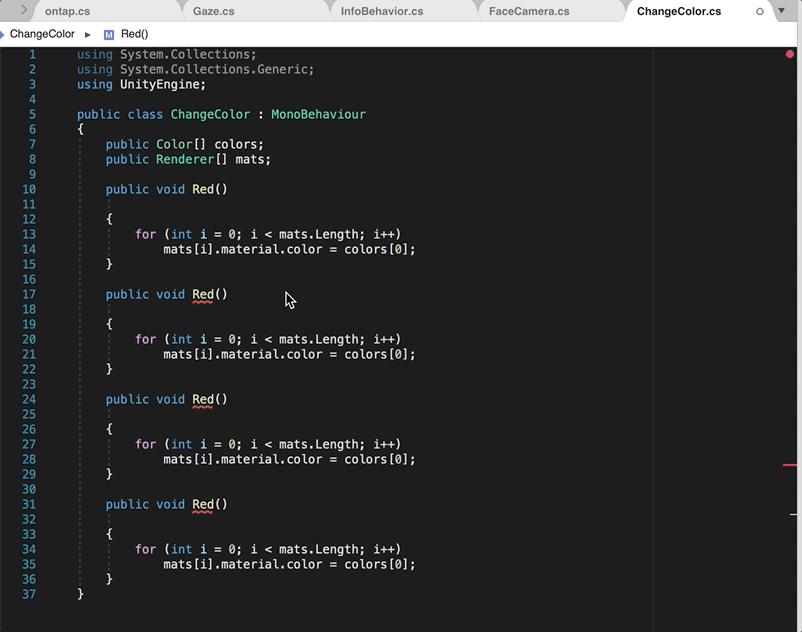
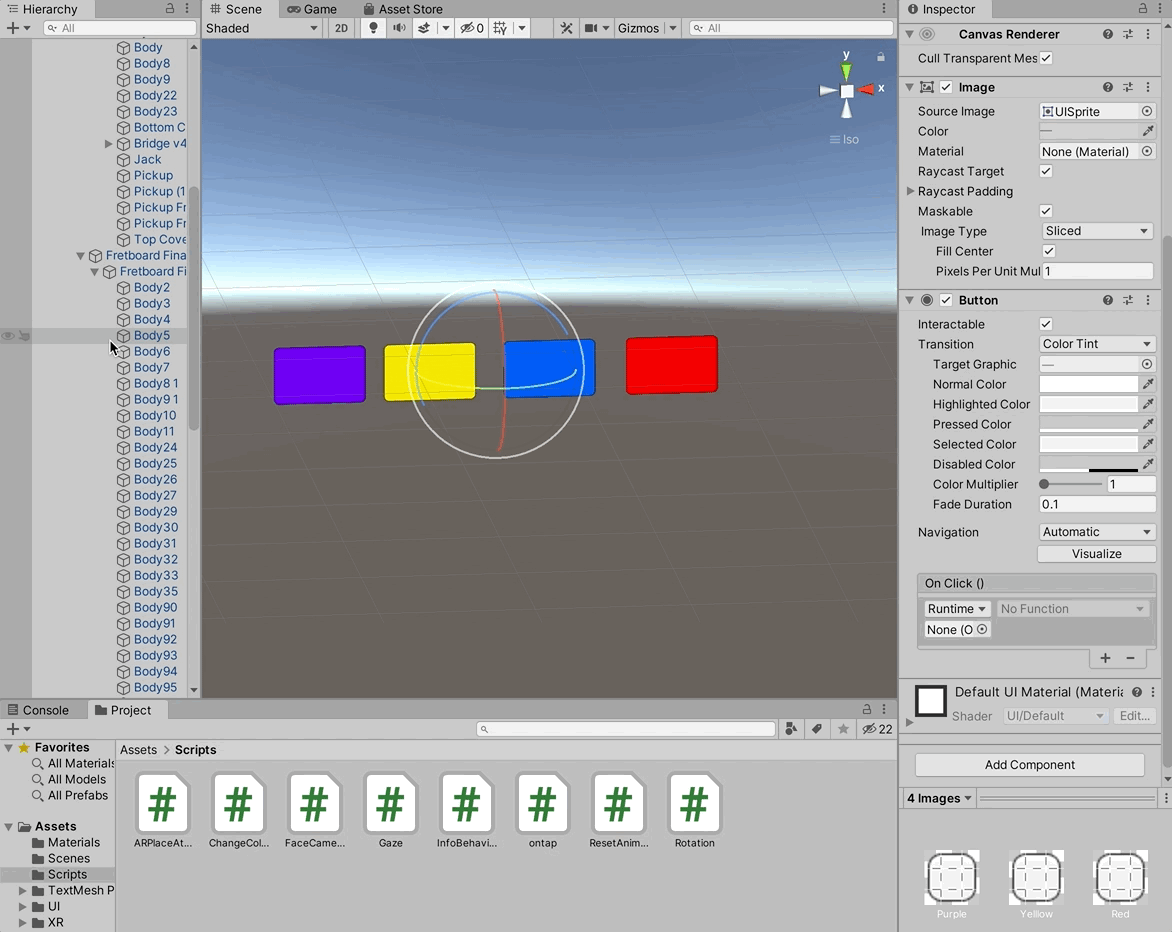
Within the script, I then created a ChangeColour.cs file that enabled colourations to be attached to the file. Next I wrote a public void with ‘Red’ making it public in the inspector menu. I then wrote a script enabling each colouration to be added onto the model. The script therefore allows the colouration and the particular element of the model to be altered and changed. These title colours would then show up in the inspector menu.
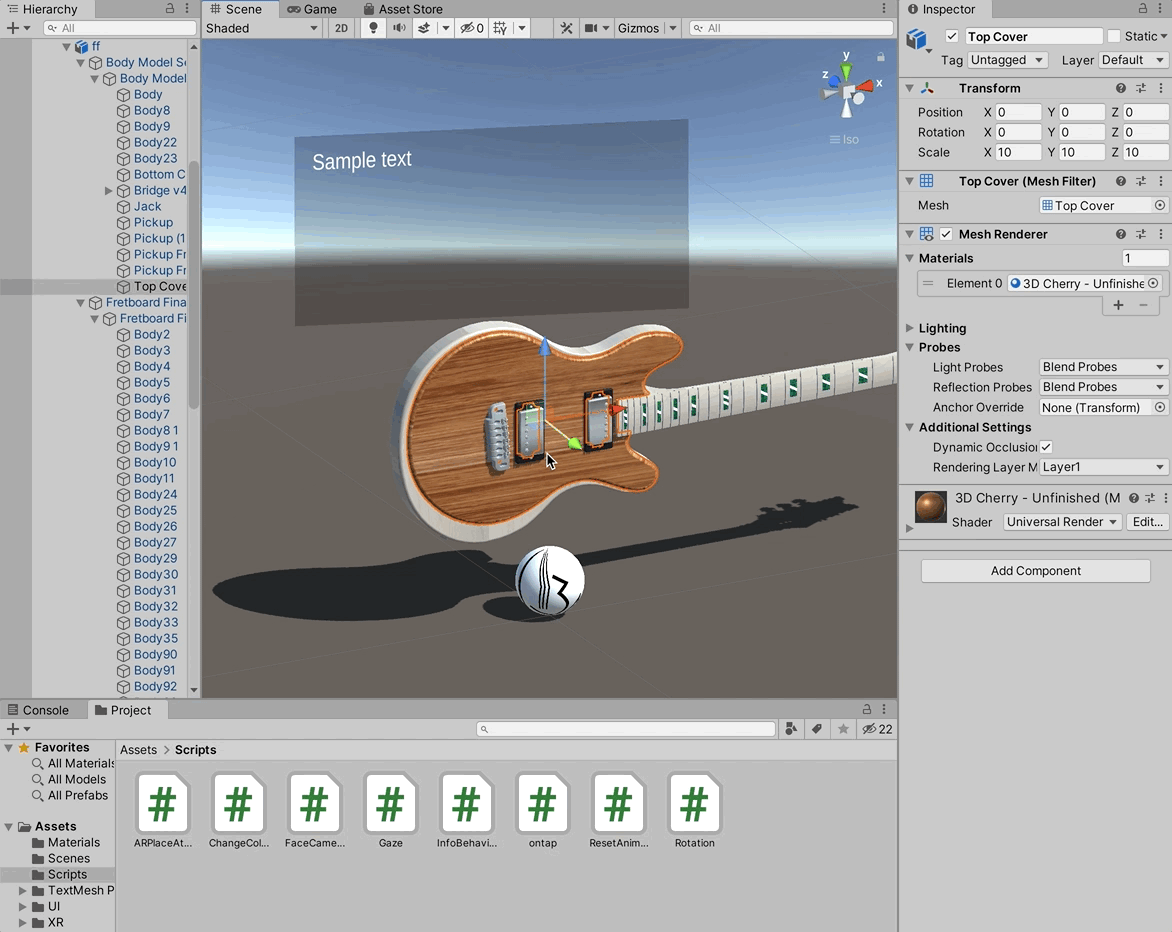
Next I assigned each colouration to the Top Cover of the model, thus enabling multiple colour options to be enabled.
I then assigned the ColourChanger game object that contains the script option to the appropriate button.
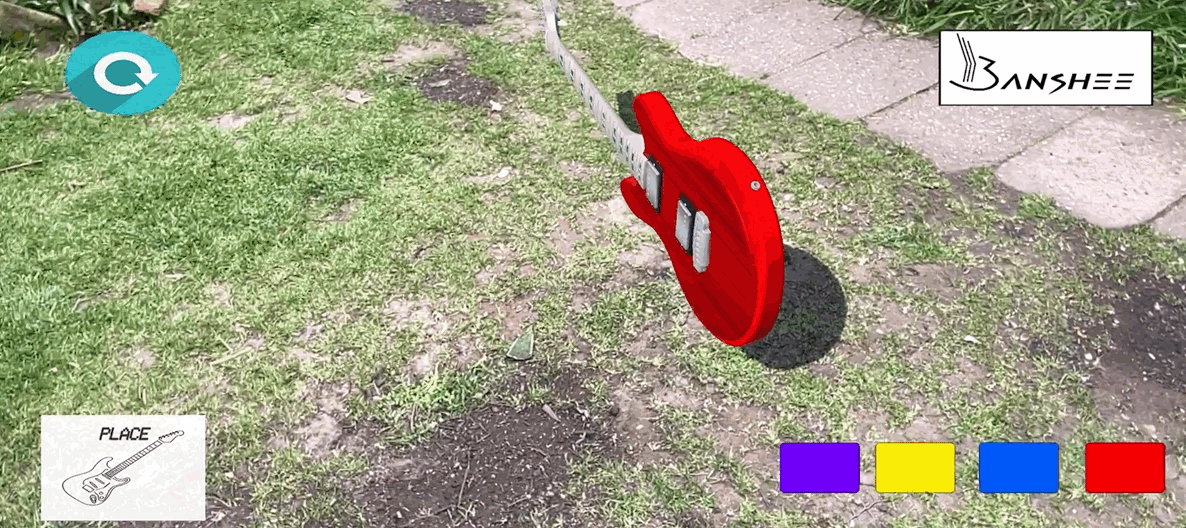
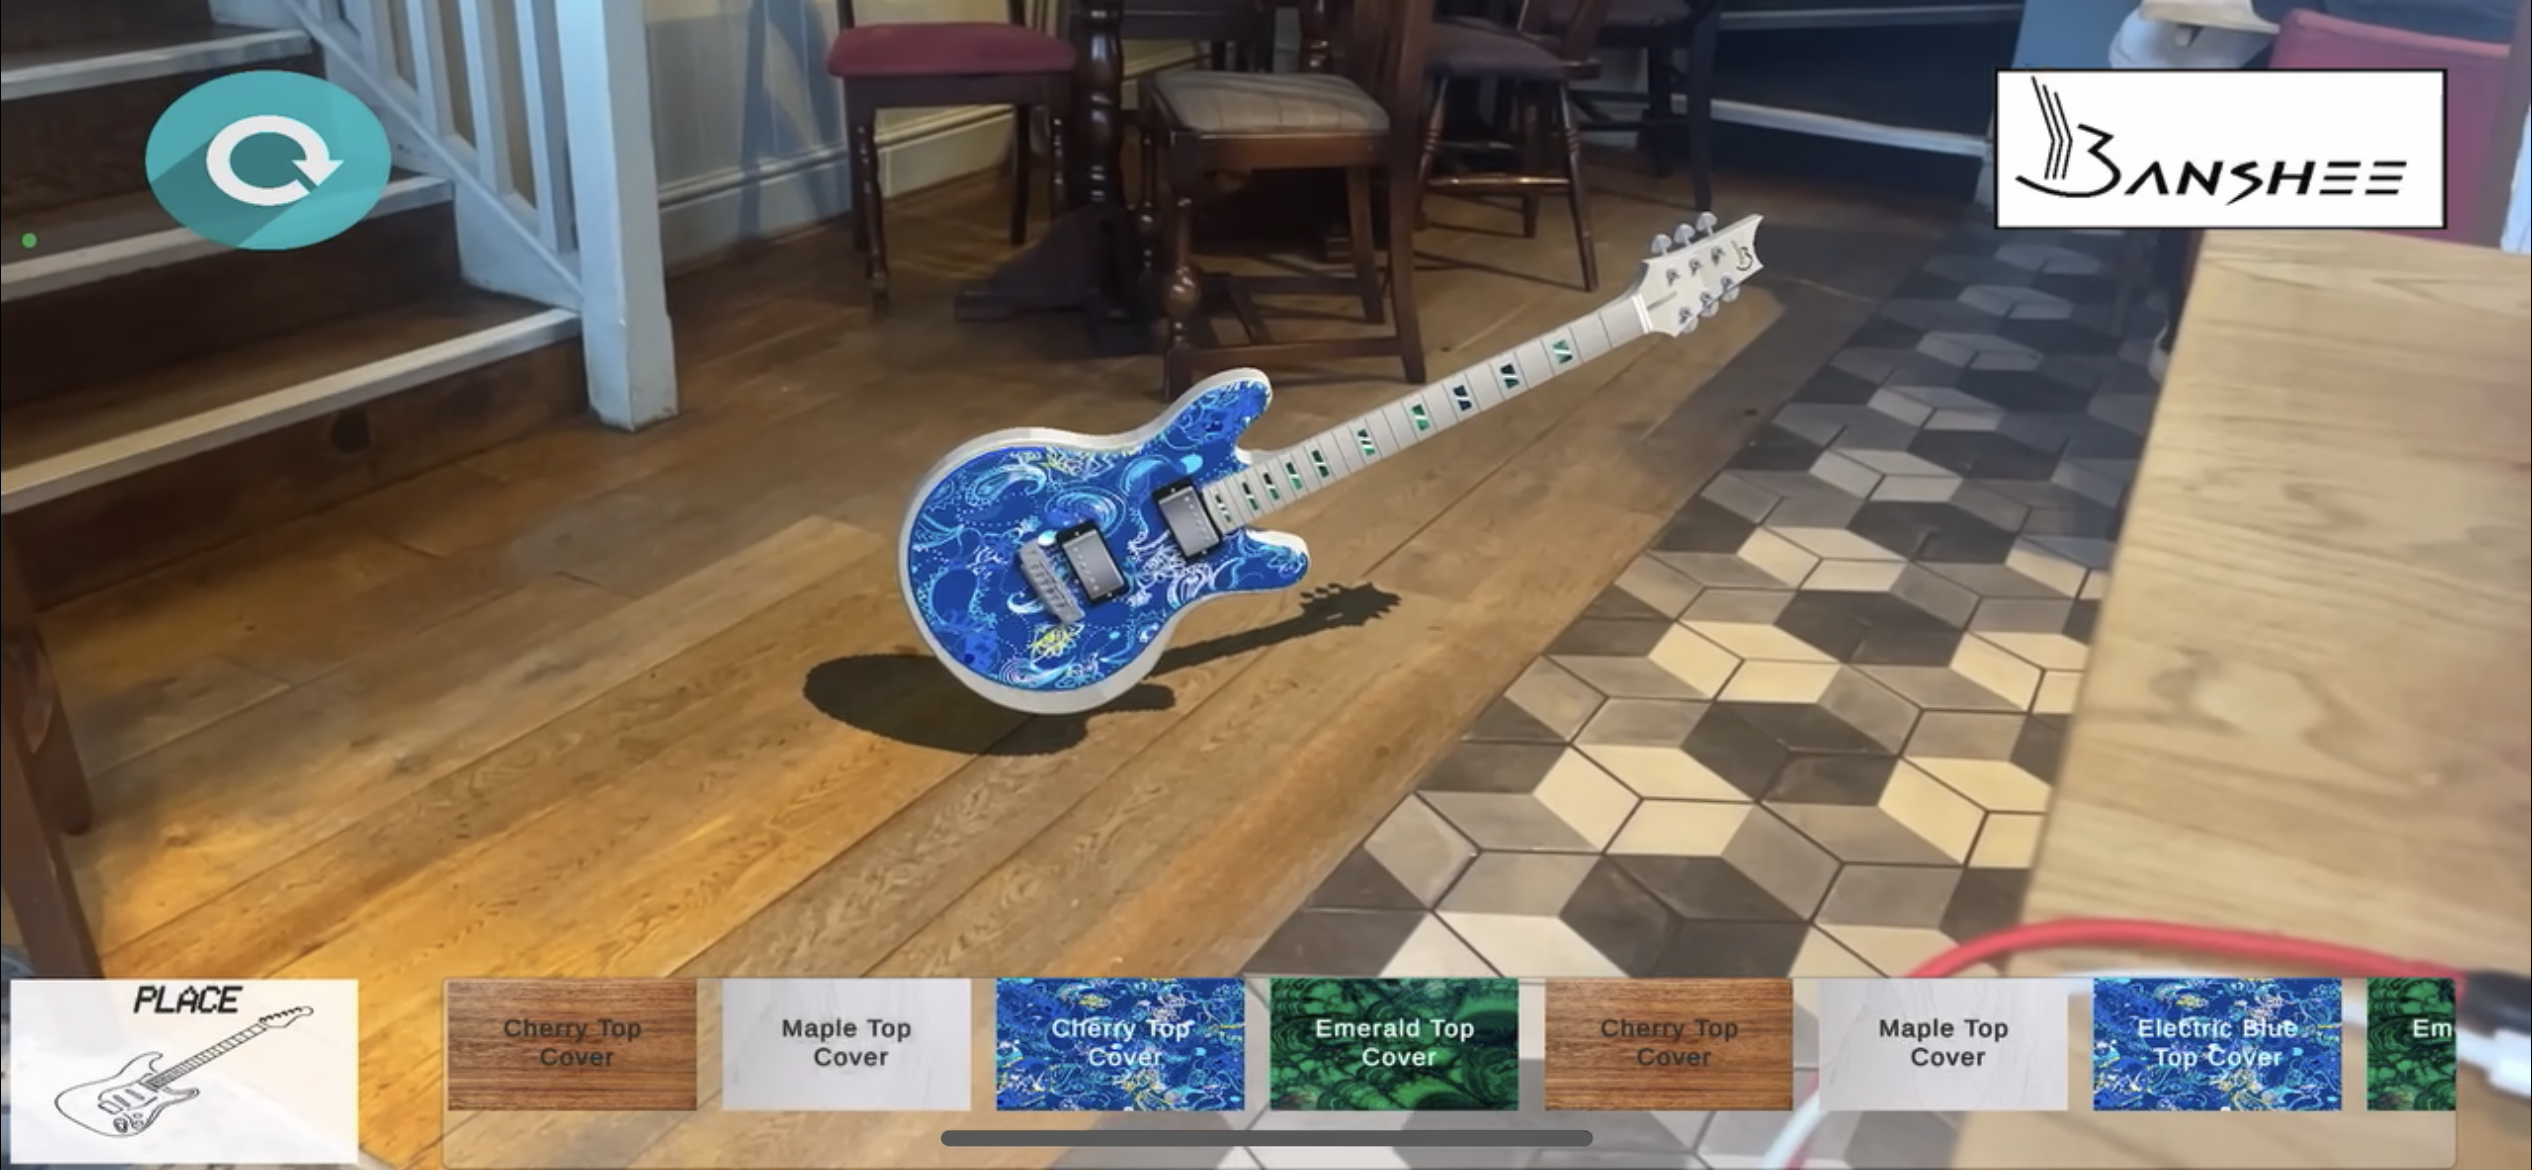
Here is the first demonstration of the AR application functioning with multiple colour options being selected, thus altering the colours of the Guitar.
This however wasn’t exactly the ideal situation, as. I want textured materials to be altered and not only colours to be altered. As a result I then located an online script on answers.unity.com that helped me understand how to assign materials using C# code.
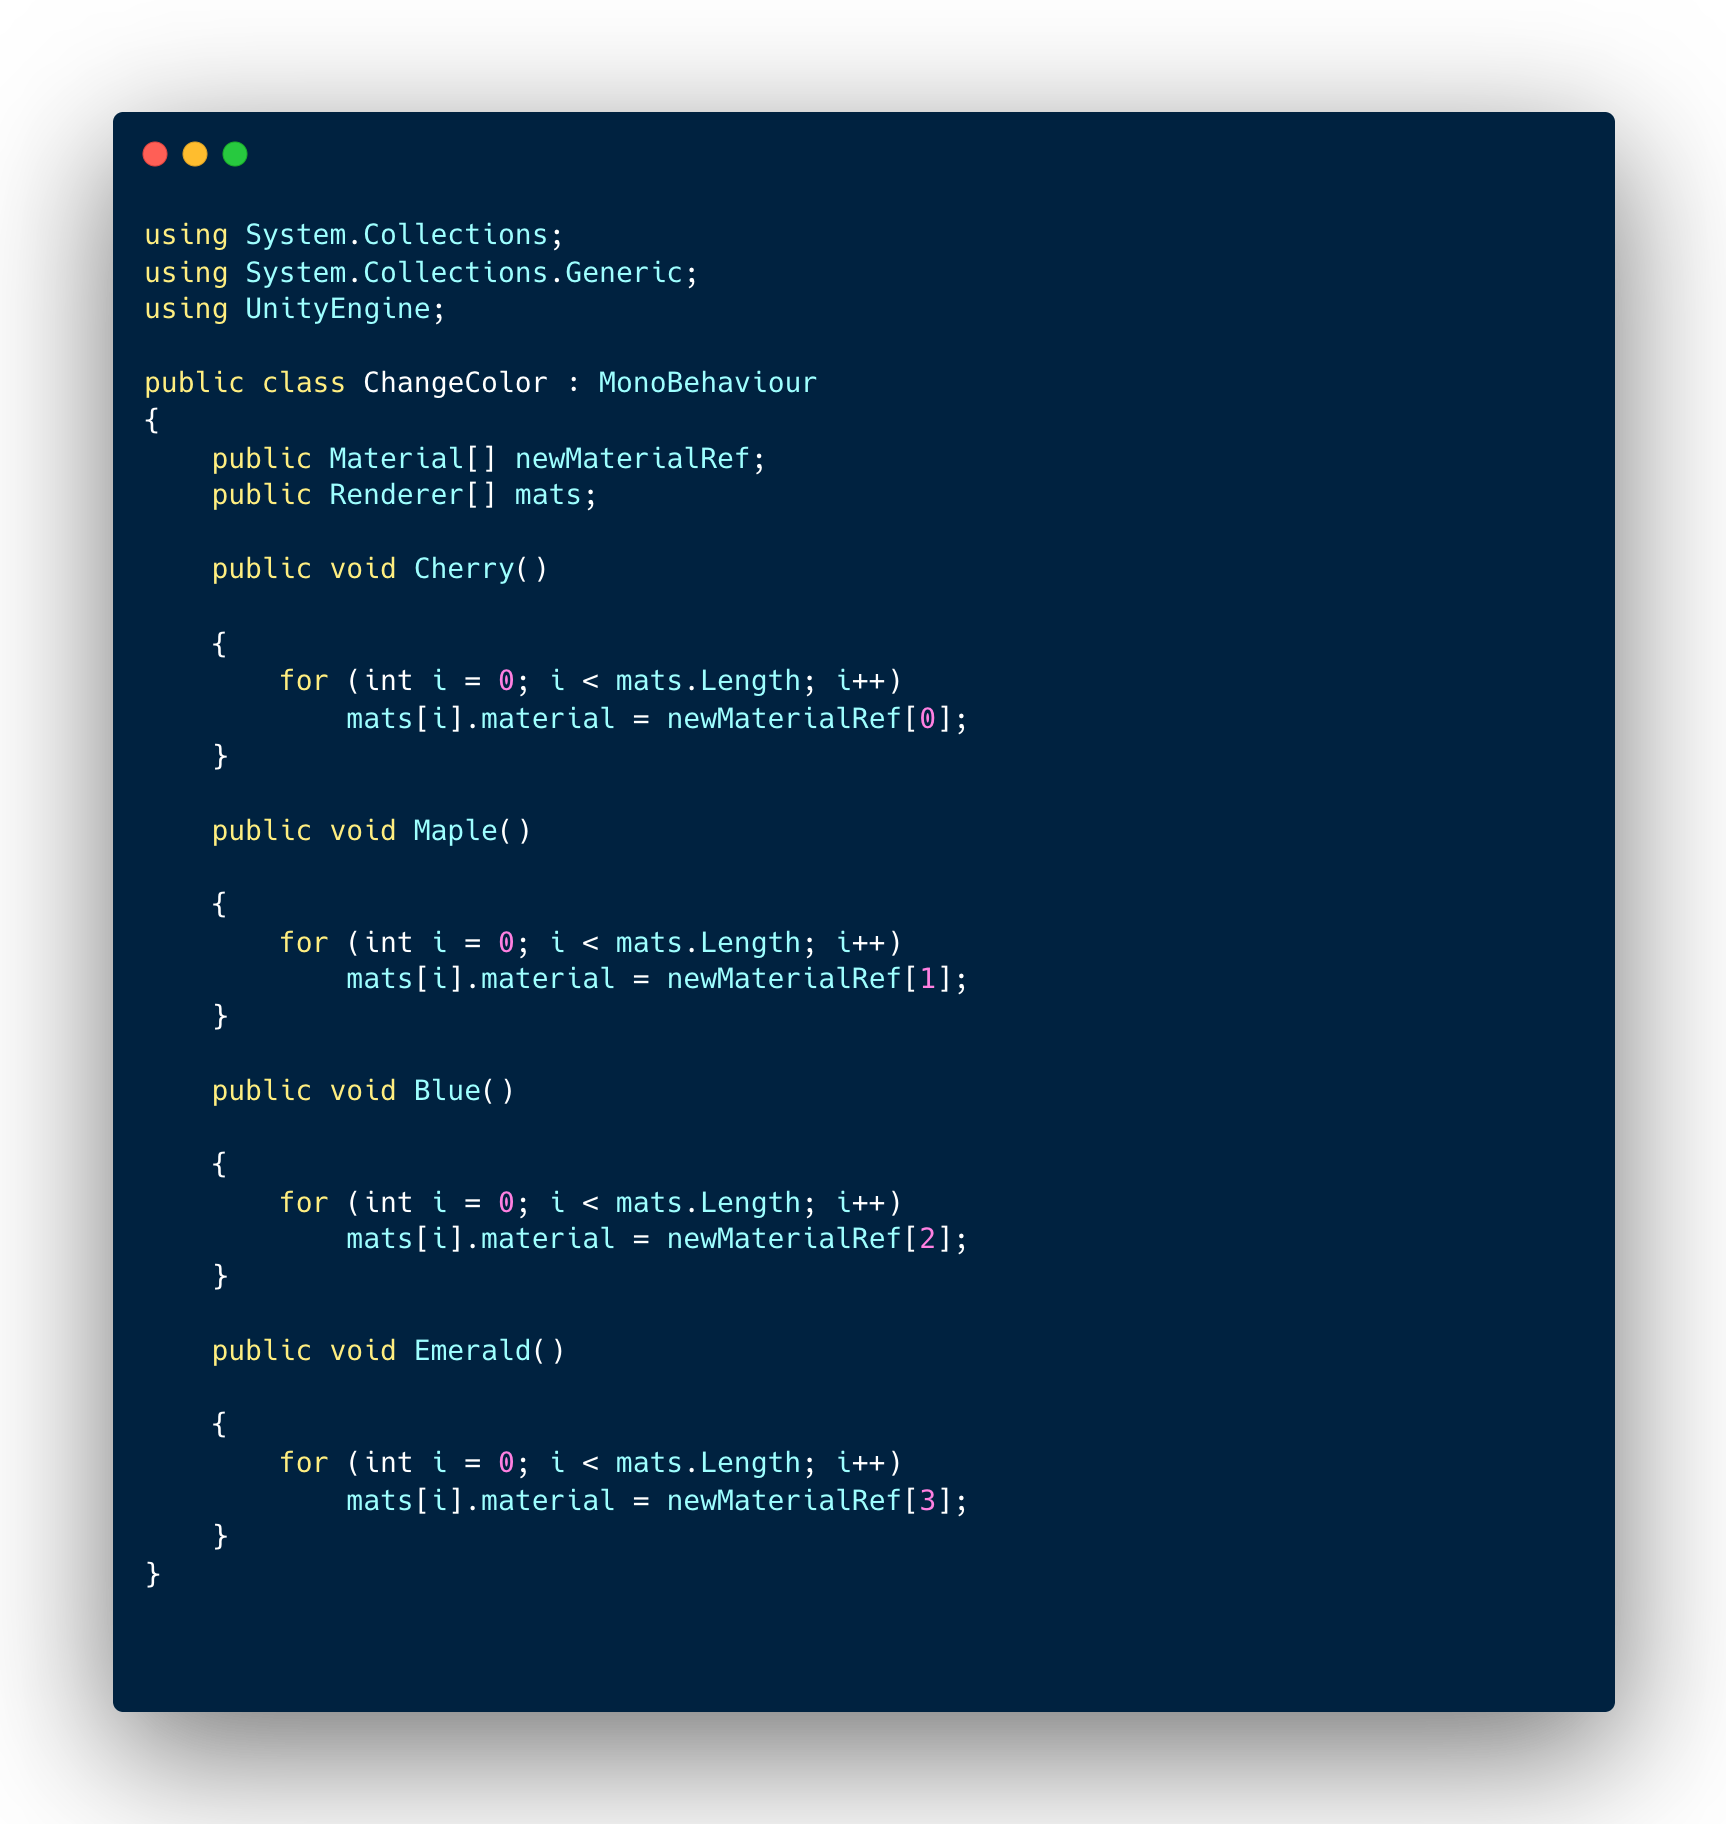
As a result I integrated ‘.material = newMaterialRef;’ into the script, thus enabling the material to assigned in the inspector.
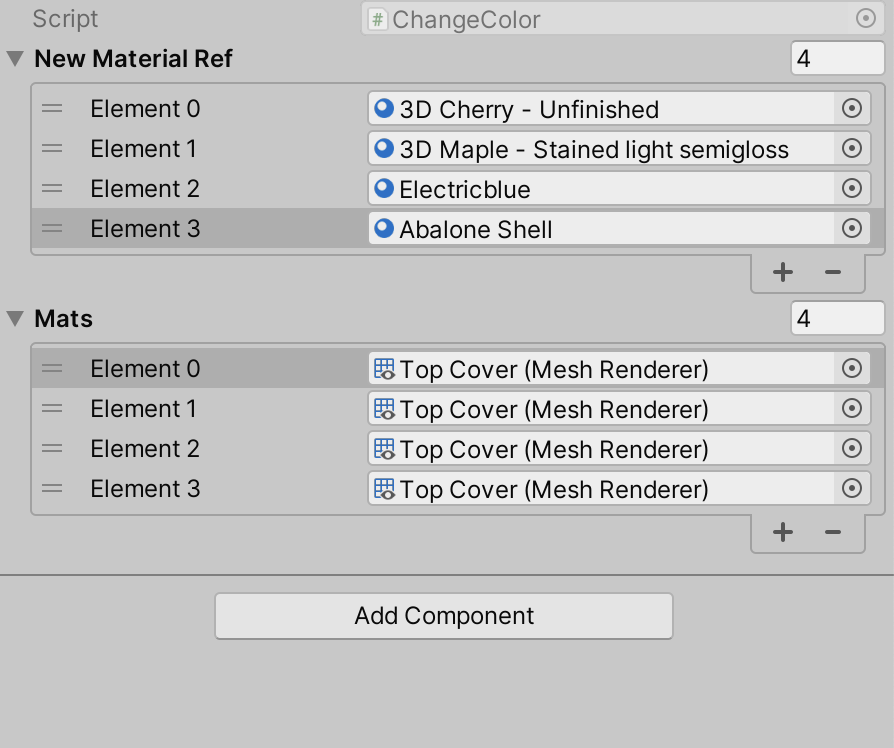
I then added four materials to the ChangeColour script.

Week 7-Asset interactivity
The next step was to create an interactive information sign post with the application, that I had previously used in first year with the Roundtable and interactive project from the YouTube account Third Aurora.
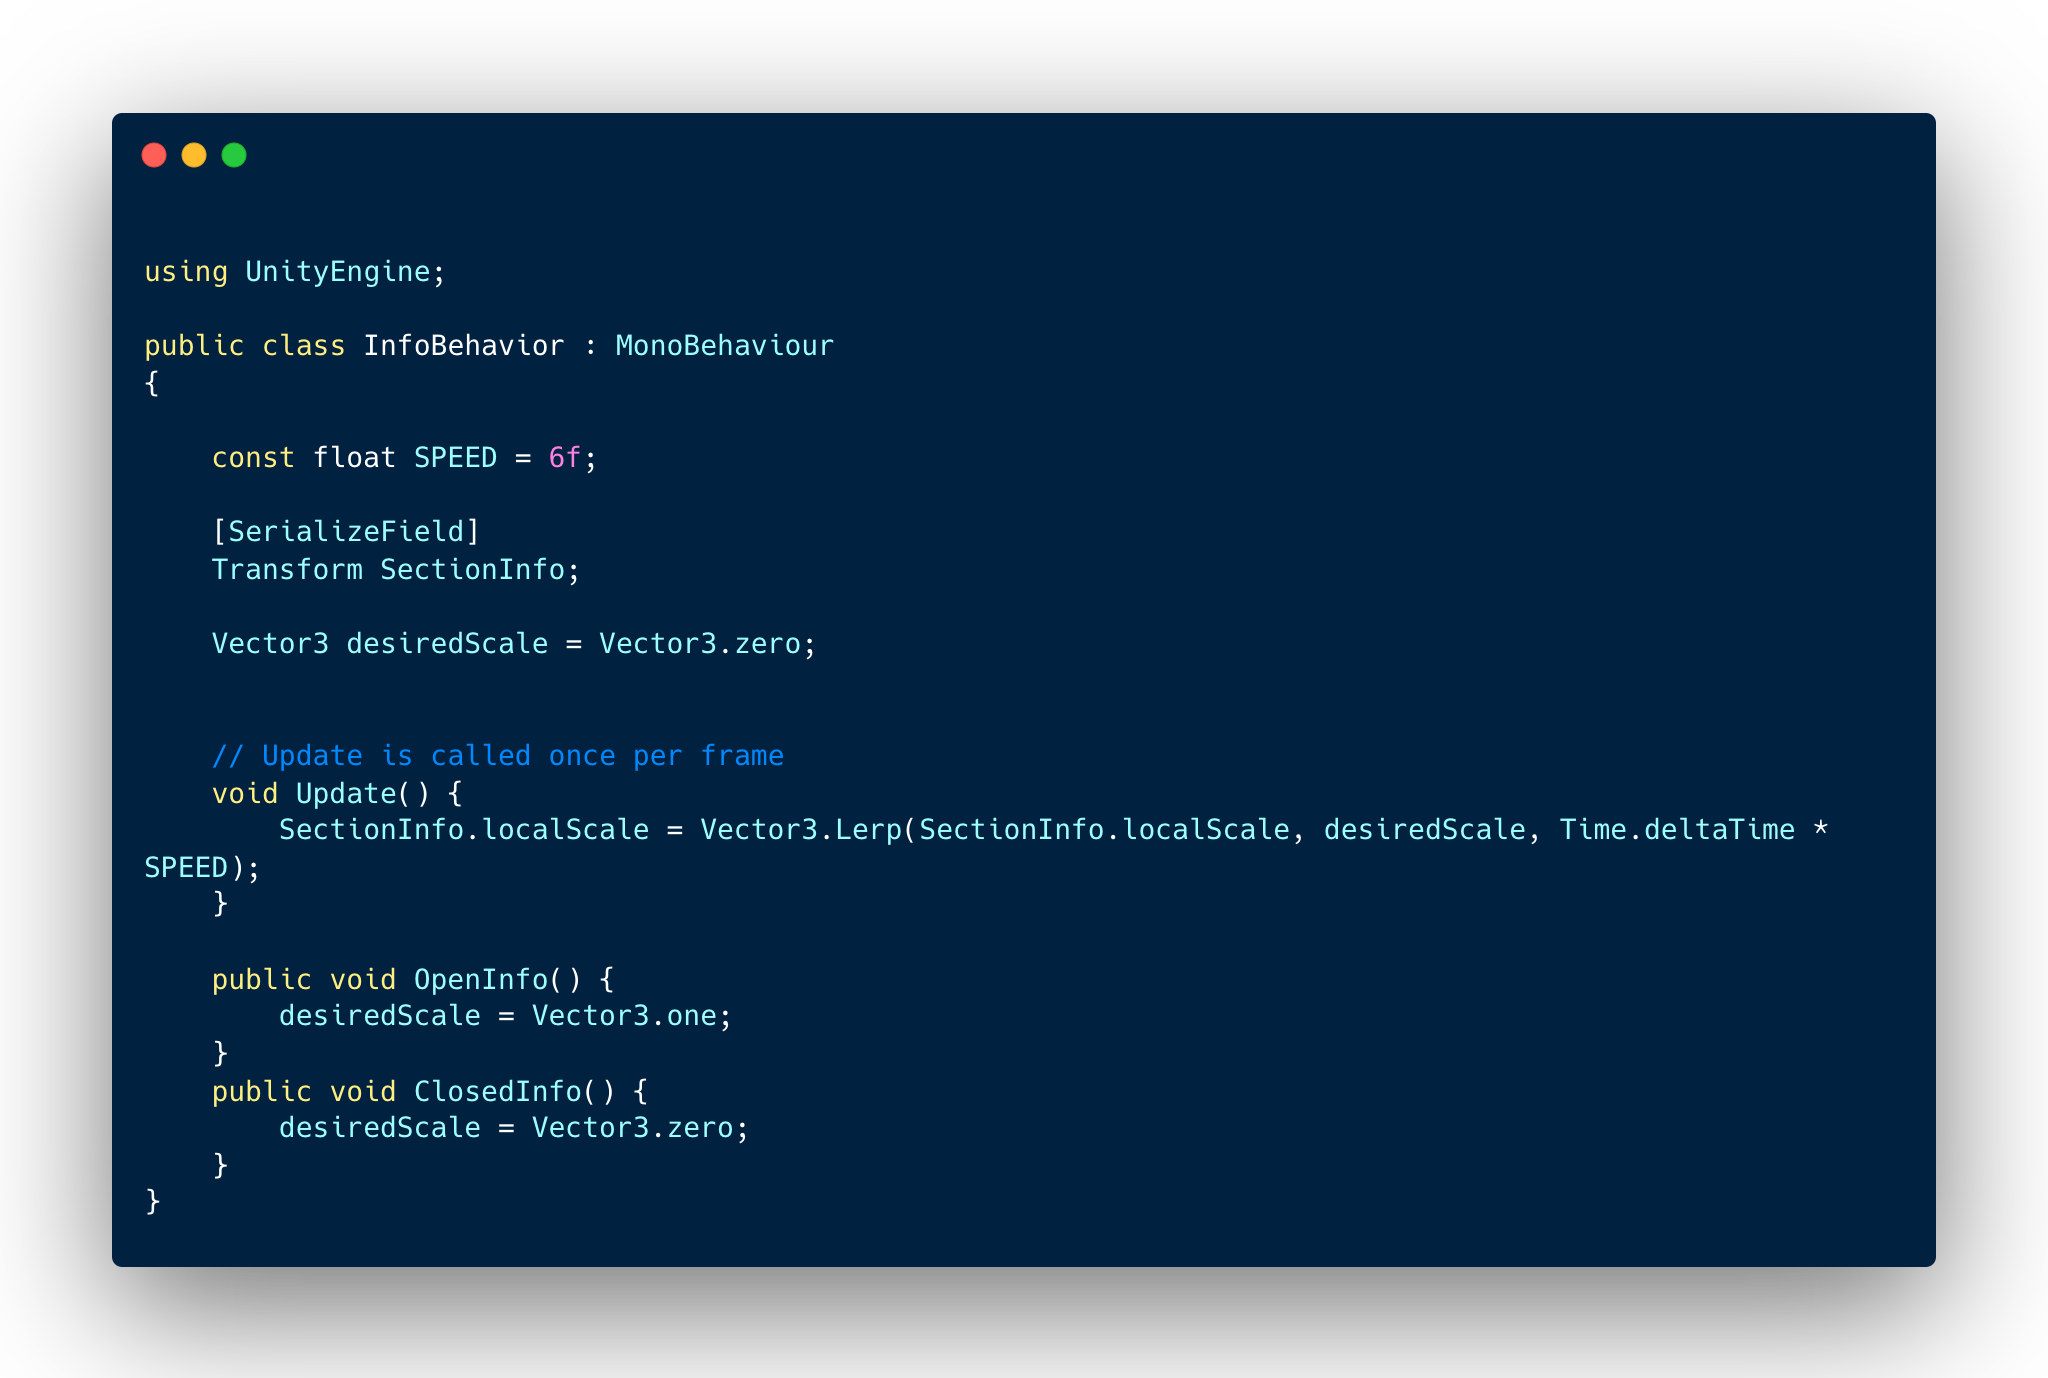
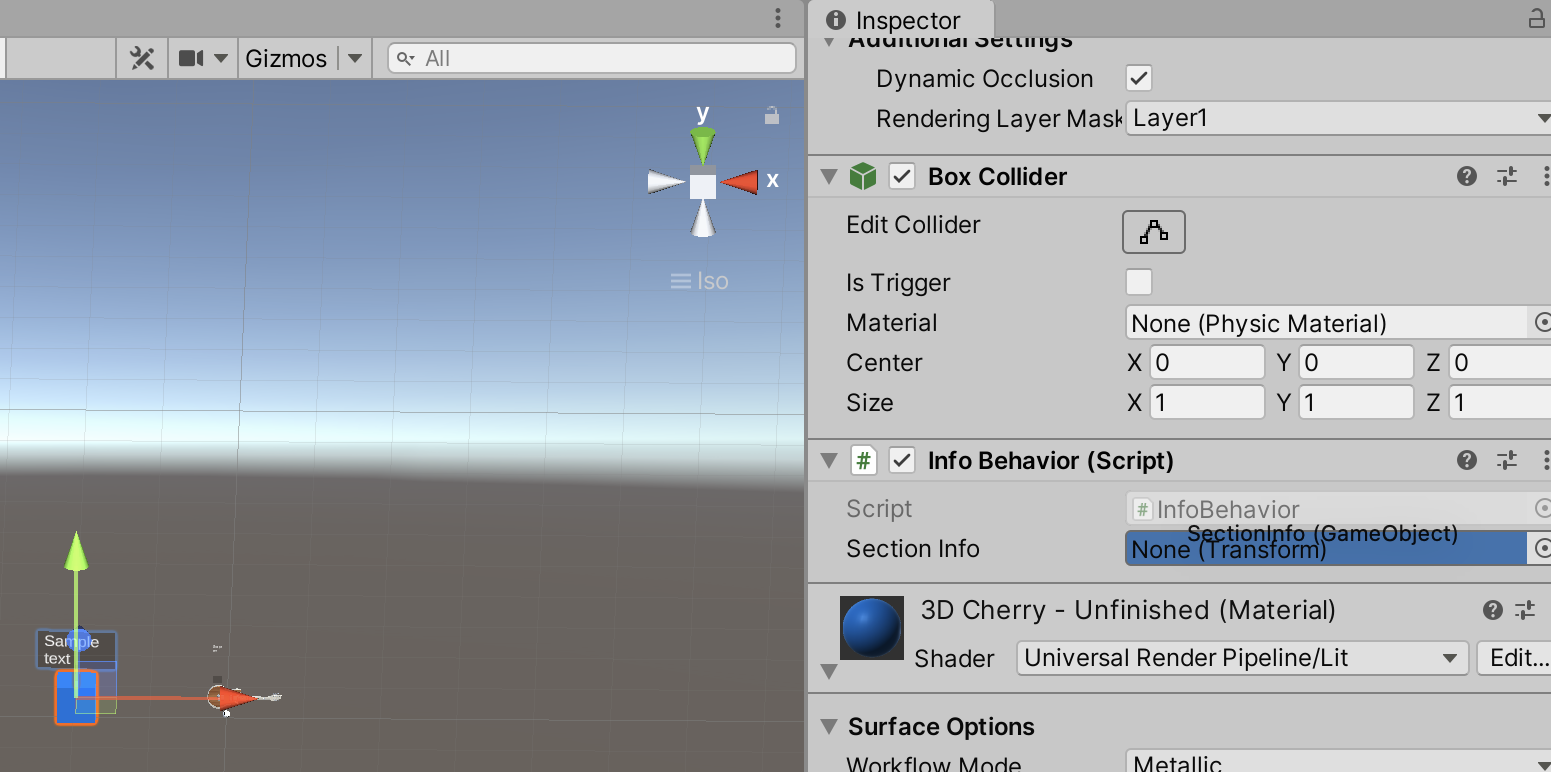
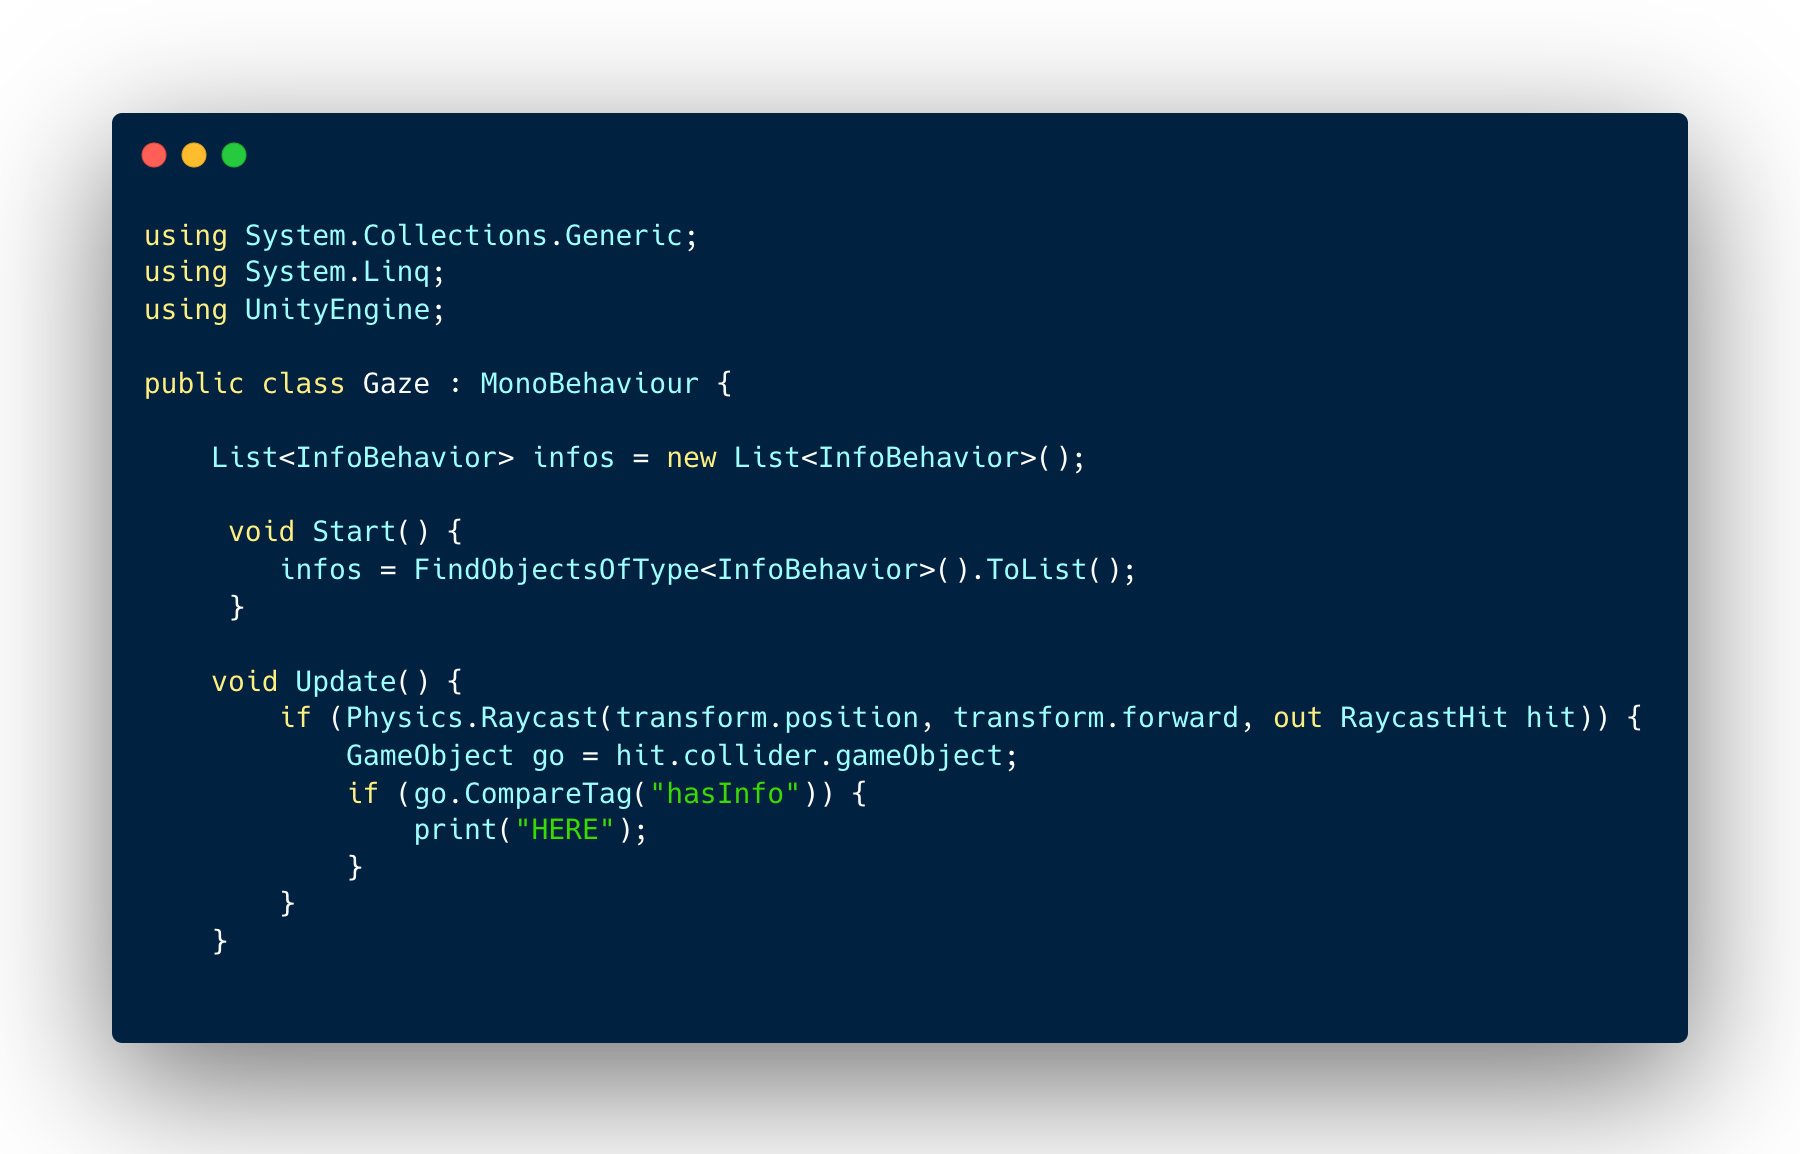
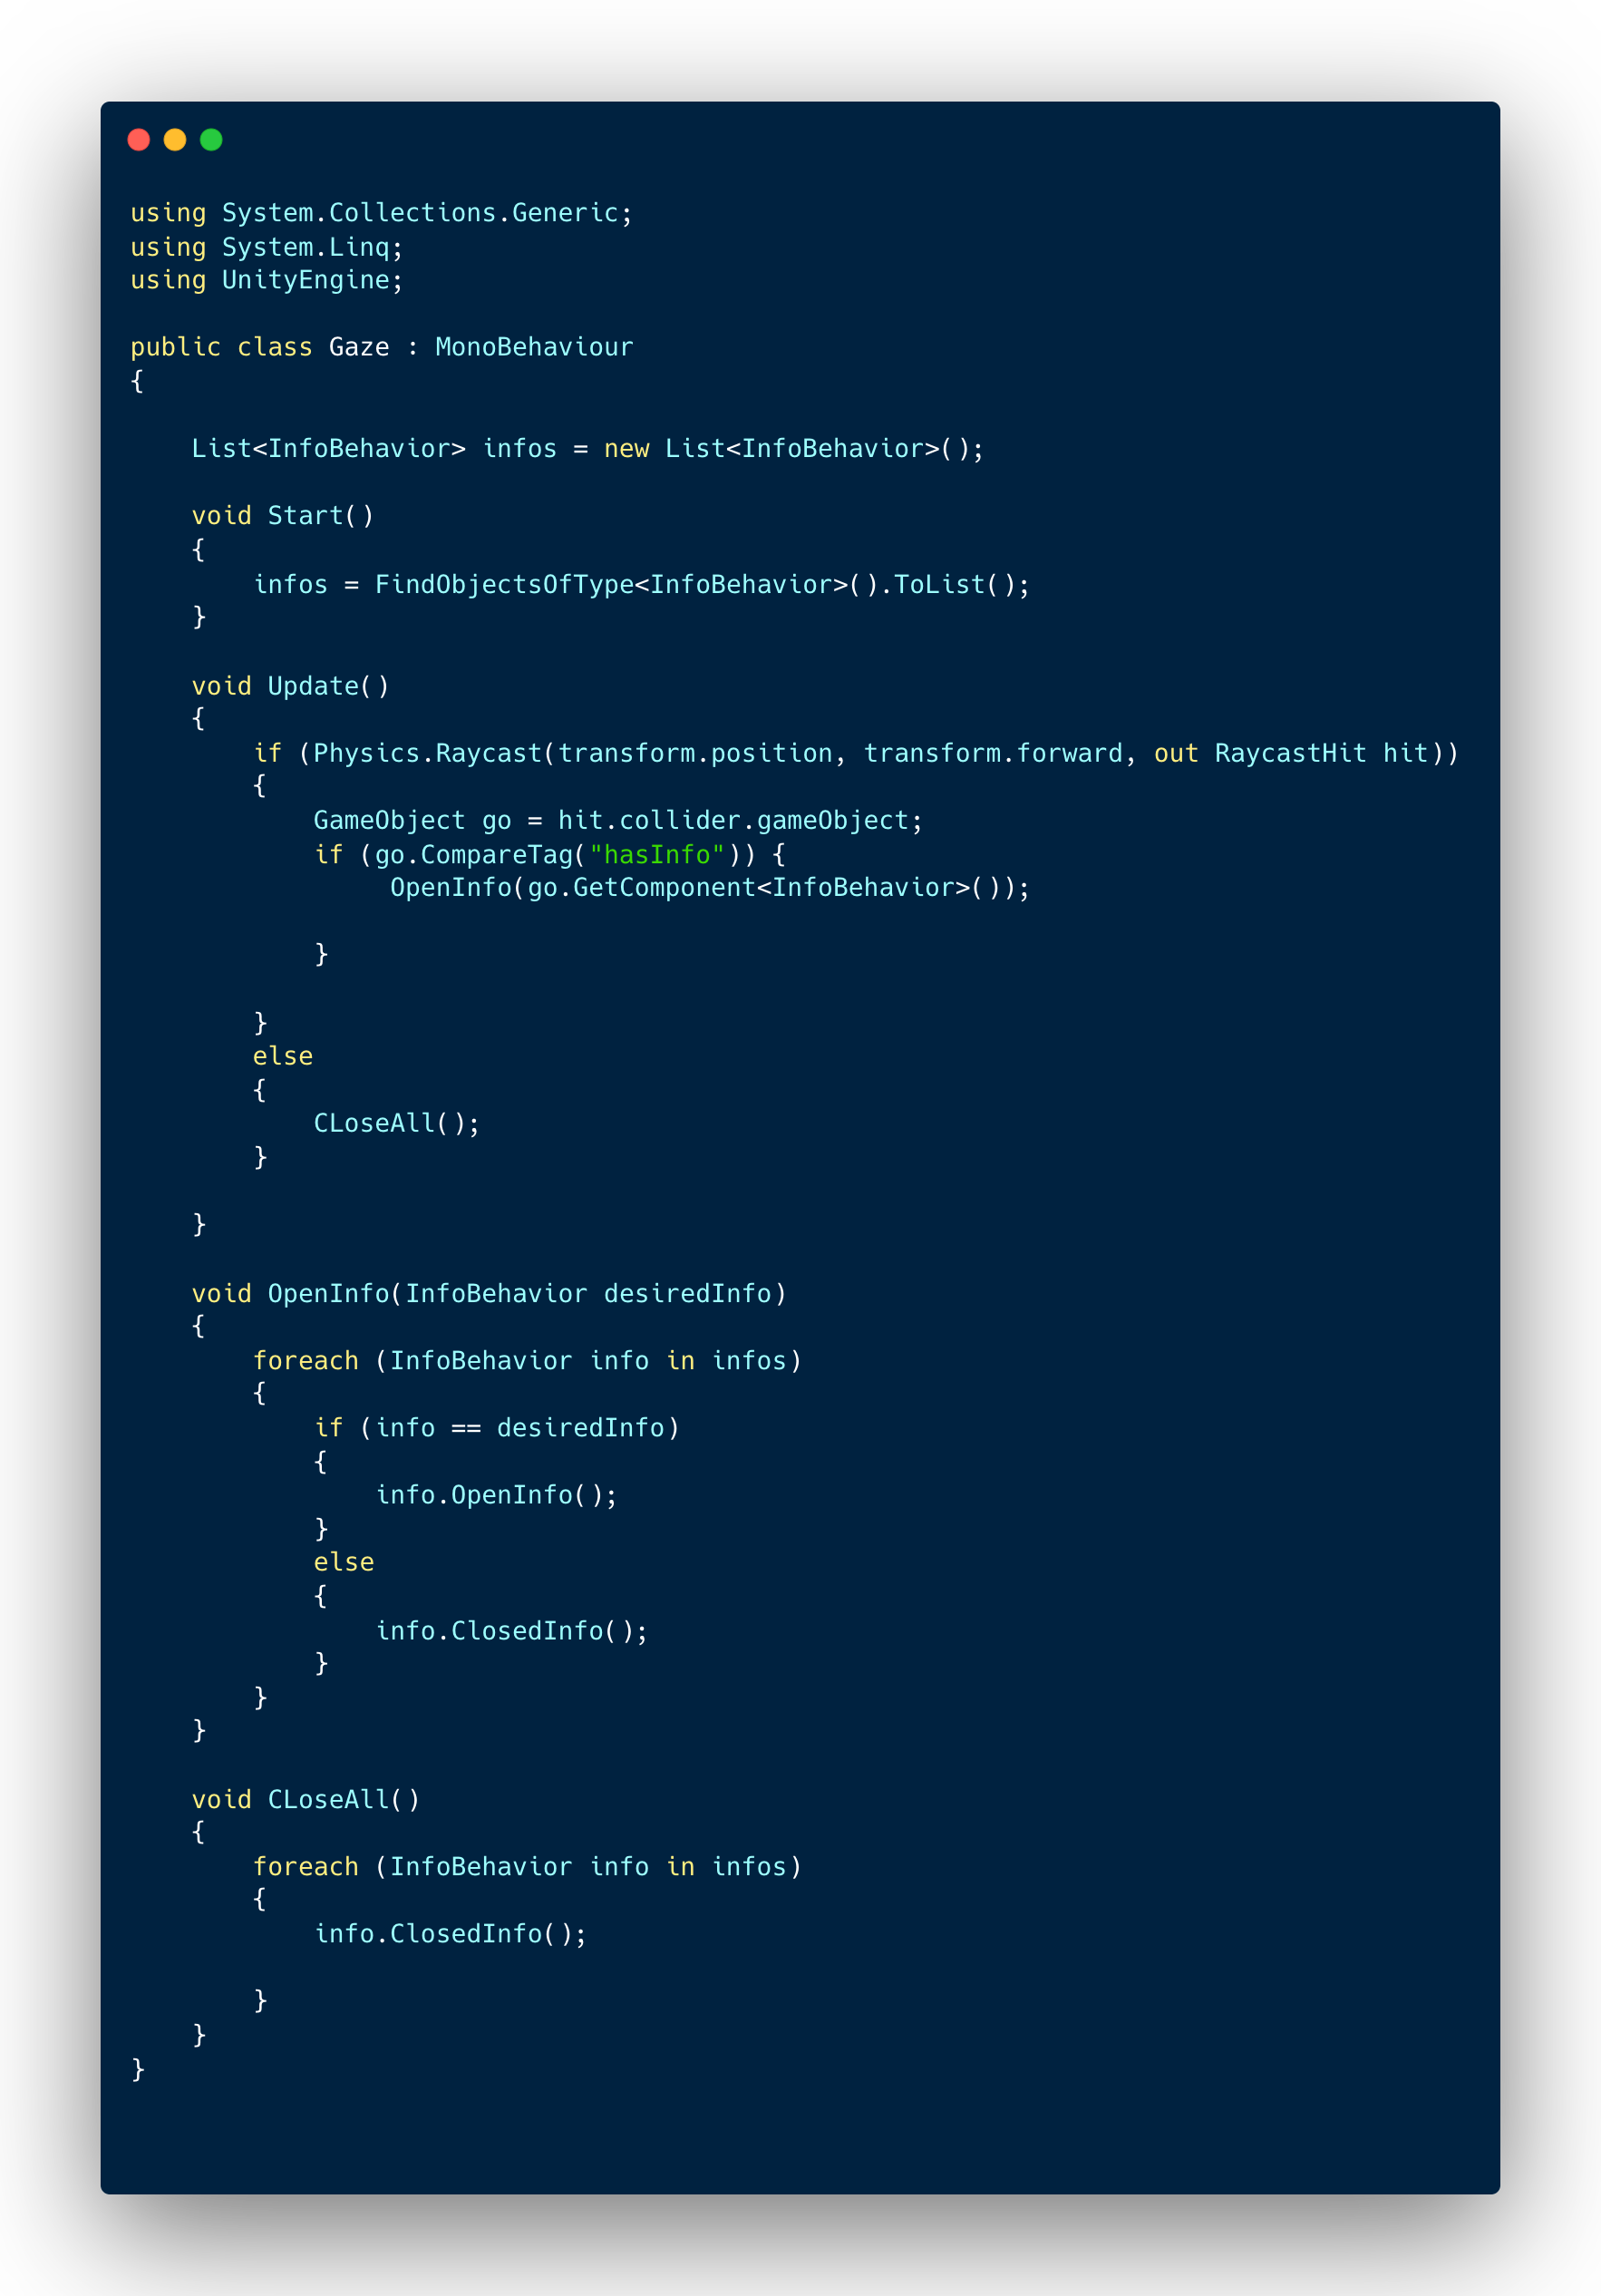
The Infobehavoir script, ties itself with the object, in this case the cube has a box collider where will interact with the "Gaze" script. From here, the code "Open info" and "Close info" will run whenever the AR camera faces the cube, due to the Gaze script being the main script for the AR camera.
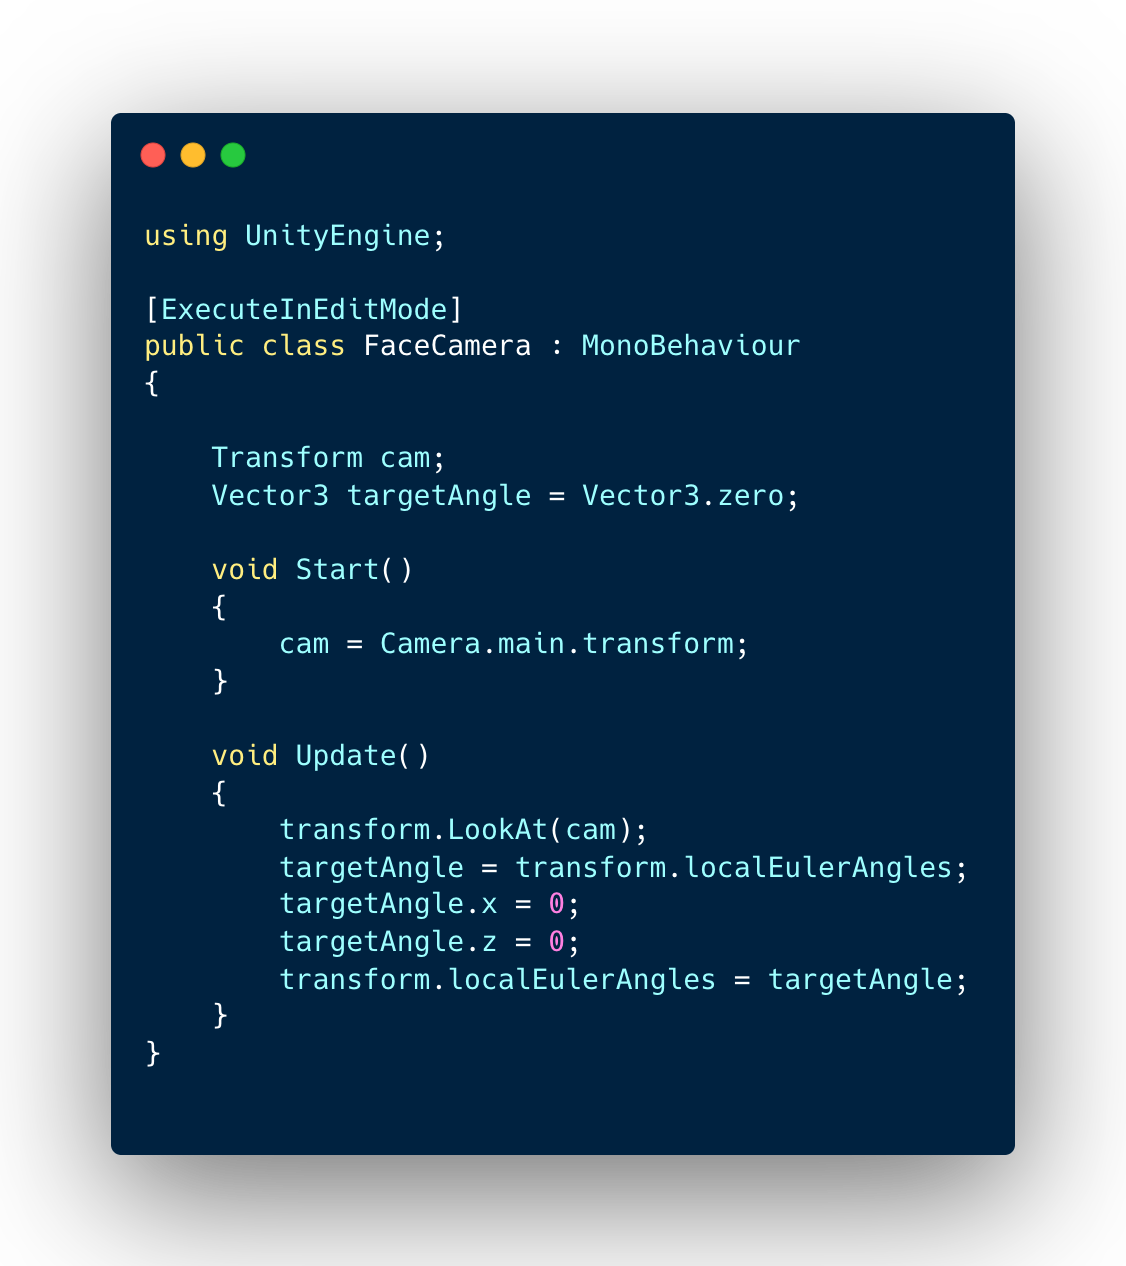
The facecamera script enables the sign post information to move to look at the main AR camera, wherever it positioned in world on the Y axis.
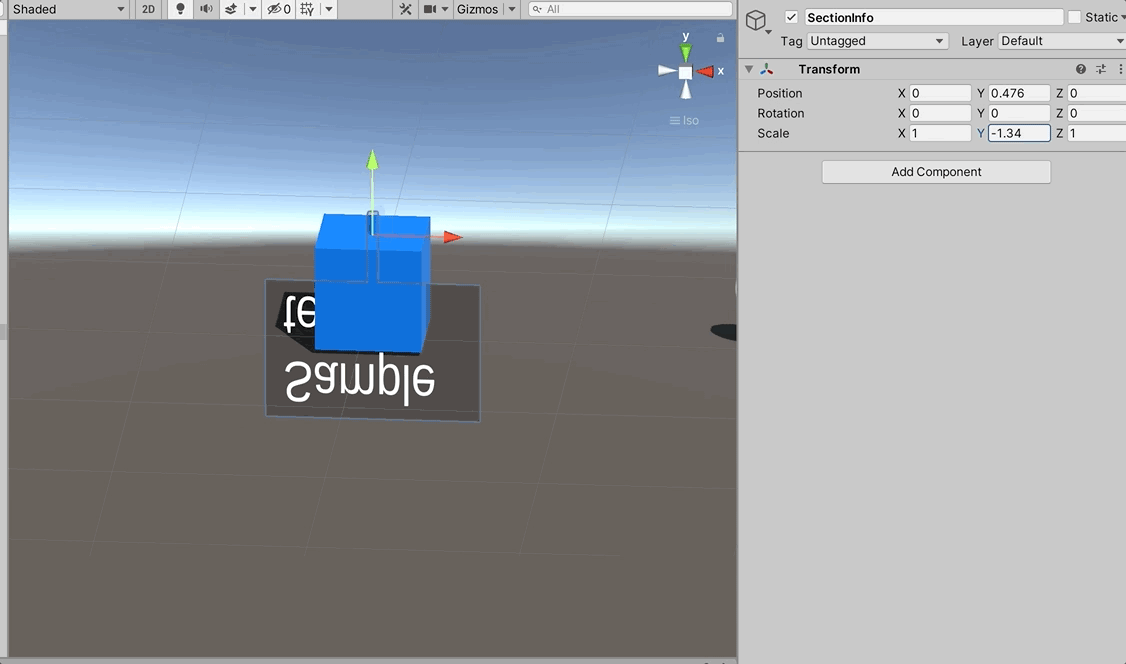
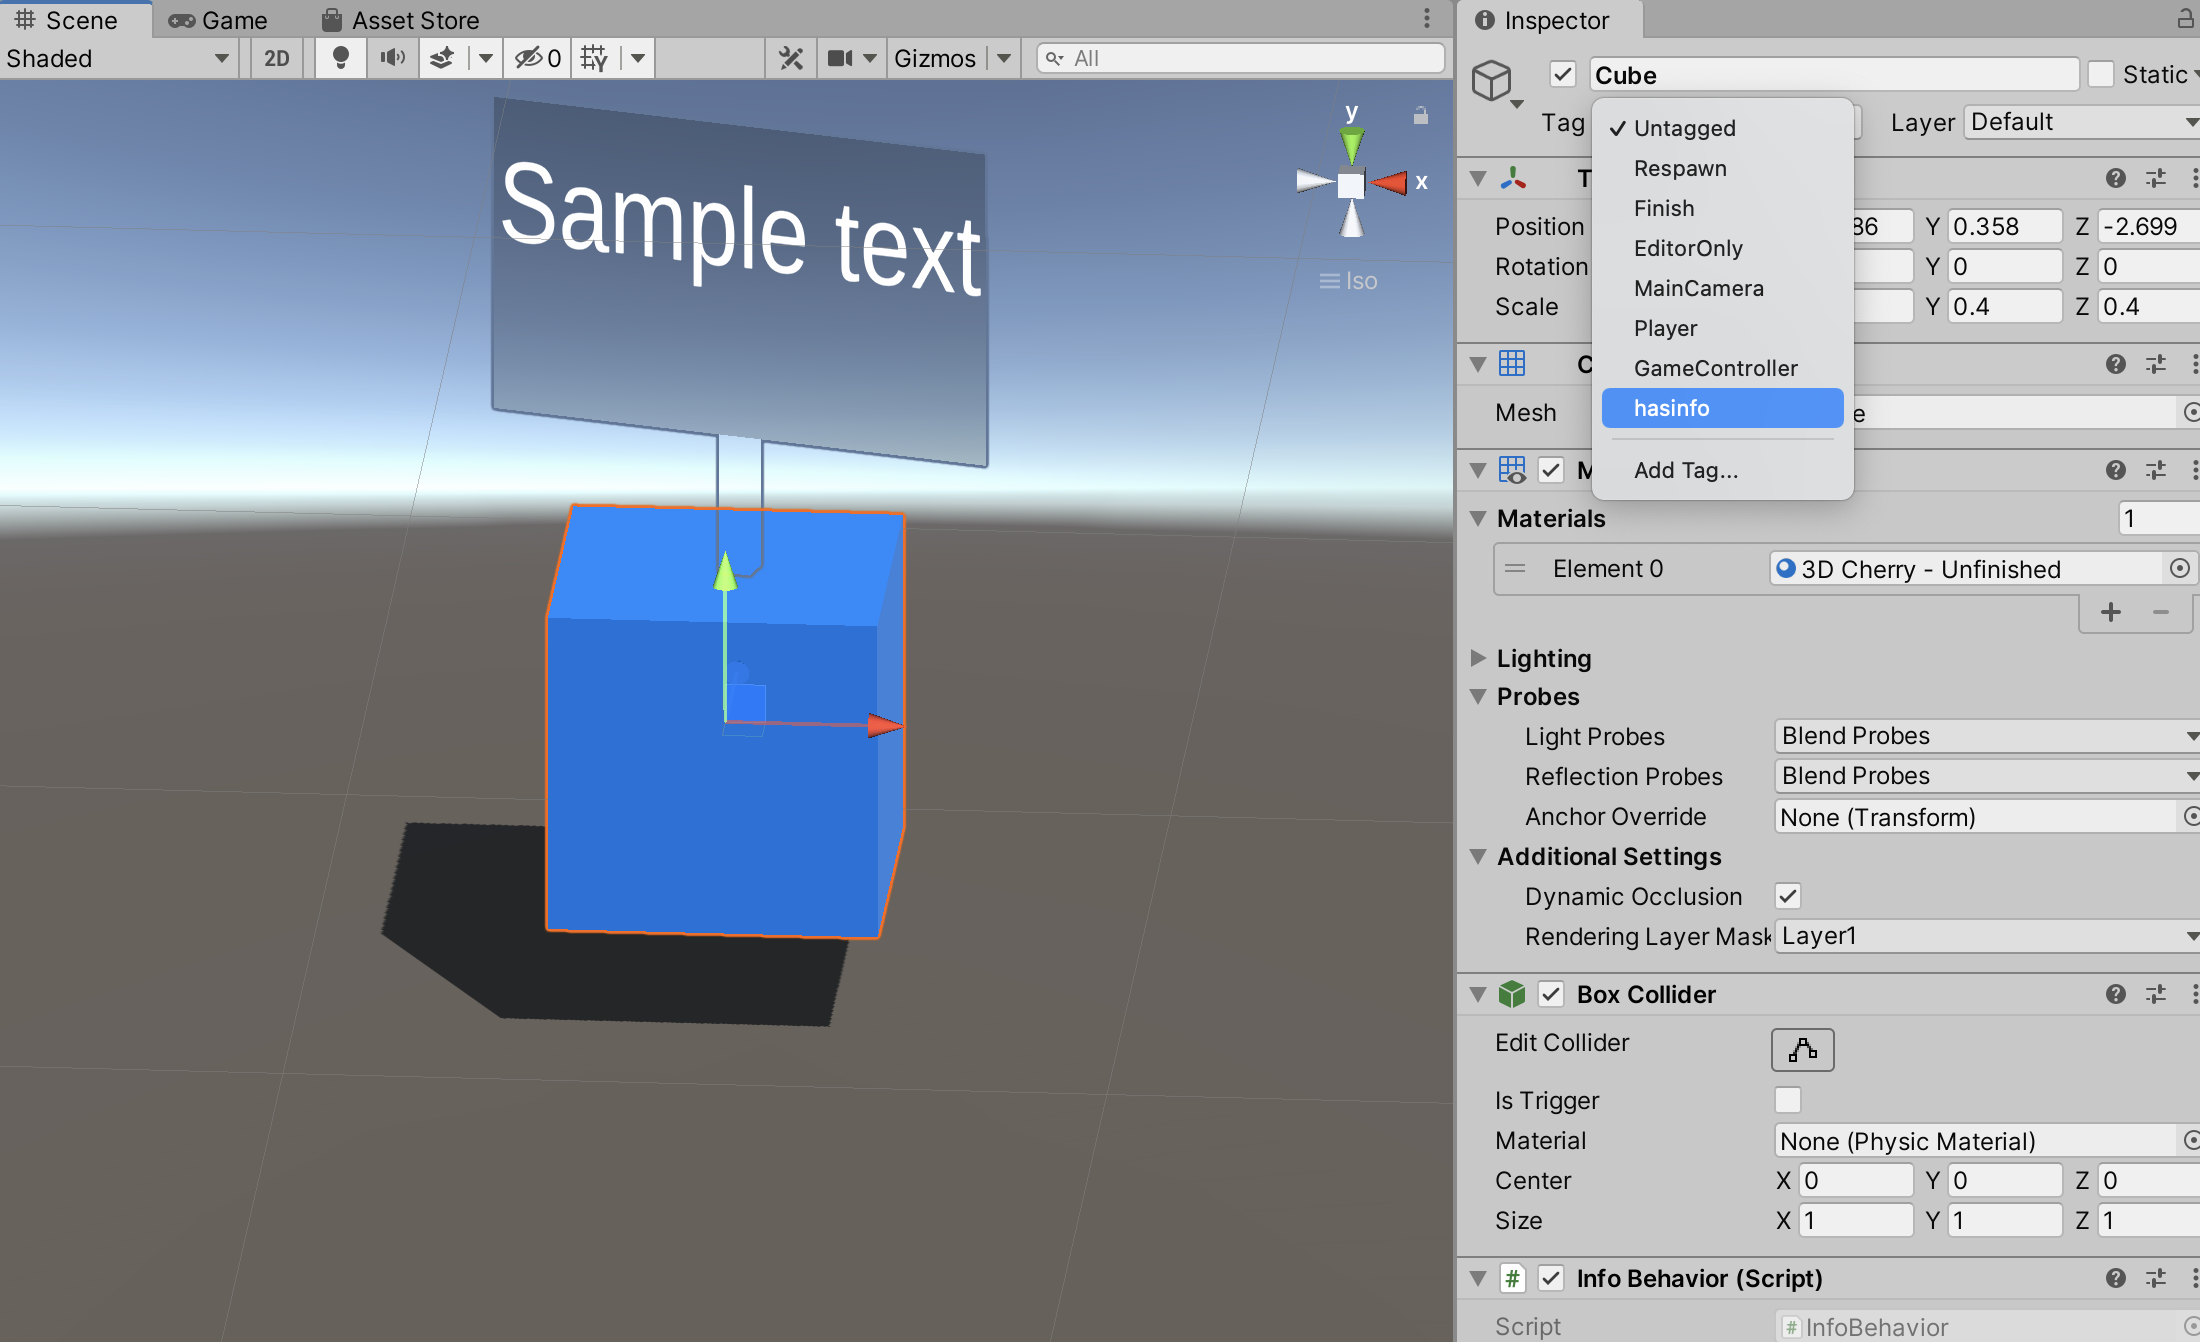
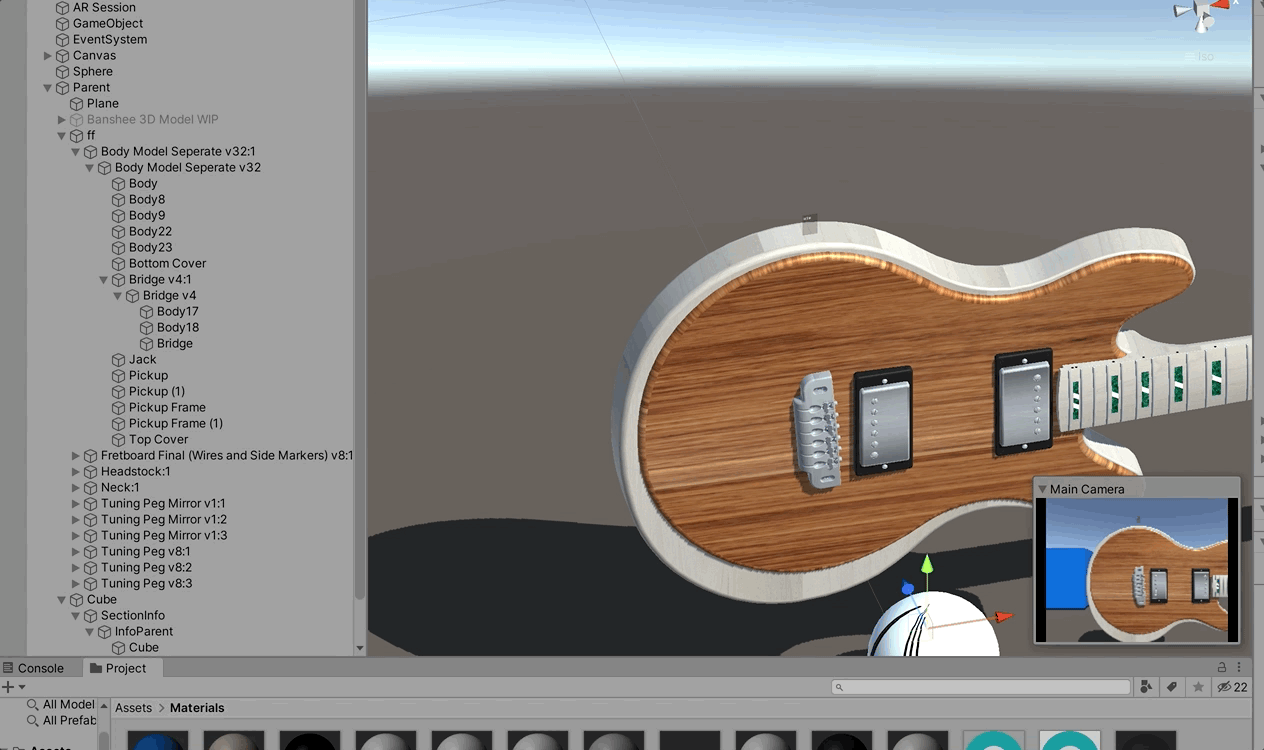
The four cubes at the very bottom of the hierarchy is where the info parents and sectioninfo's are located with the interactvity of the application. The section info then contains the C# ‘facecamera’ script as mentioned earlier and the quad, text mesh pro and cube for building the info sign.
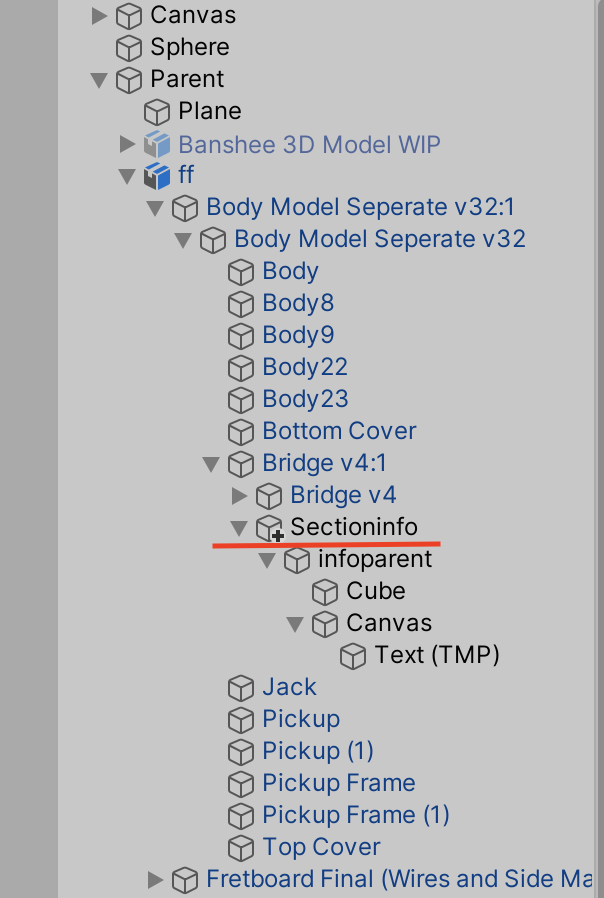
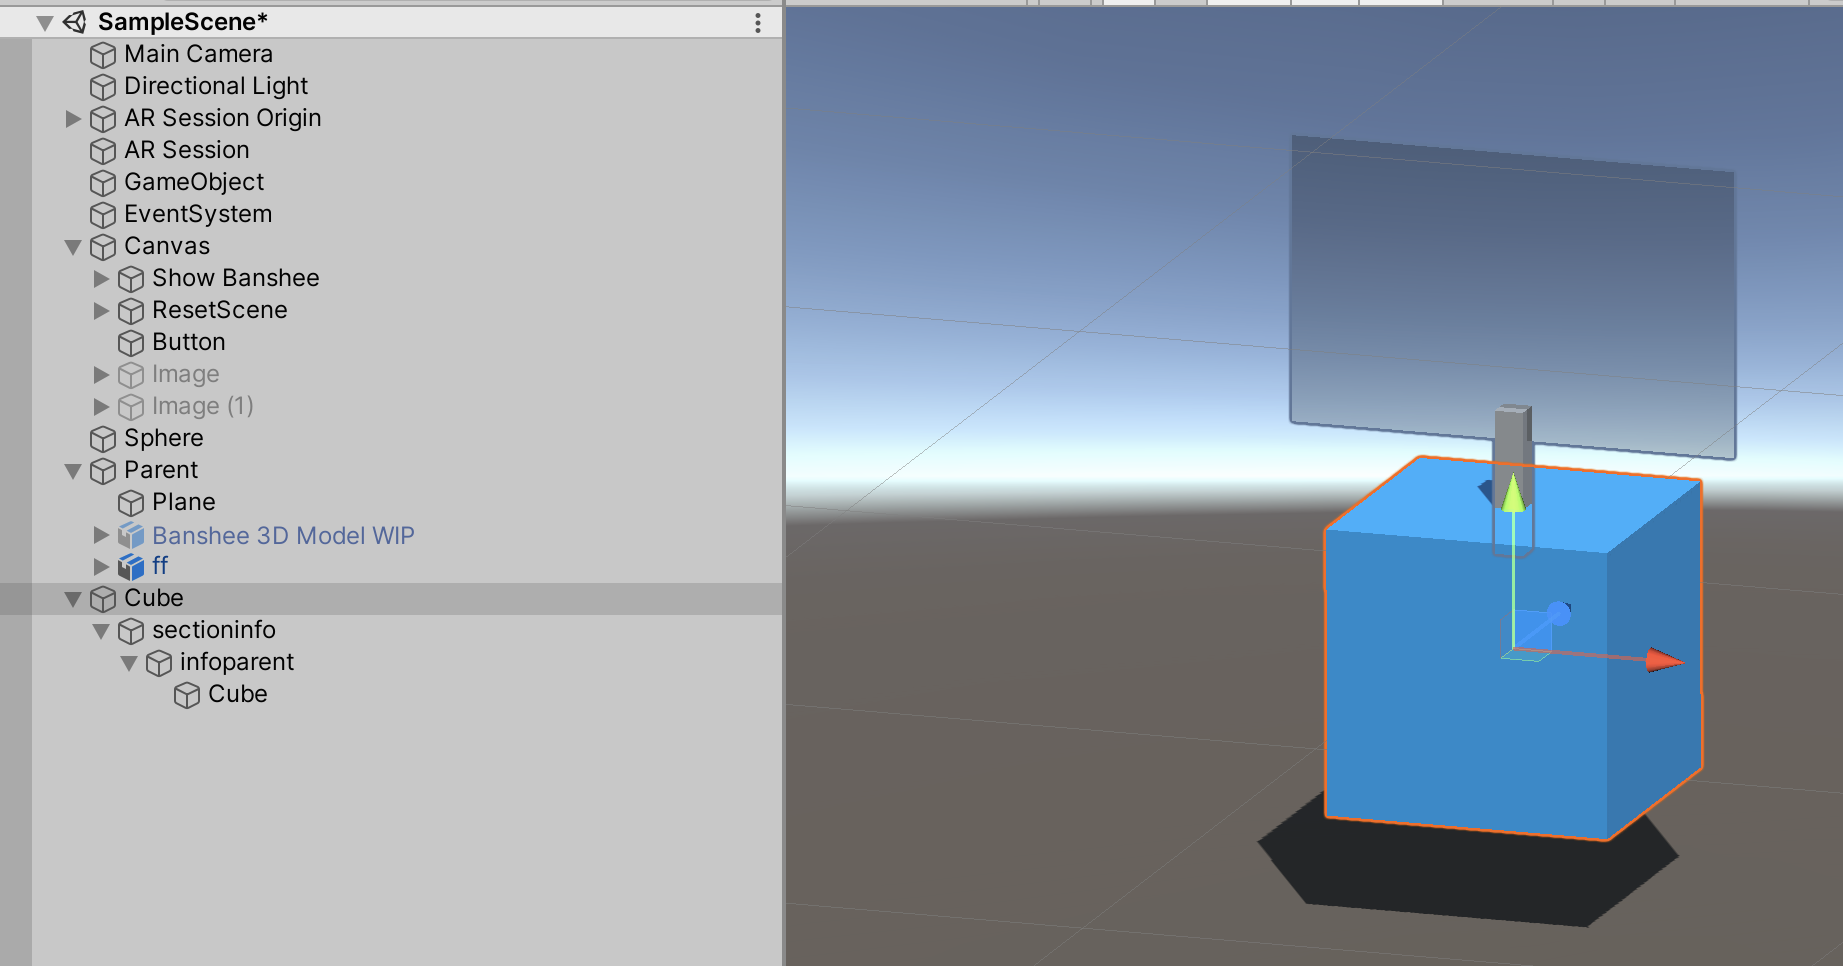
Here I created a cube to test out the functionality of the scripts. The section info is the empty game object for the base of the sign post. The Infoparent is the quad panel that was created initially for the information to be displayed on top of it.
In order for the text on the parts of the guitar to be displayed, I added a text mesh pro within the sign post.

Next i dragged the Sectioninfo into the infobehavior to allow the sign to pop up and down.
In this clip the sign is popping up and down, which will be the movement from when the camera looks at the Cube.
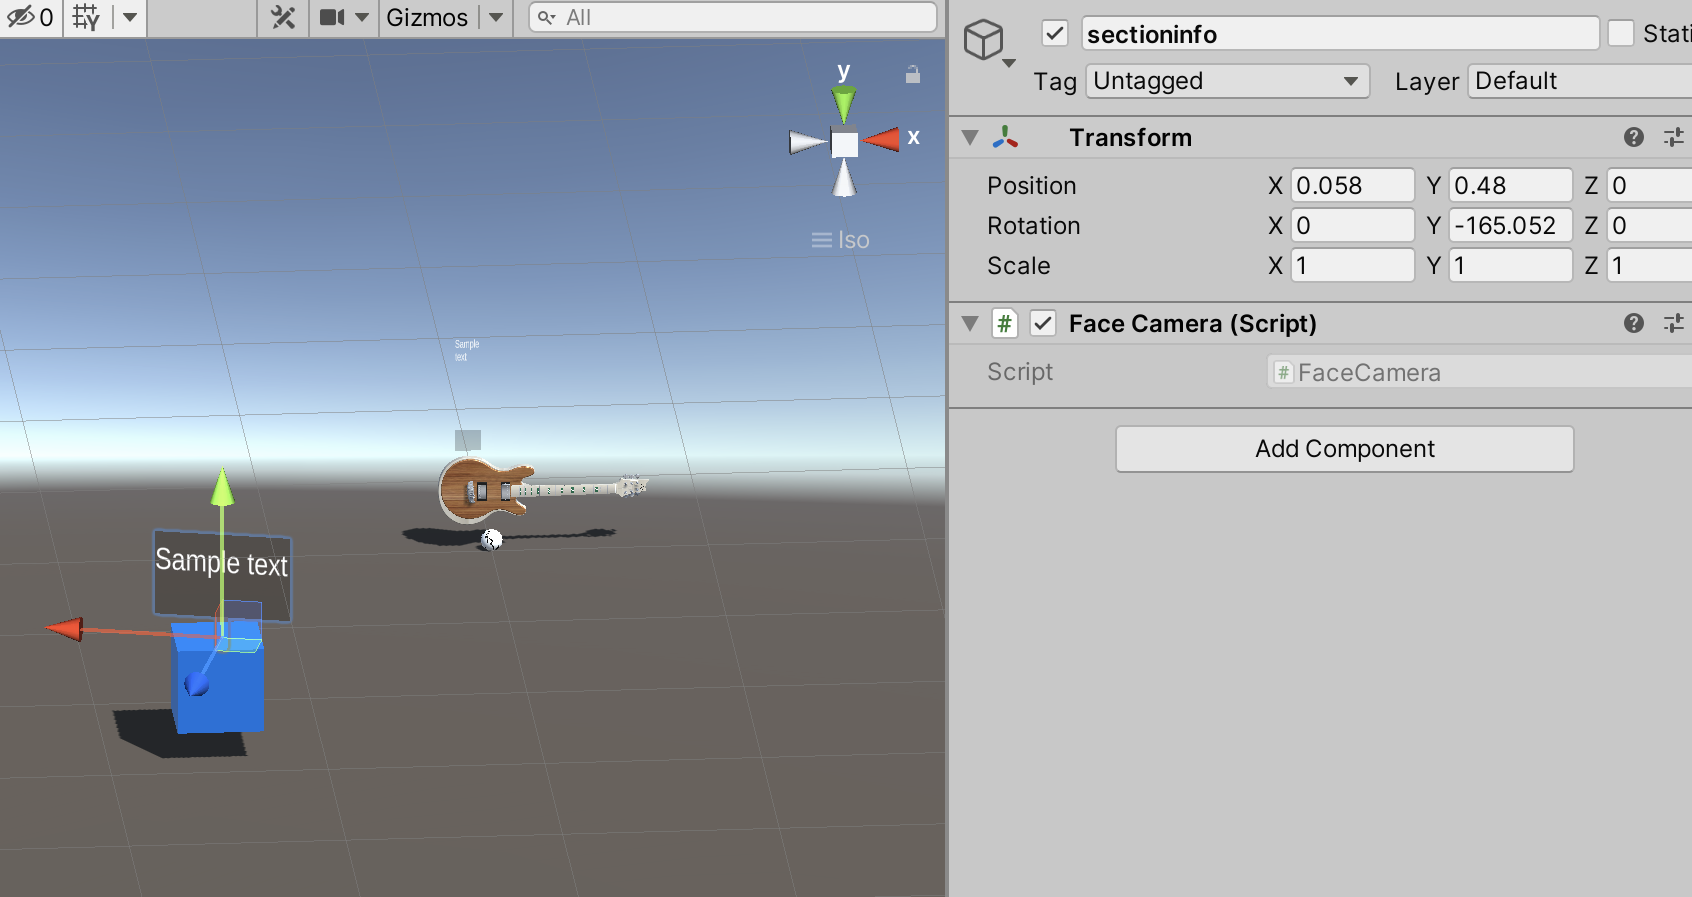
Next I attached the Facecamera script to the Sectioninfo, enabling the camera to face the camera based upon the infobehavior script.
The Gaze script enables the rayacsting to occur, whenever the forward vector of the camera (blue arrow in the editor) hits the cube. The infobehavoir script then links with the Gaze script, allowing the infobehavoir to open and close whenever the camera faces or does not face the cube. As you can see the ‘hasinfo’ is written into the Gaze script for the AR camera, enabling the interaction with the cube.
Next I attached the Gaze script to the Main Camera
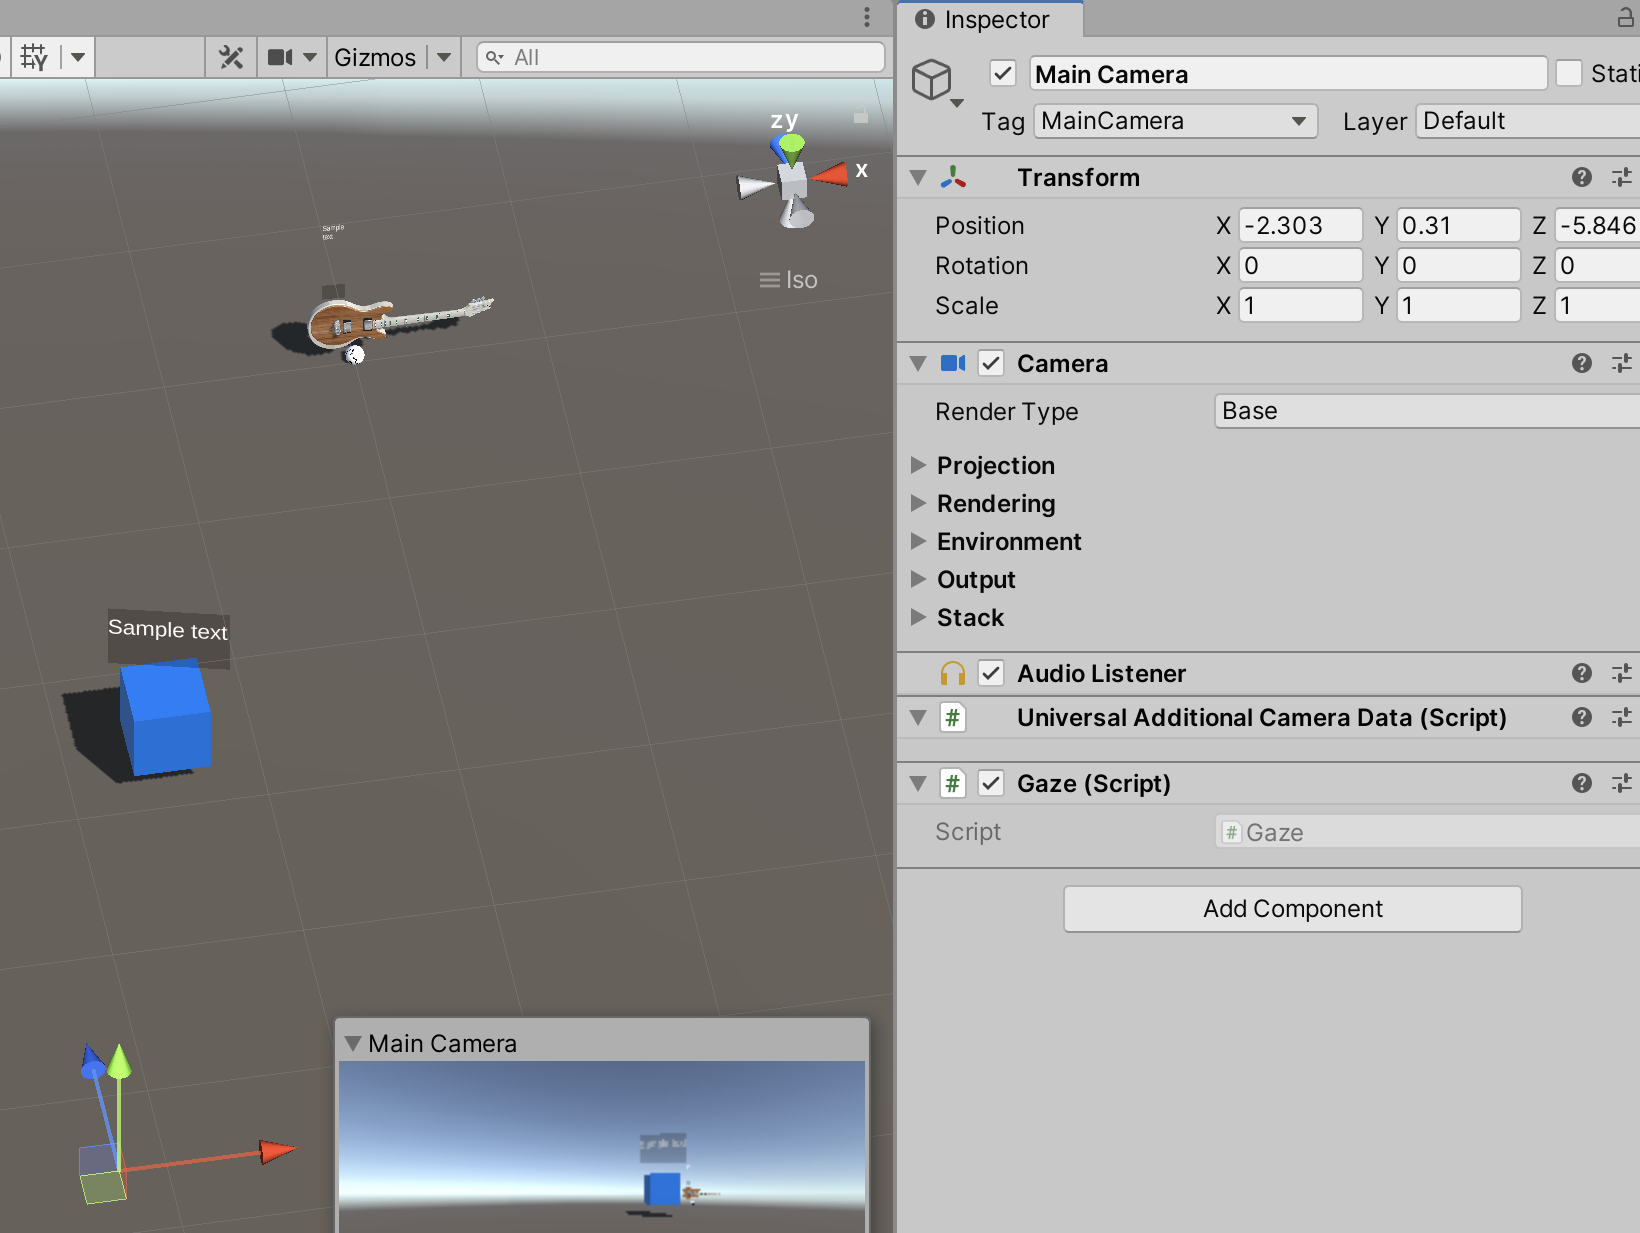
Next I added the tag ‘hasinfo’ to the cube to enable the interaction to occur, producing ‘HERE’ in the console as written in the script.
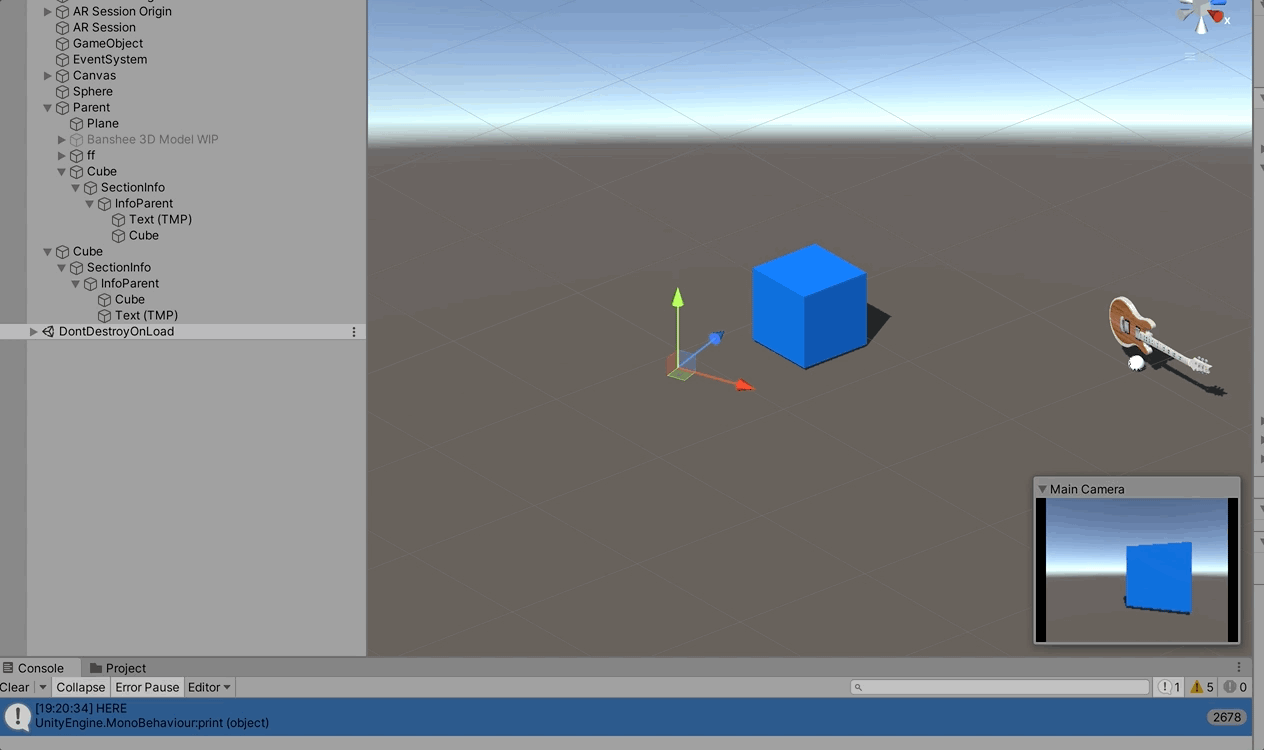
‘Here’ is being displayed in the console, enabling the being displayed below whenever the Y rotational axis looks towards the face of the cube. This shows that the ‘Gaze’ script that identifies the object, due to the cube being tagged with ‘hasinfo’ which then interacts with the Gaze script.
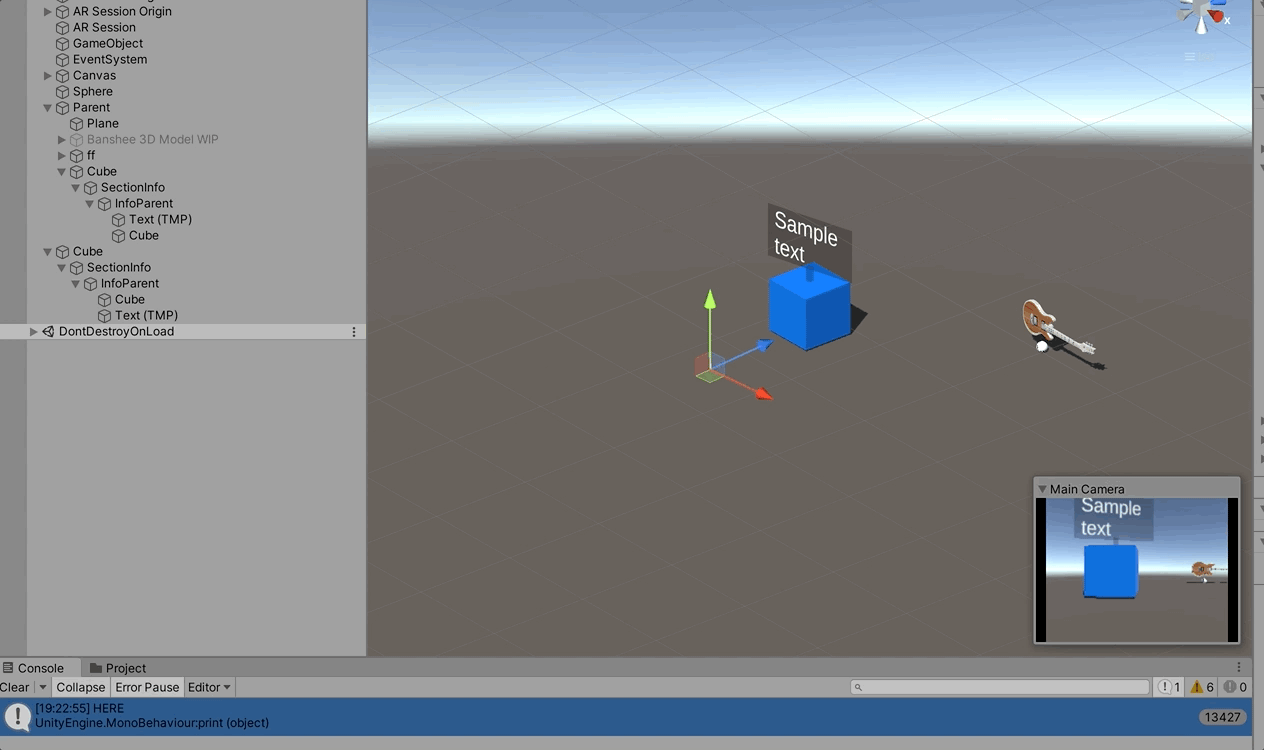
After testing the above, I then demonstrated a step further, with the AR camera interacting with the cube, causing the information to pop up. This is due to gaze script interacting with the infobehaviour script.
This is due to specific line in the Gaze script code: OpenInfo(go.GetComponent InfoBehavoiur>; this allows for the maincamera to interact with the box due to the line in the code "GetComponent". Therefore, the gaze camera is able to get the infobehaviour information from the cube and interact with it.
The next step was to integrate the scripts into the AR Guitar. This however was a challenge due to the shape of the guitar, caused the sign post to change it’s positioning as it wasn’t a flat surface. As a result I integrated the cubes into the model and made them invisible, however would still interact with the camera due to the Gaze script.
Problem Identified
This however was not successful. During play mode the gaze interaction would occur, however the signpost would be incredibly small. As shown above, I increased the size of the sign post to nearly the length of the Guitar. This however did not produce the same size the sign during play mode. This therefore led me to rethink the approach to creating the interactive AR guitar information.
One problem identified with the Gaze, Infobehavoiur and Facecamera script, was that it relied on the camera to be constancy focused on the asset’s 3D mesh collider to cause the info to pop up when in AR. This would be a problem as the user would walk backwards to view the entire guitar, which would cause the sign post to disappear when the camera would be focused on the particular part of the guitar.
Week 8- New interative infomation solution
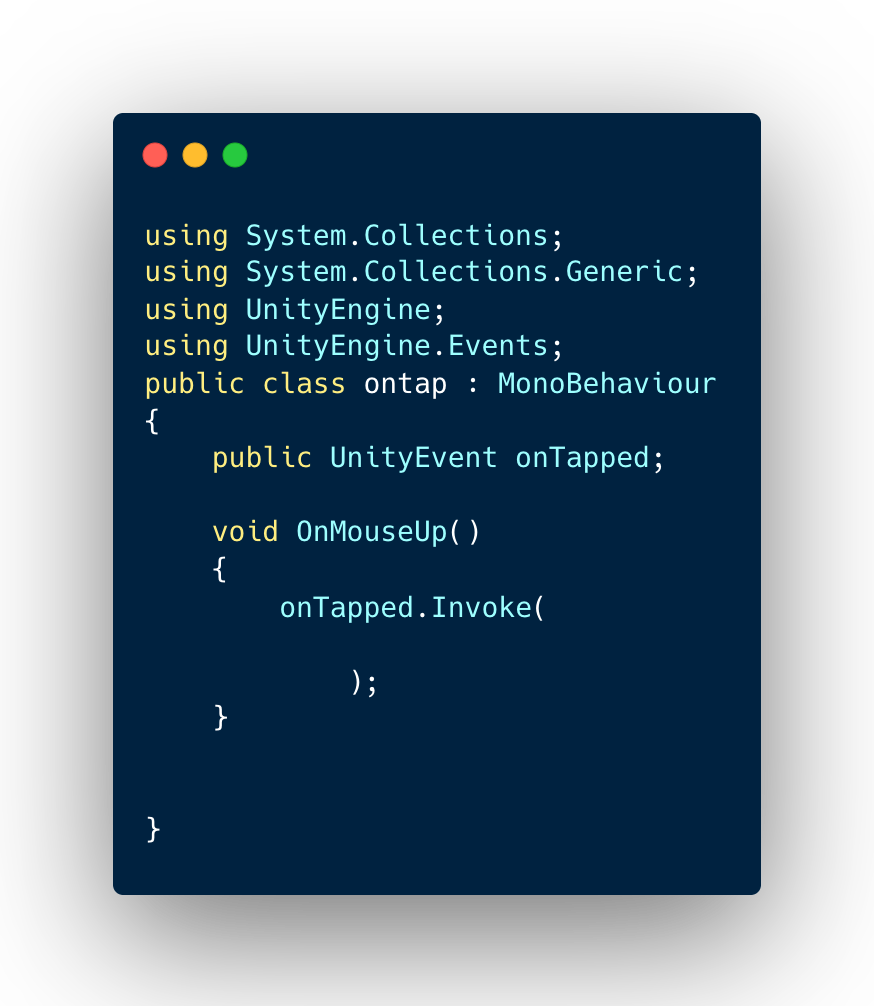
Next in order for interactivityto occur, I added an ‘ontap’ script, enabling the script to interact with the individual parts of the guitar. To enable the tap to trigger an event, I made a Unity Event called onTapped. II then added a OnMouseUP function which I the trigger for when the part of the guitar is tapped. Within that I added a Invoke function to enable the event to trigger.
This script however didn’t allow for multiple taps to occur, eg it didn’t enable the user to tap on and off the asset.
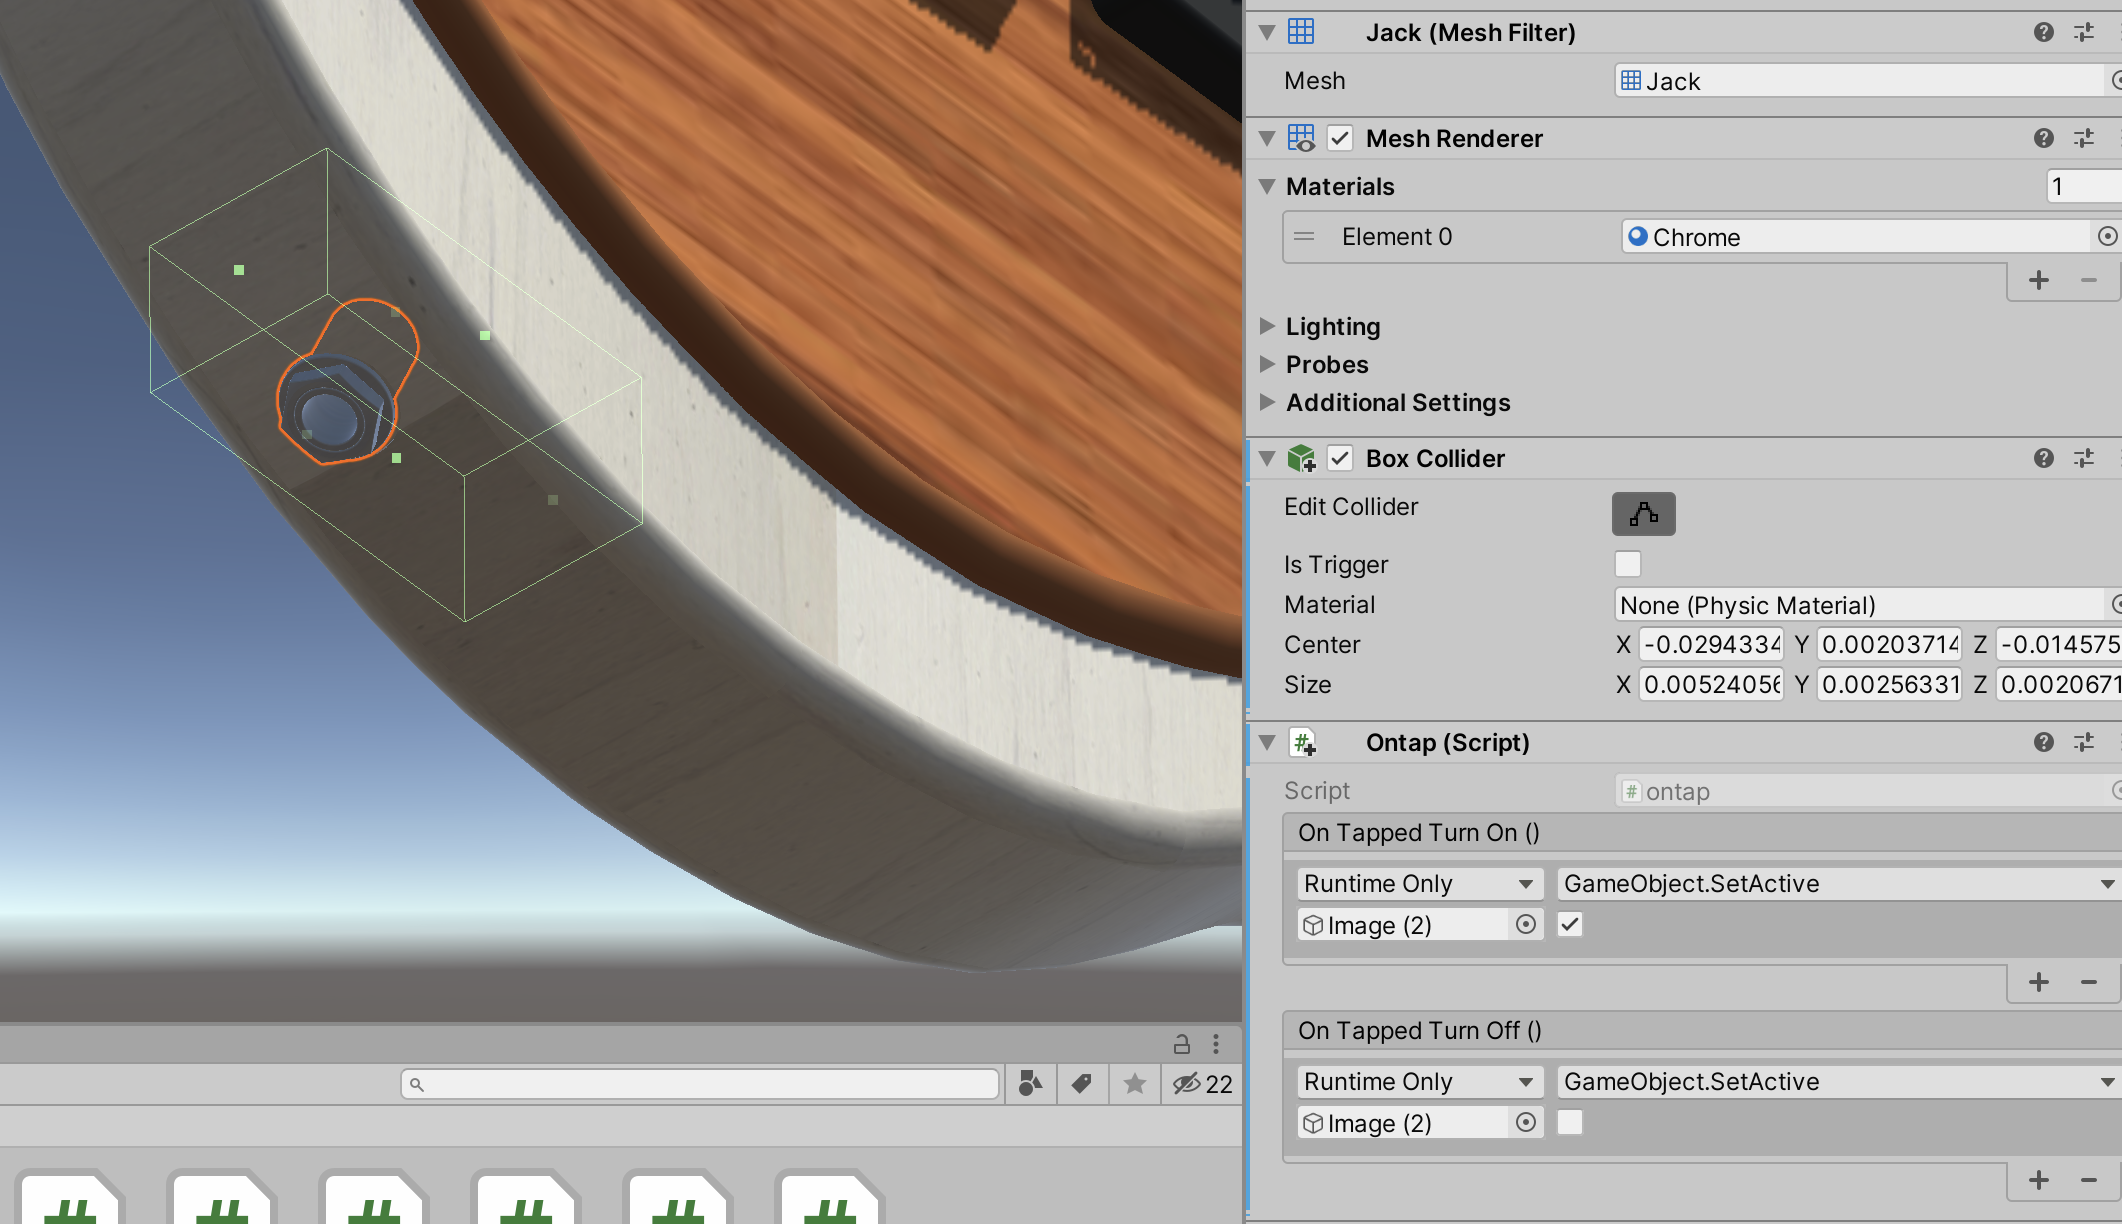
Next I added box colliders onto the Jack to trigger the on tap function, as the box Collider will enable a collision to occur when it is pressed or interacted with.
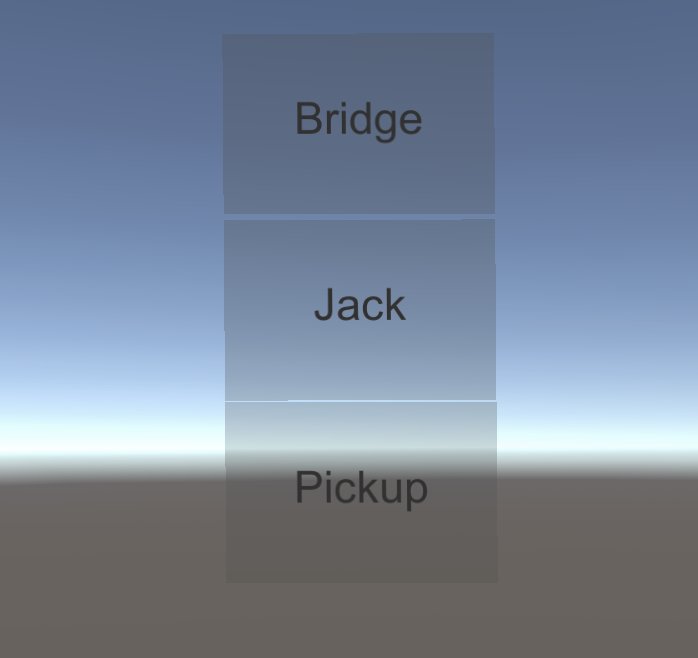
I then created an image to be triggered, which contains the identification of each of the components, such as Bridge, Jack and Pickup for example.
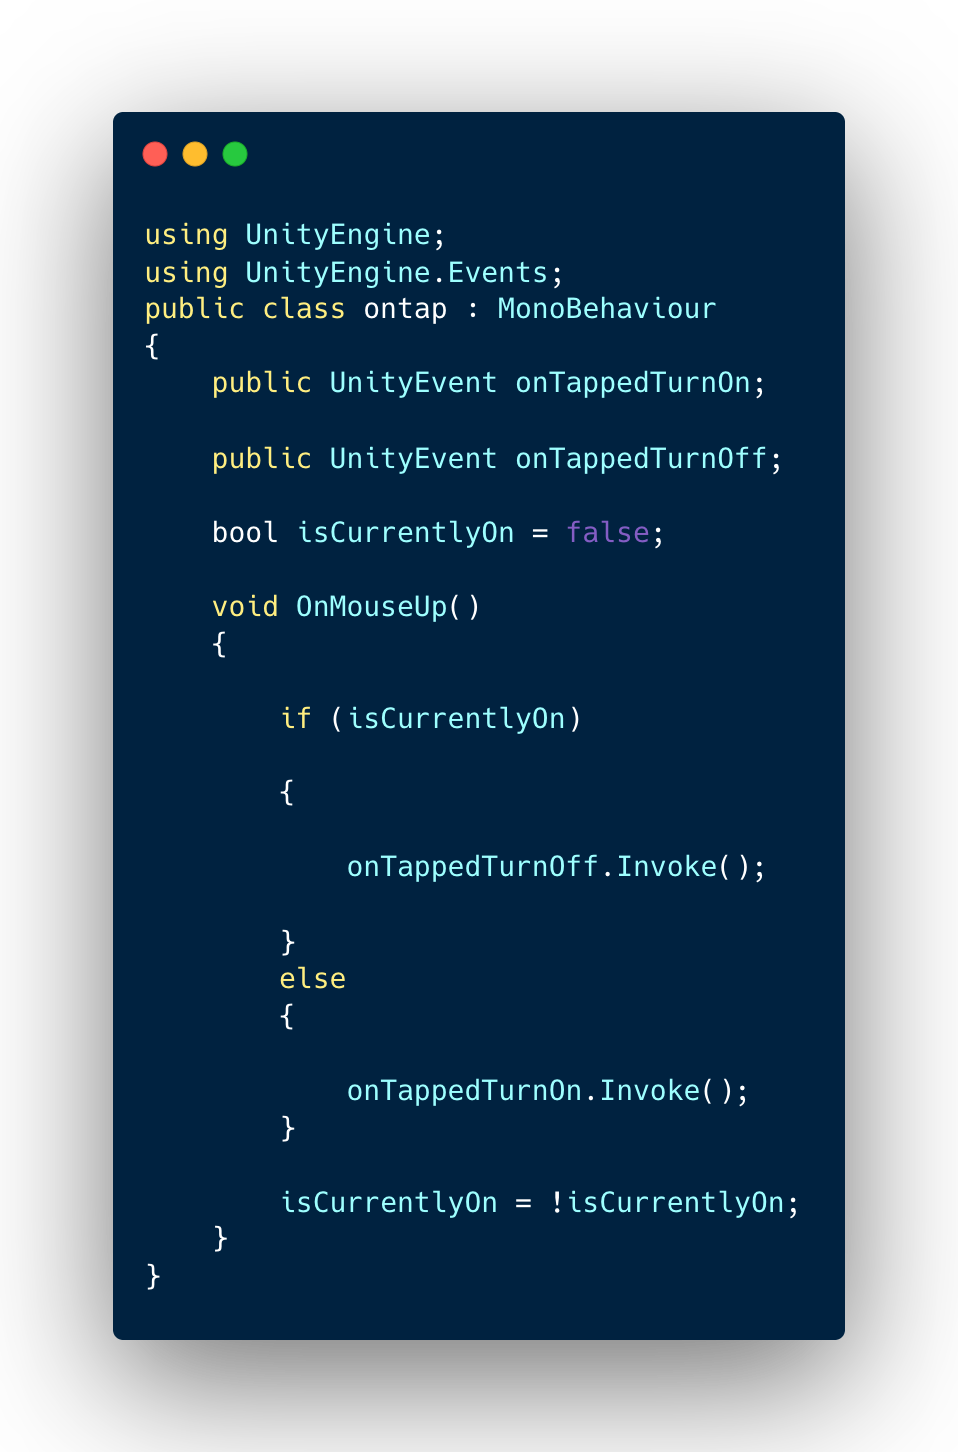
As a result, I created two Public unity events with OnTappedTurnOn and onTappedTurnOff with a bool which is a variable of true or false. I then added an if statement for if the sign ‘iscurrentlyon’, then the next event that would be triggered would be OnTappedTurnOff. Else the onTappedTurnOn invoke function would occur. I then added a = ! (inequality) operator.
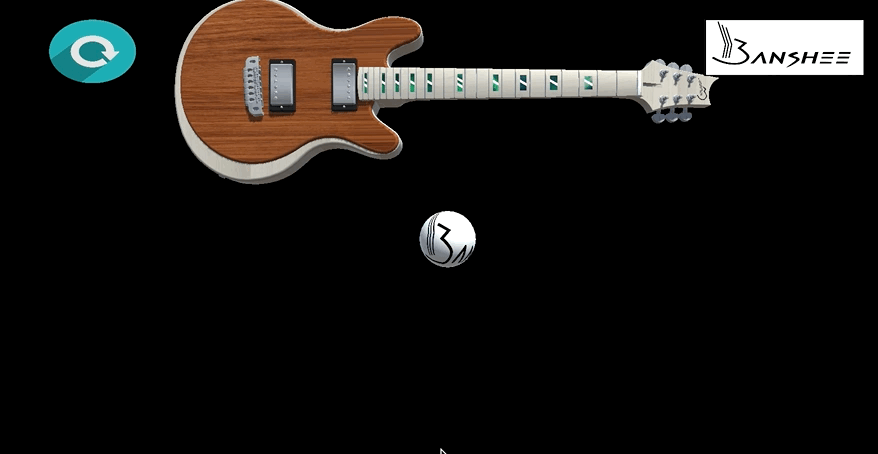
As you can see within the unity play mode, when clicking on the parts of the guitar the information turns on and off.

Once the latest version was deployed in Xcode, the app showcases the guitars parts turning on and off.
Client Feedback
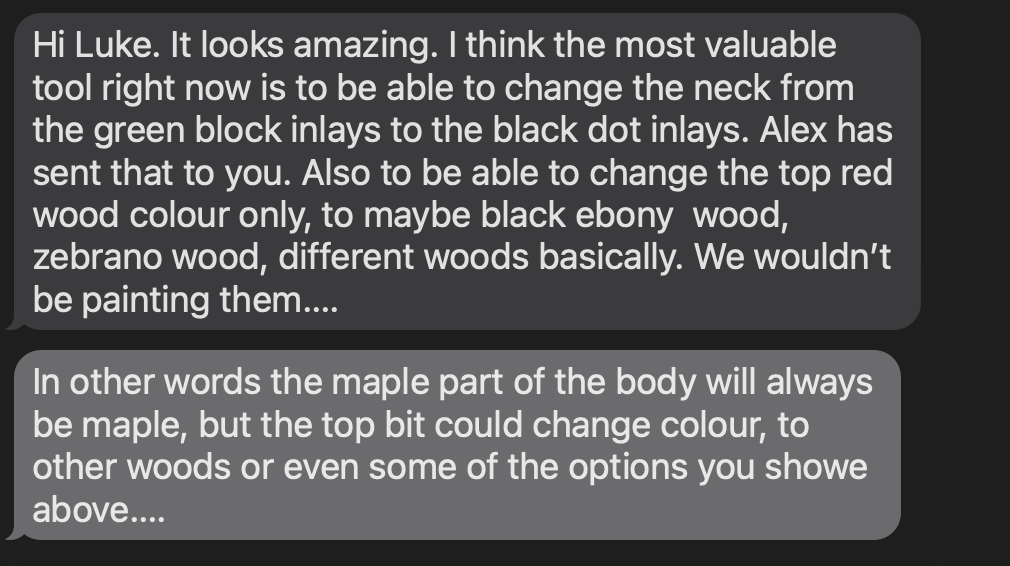
Next I sent the video to my Uncle, who really likes the model and its features however discussed two key advancements to make it before the application would be complete.
Firstly he wanted the model to change from the green block inlays to the black dot inlays.
Secondly he mentioned how he would like to see the woods change to an Ebony wood or Zebrando wood instead of the colourations such as blue and emerald.

Here I sent a video to my client, where I was toggling on and off the Dot Inlay, asking if this was what he was wanting. He replied and said it was what he was wanting as a feature.
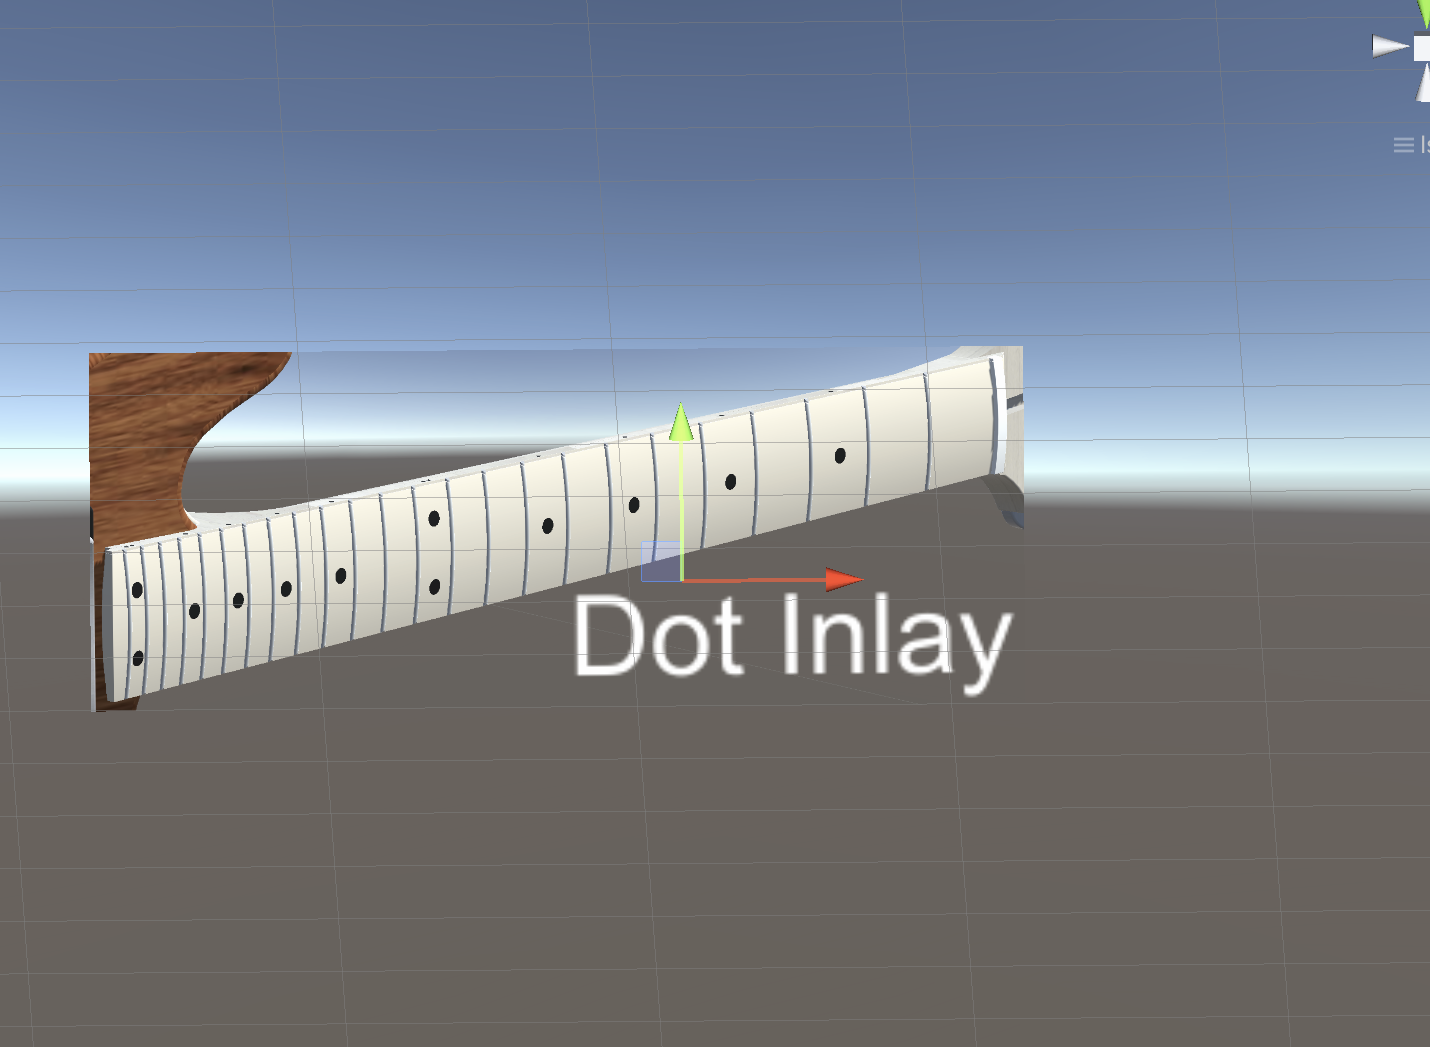
Here I sent a video to my client, where I was toggling on and off the Dot Inlay, asking if this was what he was wanting. He replied and said it was what he was wanting as a feature.
I first tried to attach the ontap script to make the application run, however the was not much luck with this. As a result I emailed Spark and they assisted me with writing this complicated script as I was unsure on how I would code such a unique script. Graham, my previous work experience supervisor, emailed back with an ToggleOnButtonTap1 script.
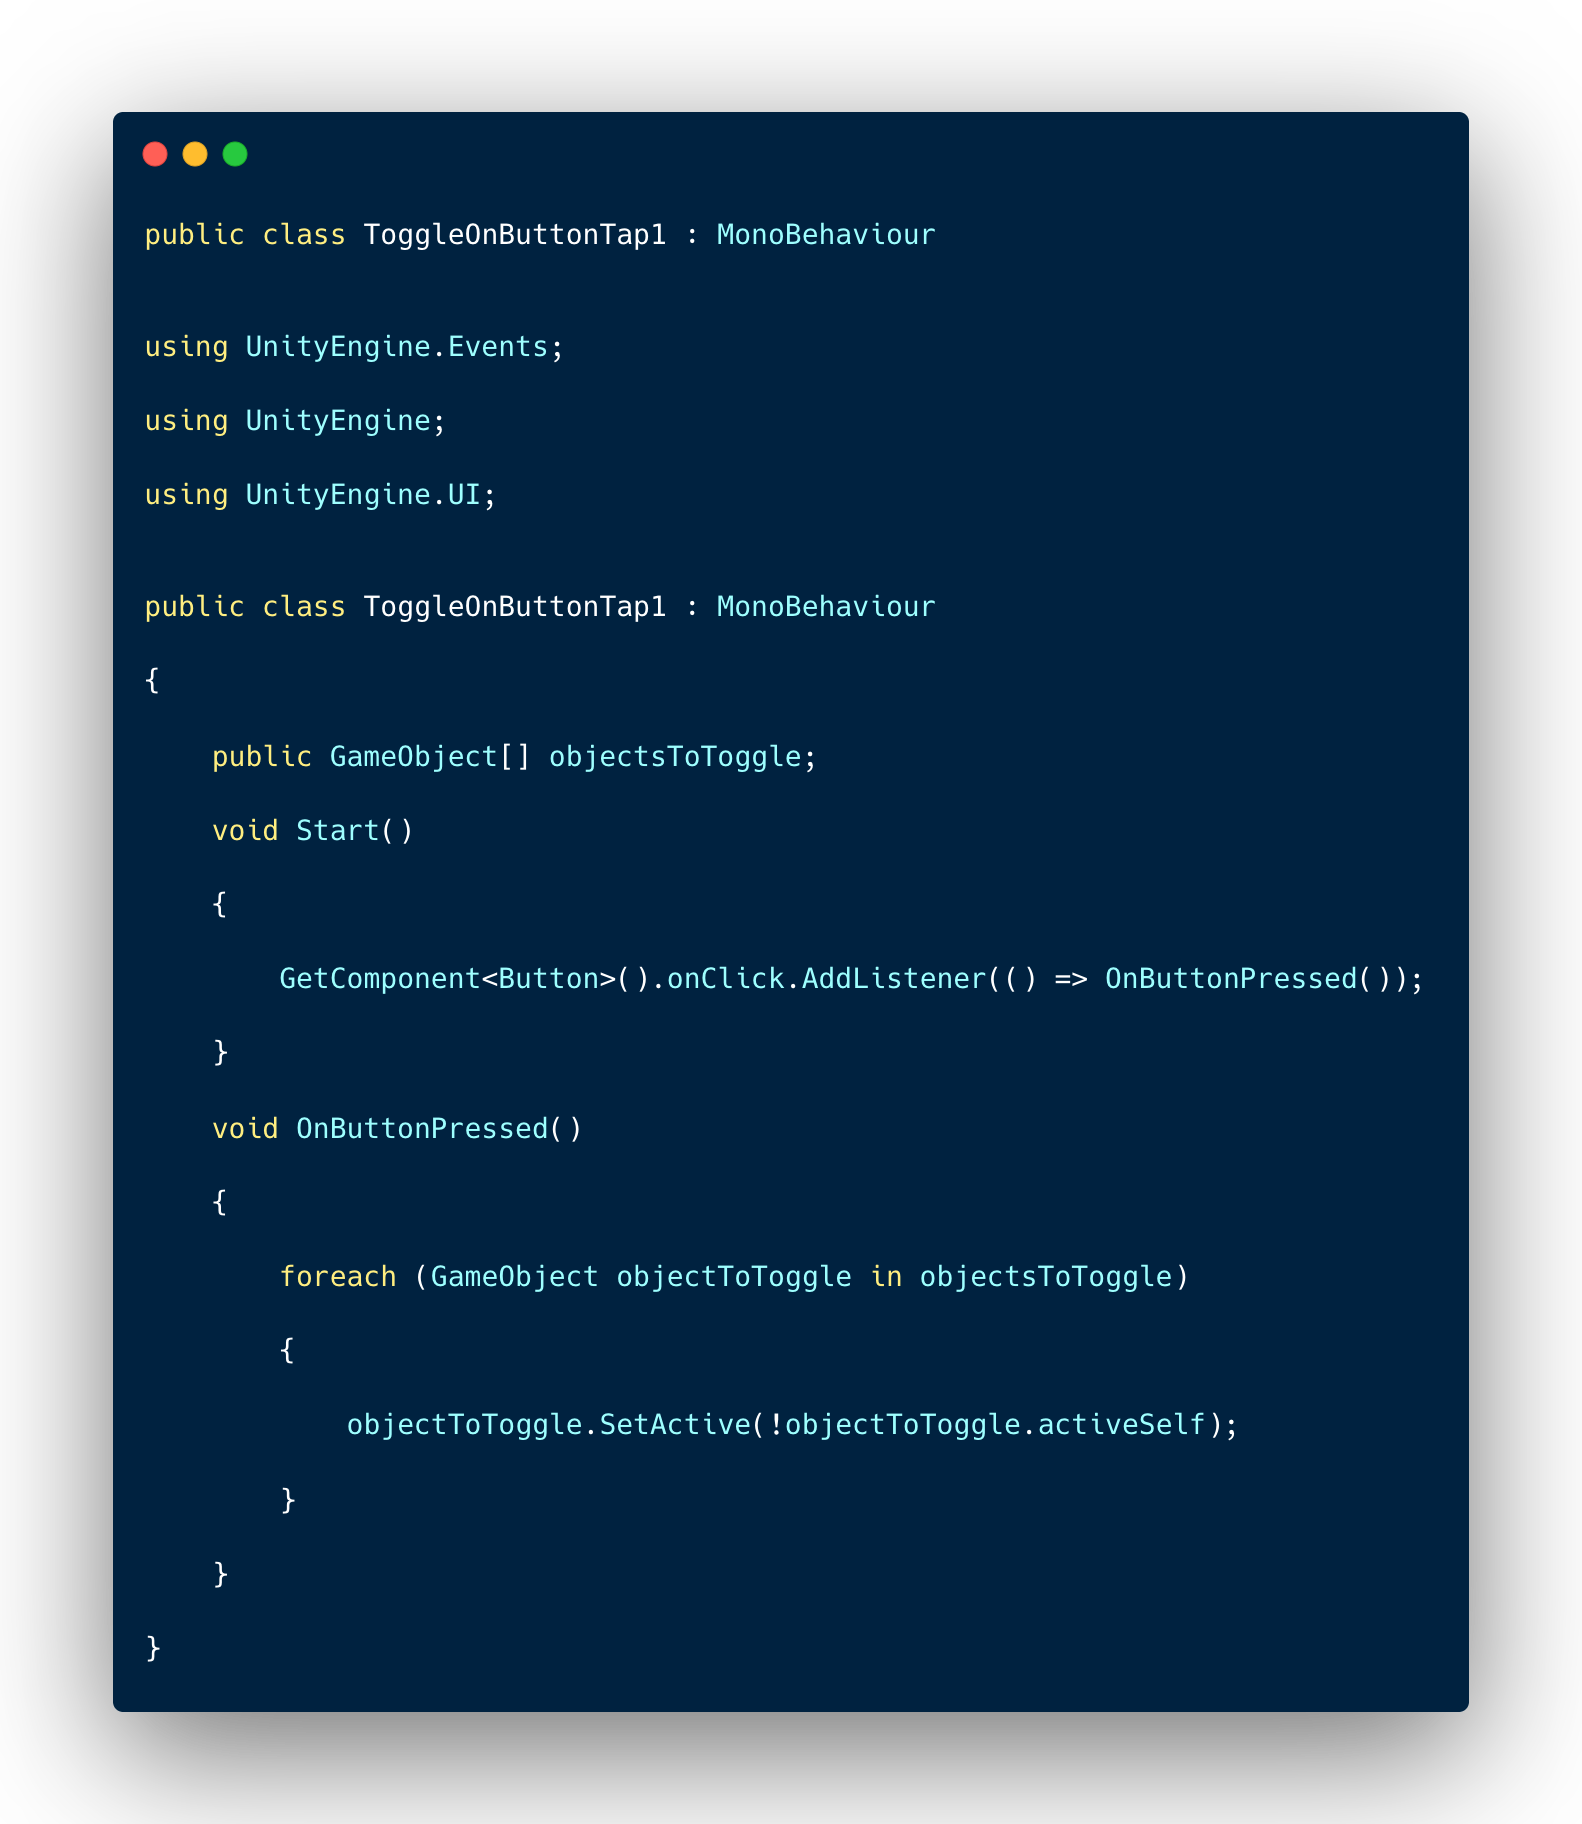
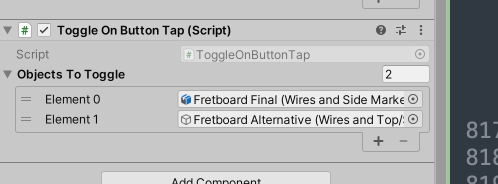
After implementing the script, I then attached the Fretboard to the ToggleObject and the new Dot Fret board to the Element one.
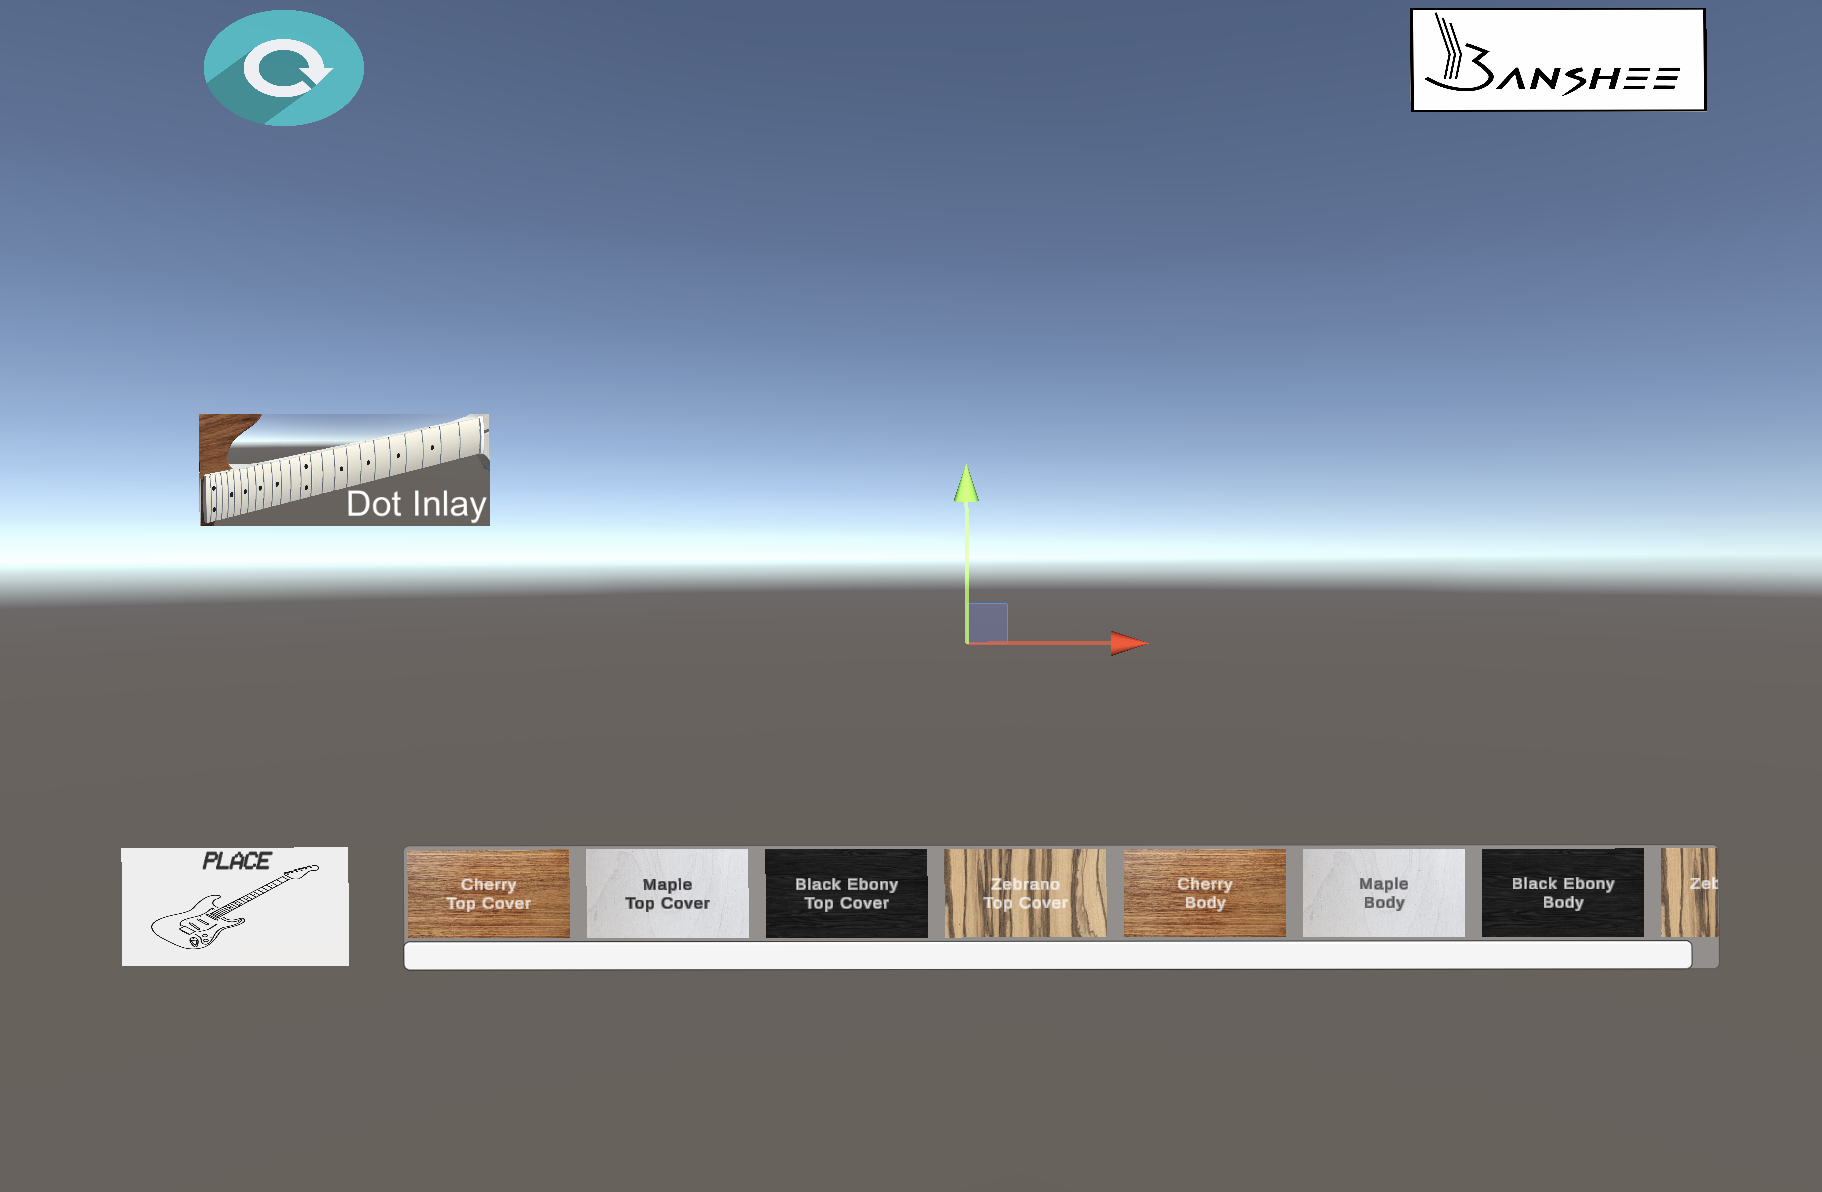
Finally I implemented the new wood materials into the UI with the chosen woods such as Black Ebony and Zebrano Wood.
Week 9- Final Outcome 🏆
The final outcome of the Banshee guitar model, showcases it being augmented in reality, with the ability for it to rotate around, provide part information, change colour and change parts depending on the user’s preference. This application will allow the user to customise their own personal model of the guitar and view the application in full size as if it was in reality.
Client Final Feedback and Reference
"The original requirement was to produce an Augmented Reality version of the Banshee guitar that clients could place in space and see in life size. They would be able to explore the guitar from all angles and have the ability to select the different types of wood to explore build options.
Luke has achieved this very well. The first time he showed me our guitar placed in space was a revelation! I was able to walk around the guitar and see it from every angle - something that no other guitar manufacturer can offer.
From the outset Luke was in constant communication. Once the basic app was developed, I asked him to add wood grain effect and our Banshee logo. This transformed the look of the AR guitar and made it a useful tool. From here we looked at how to add an interface that the clients could use to select different wood options. Again, Luke made this possible and now we have a useful tool for our clients to interact with their guitar before it is even built!
The final step would be to publish it on the App Store and Google Play for customers to download on iPhone, iPad and Android. This will enable the buyer to view the banshee guitar in life size and with a vairety of colour options and fret alterations before buying. Luke will be working on that in the next few months.
Thank you Luke for this fantastic work, I very much look forward to seeing what the future holds for our futures!" -Simon Congdon 2022
Reflection and Analysis
To reflect on this project, I found the development of the Banshee guitar to be my most enjoyable and satisfying AR applications to build, as it provided me with a unique task to develop an application for a Guitar Company, who was also a Family relative of mine. I found the development of the guitar challenging at times as it required new scripts and variables to be integrated into the script to create different functions to occur, however as I have had experience in developing AR applications before, I was suited to rising to the challenges presented to me. I was also very satisfied with the feedback my client gave me, as it will enable them to target customers in the future, that no other guitar brand will have done before. This will be developed and deployed onto the App Store in the future.
Time Management
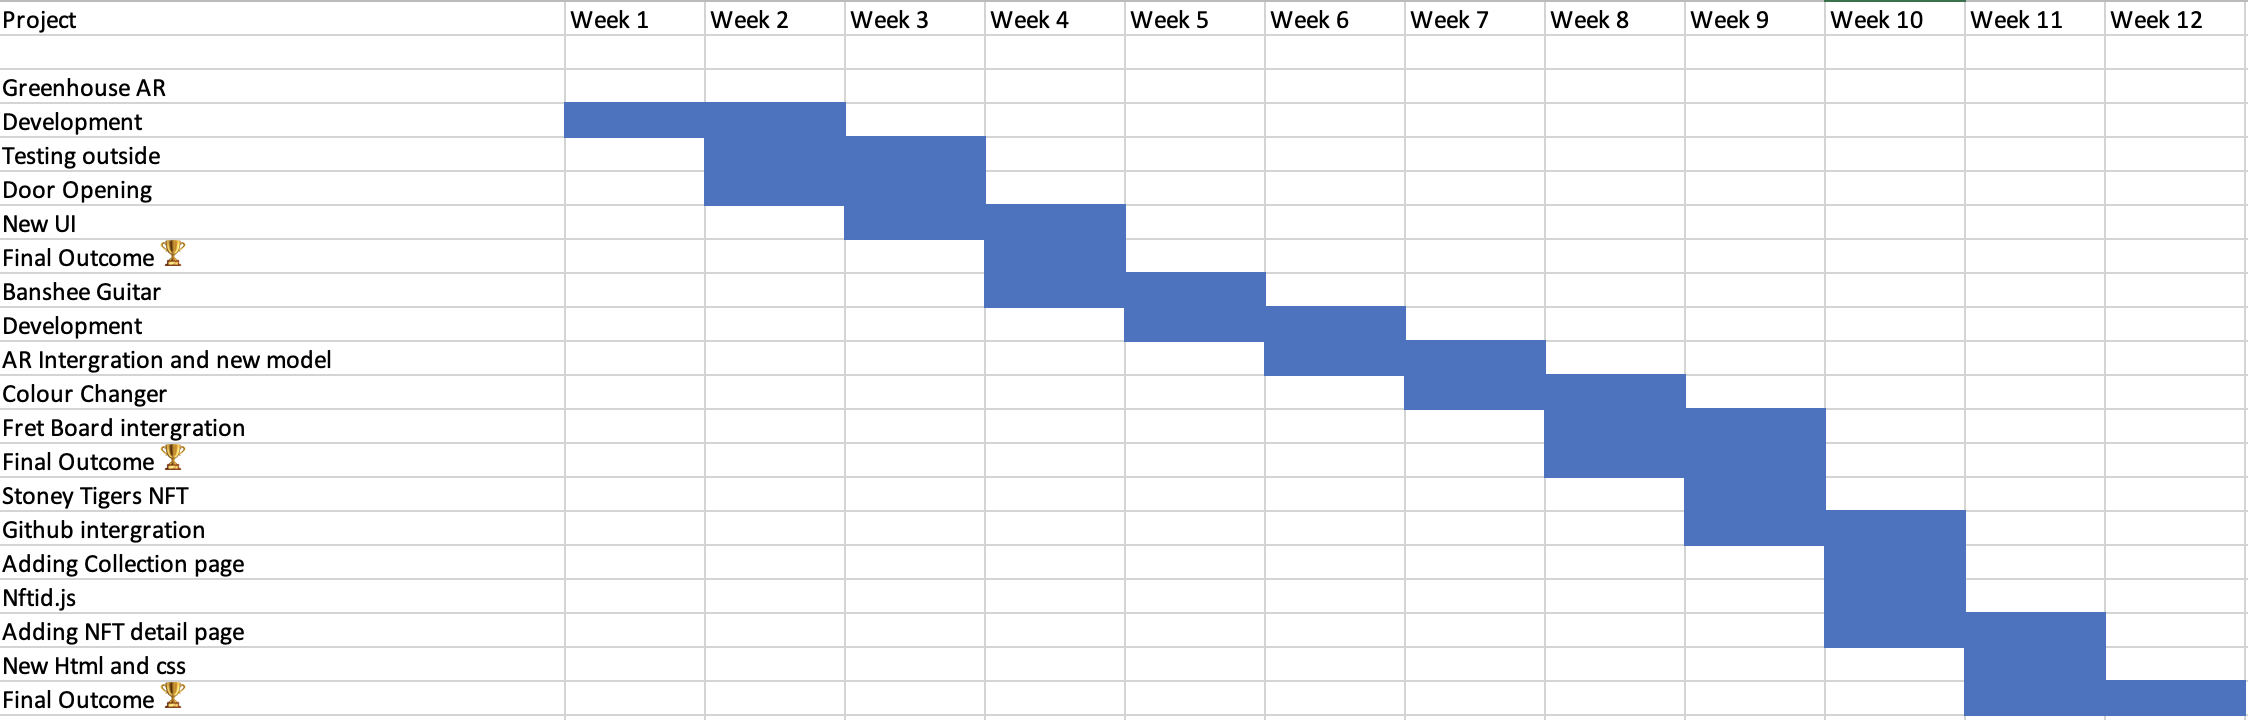
II structured my time management on a week by week basis, where I made sure that I took each stage into account. The My Room in the Garden project (Greenhouse AR), took four weeks to complete, with the Banshee AR guitar project taking 9-10 weeks to complete. This was down to the amount of development work required to build out the application as well as manging work alongside my dissertation too. The Stoney Tigers NFT platform however stretched between week 9-10 and week twelve, due the longevity that it took for the development and completion of application, partly due to the postponed handover document from our client. Overall I was happy in the way I managed my workload, however was not happy with the delayed development of the Stoney Tiger Project.
Handover information
References
Rotation- https://stackoverflow.com/questions/
57790059/rotating-an-object-at-which-i-am-looking-arfoundationAugmented Reality for Everyone-https://www.youtube.com/watch?v=WzfDo2Wpxks&t=38482s
answers.unity.com- https://answers.unity.com/questions/13356/how-can-i-assign-materials-using-c-code.html
Third Aurora- https://www.youtube.com/watch?v=OE66gtiF8QQ/p>
Spark Lab- https://www.spark-lab.co.uk/